How to control 404 page, Date & Time, Copyright, Cookies, Donate, Anti-spam, Redirects and much more
When you switch to Planet 4, you’ll need to make some modifications in Planet 4 Settings Panel to ensure proper functionality. This section tells you what each setting does.
General Settings (Title, Date, Admin)
Dashboard > Settings > General
Give your site a title and a tagline, you can’t edit URL and Site addresses, but you can insert the admin email address, and decide if anyone can register and in which default role
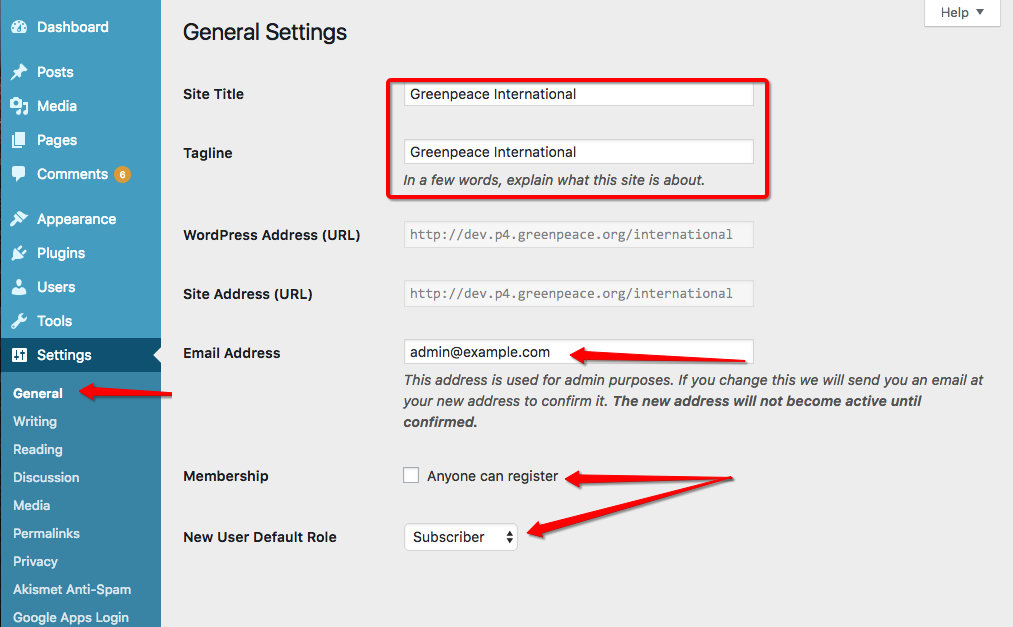
Please remember to change the site email address to a contact address/webmaster from your office
Language, Date and Time
Dashboard > Settings > General
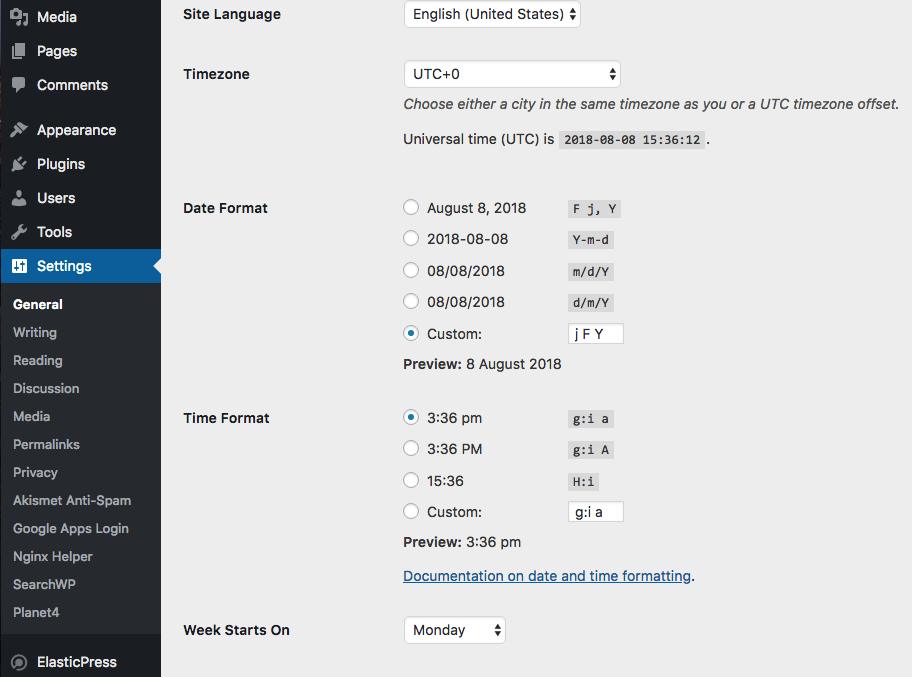
As an Admin, you will be able to set date and time, and check the default language. Need to translate P4? Check this page.
IMPORTANT >> Make sure you change the admin email address of your production site to a contact email/web master email from your office.
Reading Settings (homepage, indexing)
Dashboard > Settings > Reading
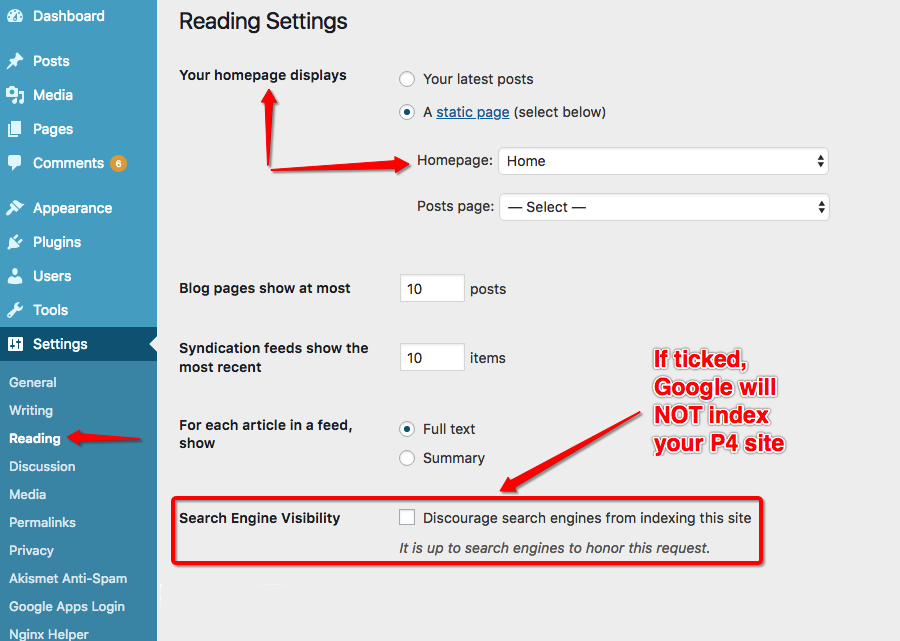
The “Reading” settings tell browsers and search engines how to “Read” the website. From here, you can determine which page will be the Homepage and if the site will be indexed by search engines or not.
KEY INFO >> If the “Search Engine Visibility” box is ticked, search engines will exclude your Planet 4 site from search results
Discussion Settings (Comments)
Dashboard > Settings > Discussion
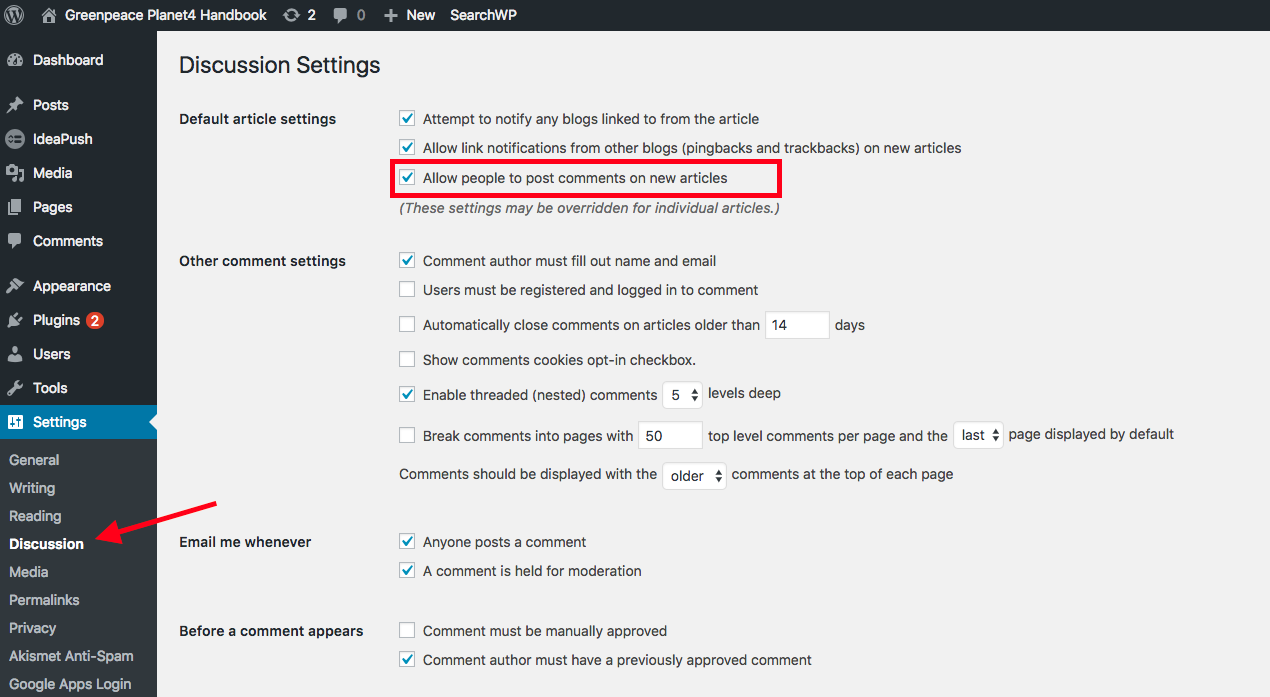
Enable or Disable comments on posts by ticking the following checkbox:
KEY INFO >> Changing this setting will only affect newly created posts, not existing ones. See below to find how to disable comments on existing posts.
Disable comments on existing posts
Posts > All Posts
To remove comments from all of your existing posts, you have to do it through a bulk edit from the Posts overview.
The bulk edit only applies to the posts selected, so it will only affect the posts shown on the page. To avoid having to do this many times, change the Number of Items from the Screen Options panel on top and Apply changes.
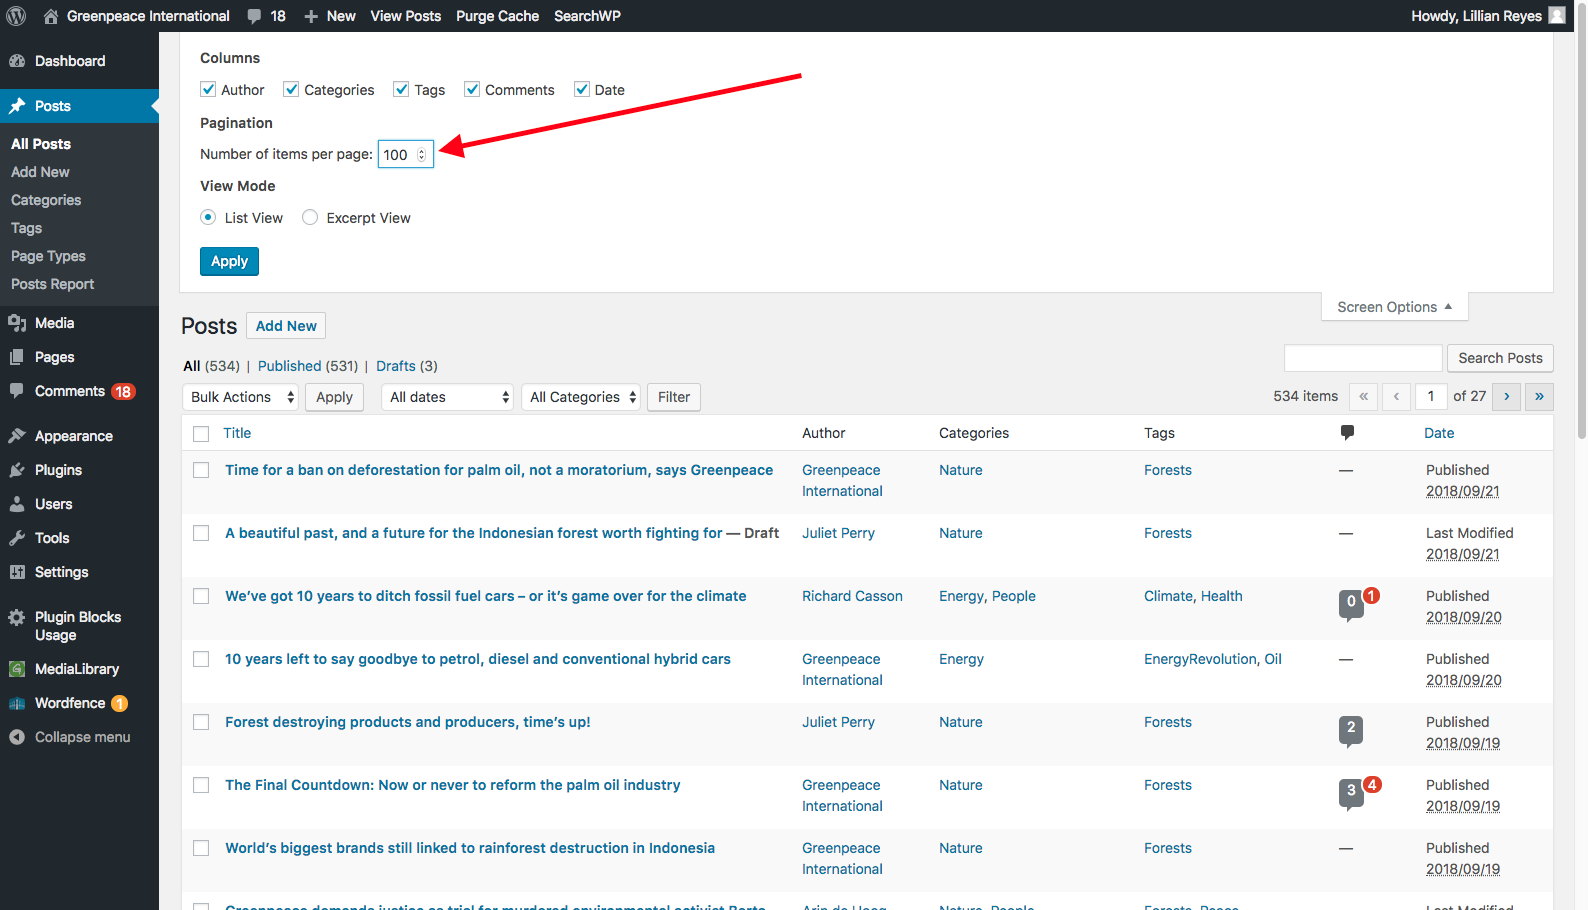
Then select all the posts and on Bulk Actions select Edit and click on Apply.

Then a panel with options to edit is shown and you’ll see there is a Comments field. Here you select the option to not allow comments and Update changes.
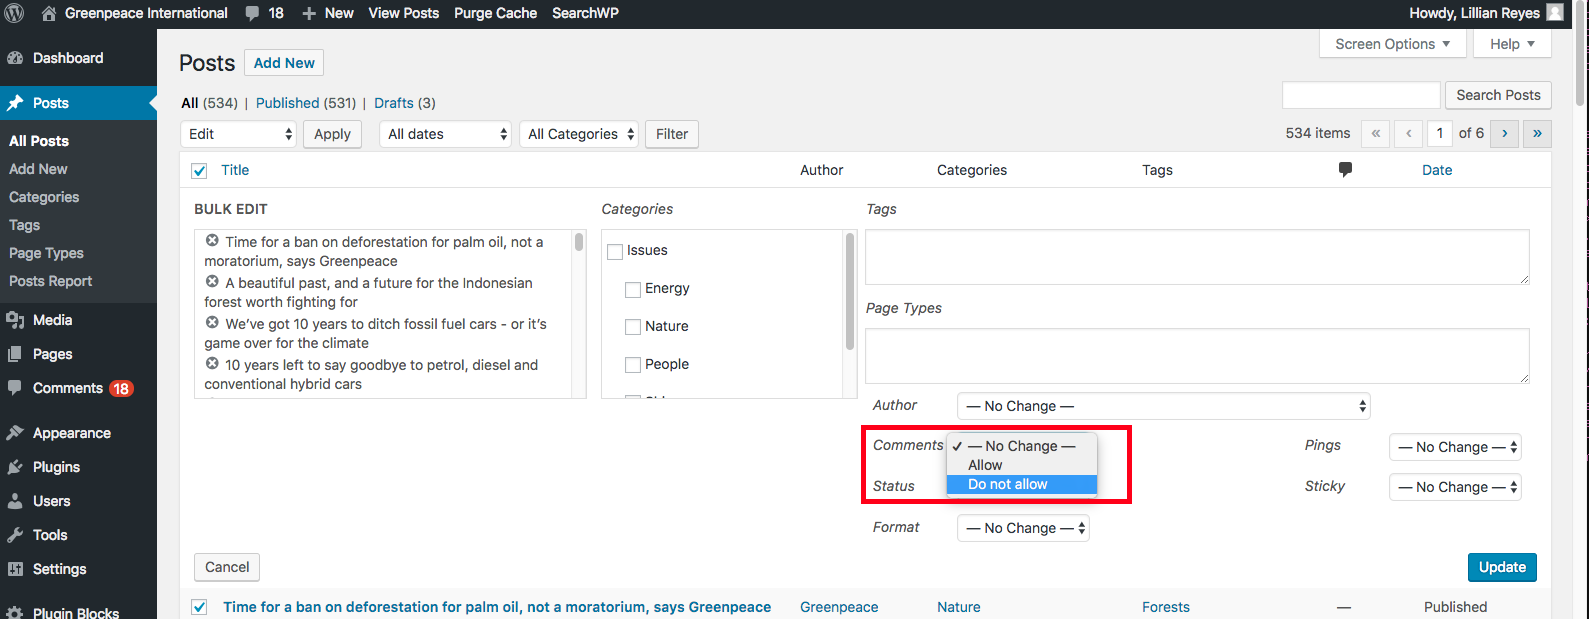
Allow comments on existing posts
Same steps as for the previous action, you just need to select the Allow option.
Watch the video below.
Re-attribute comments to another user
Steps:
- submit a comment being LOGGED OUT of Planet4
- login to P4
- go to the Comments section in the back end
- look for the comment you want to change the author name and click on Edit or Quick edit
- change the name and then click Update comment
- check if the name is both changed in the back end and front end.
Watch the video below.
Planet 4 settings
The Planet 4 settings control all commands related to the specific connections of P4 with external services and are accessible from a menu item on the sidebar menu.
KEY INFO >> Only P4 Administrators can access the Planet 4 settings.
Main P4 Navigation (Title, Act, Explore)
Dashboard > Planet 4 > Navigation
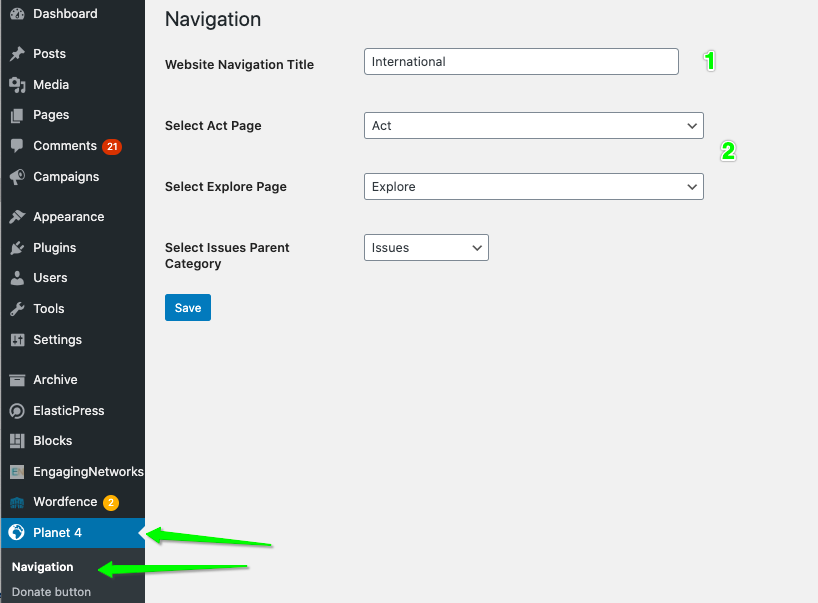
Website Navigation Title (1)
Each install of Planet 4 has a drop down menu that allows our supporters to navigate to other Greenpeace sites. Put your site name into this box to let the user know which site they are currently on. The country menu below will always remain the same.
Act and Explore Pages (2)
The main functionality for the platform is built into blocks, which should be able to go to any page and still work properly. However, design and functionality on blocks on certain pages (ACT and EXPLORE pages) needed to be different. For example, we need to know which pages are subpages of the “ACT”, in order to consider them as “Take Action” and apply the appropriate styles.
Additionally, Planet 4 needs to work in multiple languages. Because the “ACT” page will have a different name in each language, an admin needs to tell Planet 4 which page to look at. This setting defines which page is the parent of all “Take Action” pages.
This is similar for the Explore and Issues pages. These settings help the platform deliver the proper functionality at the proper time.
KEY INFO >> To determine “ACT” and “EXPLORE” is fundamental to unlock a series of functionalities developed for P4, such as “Take Action” or “Issue” pages, which must have “ACT” and “EXPLORE” as parenting pages, respectively. More on Navigation & Main Pages
Copyright Texts
Dashboard > Planet 4 > Copyright
Copyright text Line 1 and Copyright text Line 2 (3 and 4)
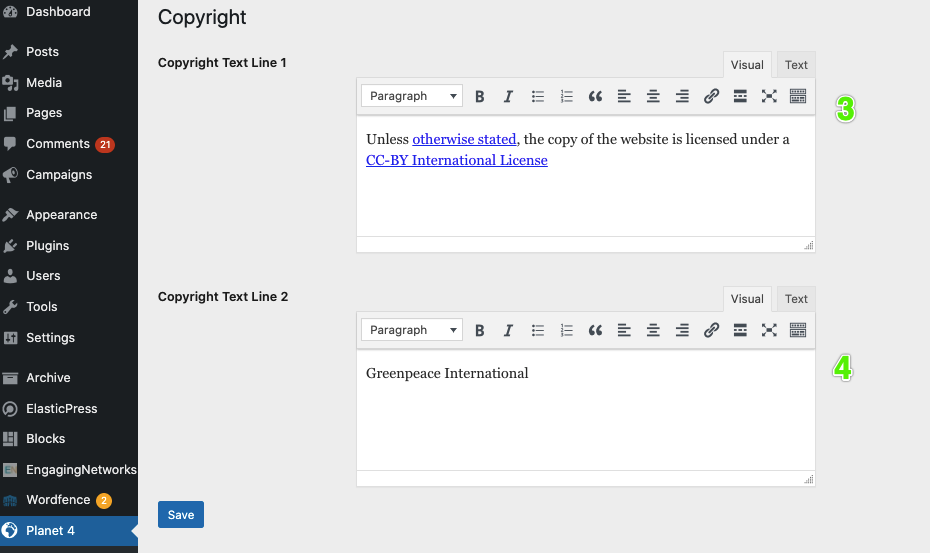
Generic Copyright usage (see “legal checks” for more info), which state the usage of your P4 site. Below the text used for the International site:
- Unless otherwise stated, the copy of the website is licensed under a CC-BY International License
This text appears below the Footer, here’s what it looks like in the front end of the International site (yes, on 4 the year gets automatically updated!)

Tag Manager, Optimize, Smartsheet ID
Dashboard > Planet 4 > Analytics
Google Tag Manager Container, Optimise, Smartsheet ID (5, 6,7)
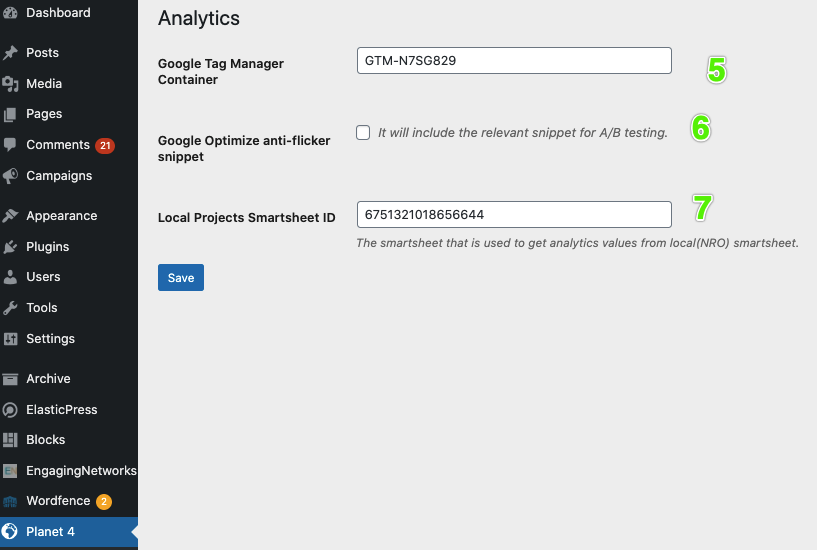
- The Tag Manager Container is used to set up Analytics, cross-domain KPI tracking suite and custom code via triggers (see “Set up your P4 GTM“)
- The Local Smartsheet ID is used to pull out an NRO local campign details (see “Tracking global Campaigns“)

Features
Under the Features section, you can find the option to activate the Image Archive Integration. The default is not ticked.
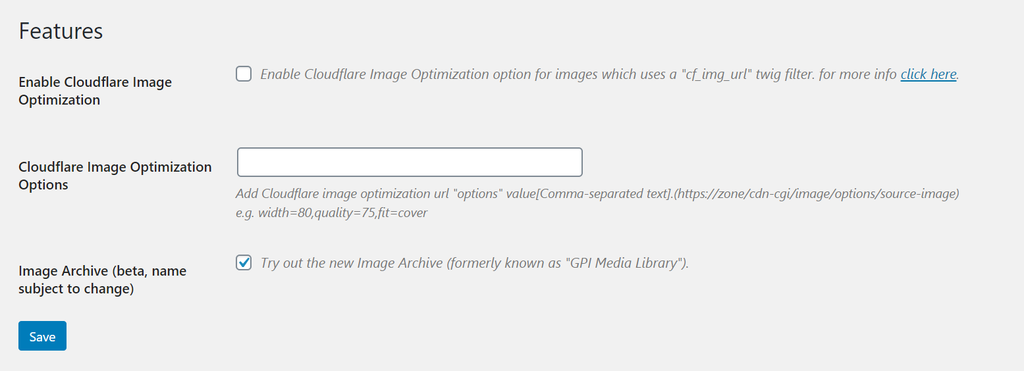
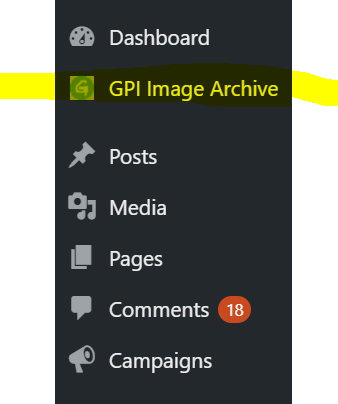
The moment you select this option the page will refresh automatically and the GPI Image Archive button will show up on the left menu under the Dashboard section.
Facebook (page ID / Token) and Pre-connection with other domains
Dashboard > Planet 4 > Social
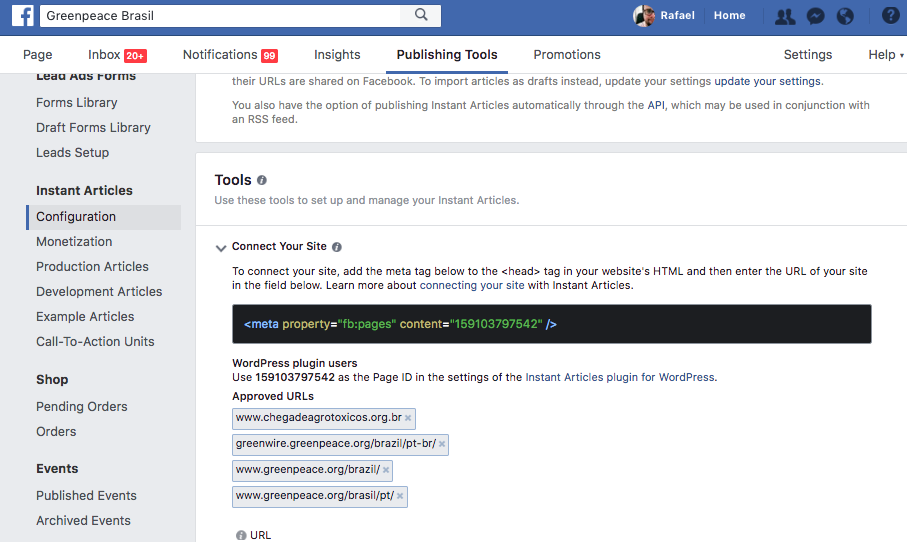
- The Facebook Page ID is used to enable FB instant Articles in your P4 site. The FB Page ID can be found on the FB Business Publishing Tools page: Instant Articles > Configuration > Tools > Connect your site. To finalize the connection P4 < > your GP Facebook page, the FB Admin needs to go to FB Business Publishing Tools, then Submit the URL of your P4 website: Instant Articles > Configuration > Tools > Connect your site > Submit URL. More info on the FB help page.
- The “Facebook App Access Token” is used to fetch Facebook and Instagram oembed in the Social Media block.
- NROs can also override the default token with their own FB App ID and App Secret eg. {your-app_id}|{your-app_secret}
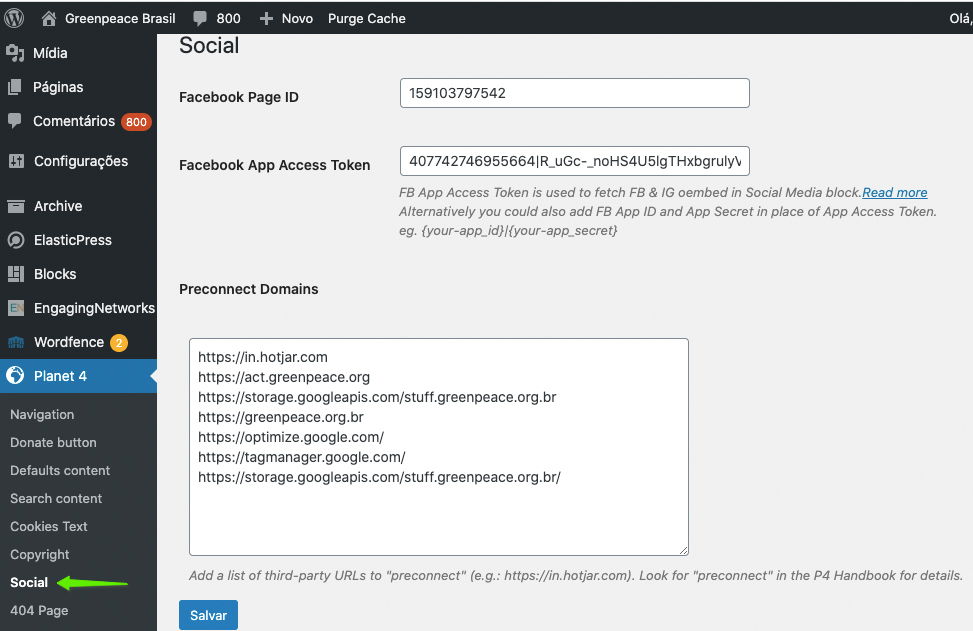
- “Preconnect Domains” is a tag the P4 team added to the code which tells the browser that we are going to connect to some third-party resources and that those resources can be loaded in parallel, usually these resources are scripts from analytics tools like Hotjar, Google Analytics, Mixpanel, etc. Hence it makes the page load a bit faster.
- If you are using one of those services, it is a good idea to add their domains to the “Preconnect” settings.
- If the domain is not listed it could make the page a bit slower to load, but not drastically.
- The P4 team also pre-populated that field with two very common domains
- https://in.hotjar.com
- https://act.greenpeace.org
- However, if you know your NRO is also using Analytics and Tag Manager, make sure to add the 2 domains:
www.googletagmanager.comwww.google-analytics.com
Defaults (Read More, Donate Buttons, Happy Point subscribe form…)
Dashboard > Planet 4 > Defaults Content
POSTS – Default title, button title, and Number of Related Articles
- The Default p4-pagetype is the standard Page Type a Post gets assigned (see “Create Posts“).
- The other commands are useful to change some strings or features for the Block: Articles
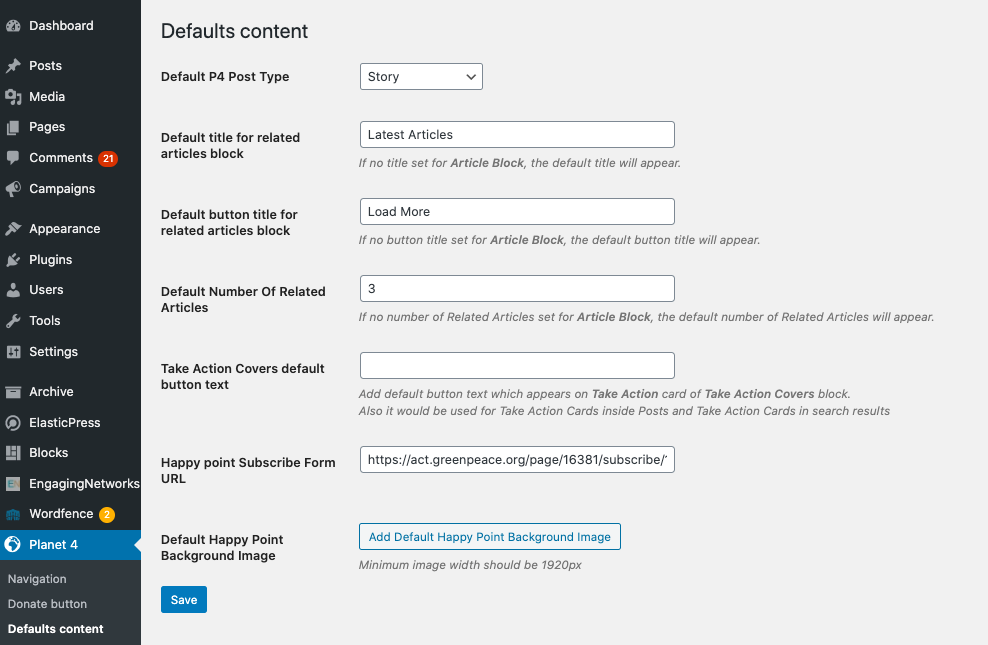
Take Action Covers default button text
- The Take Action Covers button will be displayed in the Block: Covers (Take Action style), and can be customized to be different than the “Out Of the Box” TAKE ACTION.

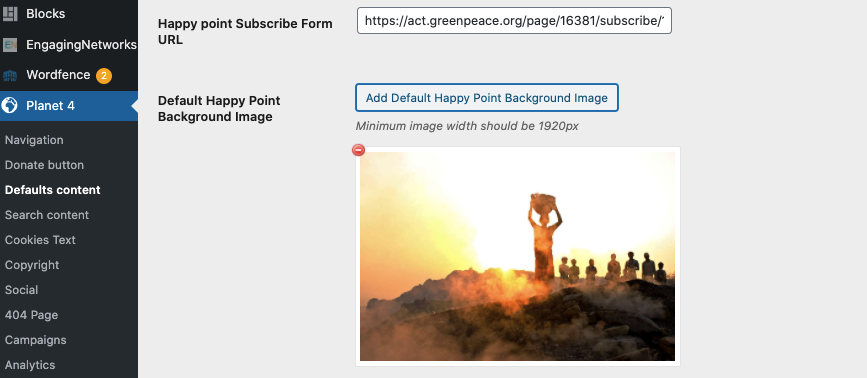
- The Happy point subscribe form URL is used in the “Block: Happy Point“
- You can also assign a default image to the Block: Happy Point. This image will be assigned automatically as a background of your form if you don’t customize it within the block itself.
Donate button
Dashboard > Planet 4 > Donate Button
Donate Button and link to the donation page
- The text of the “Donate” setting has no capitalisation rules, this means that if in P4 settings you write “doNAte” that’s literally what will appear in the button!

- The Donate button link is the URL of your Donation Page

After running an A/B test about an Enhanced Donate Button on Mobile, whose results showed a 95% chance that the alternative design can drive an uplift from 6% to 108% on the button’s click-through rate, we decided to implement the option for such a button for mobile screens.
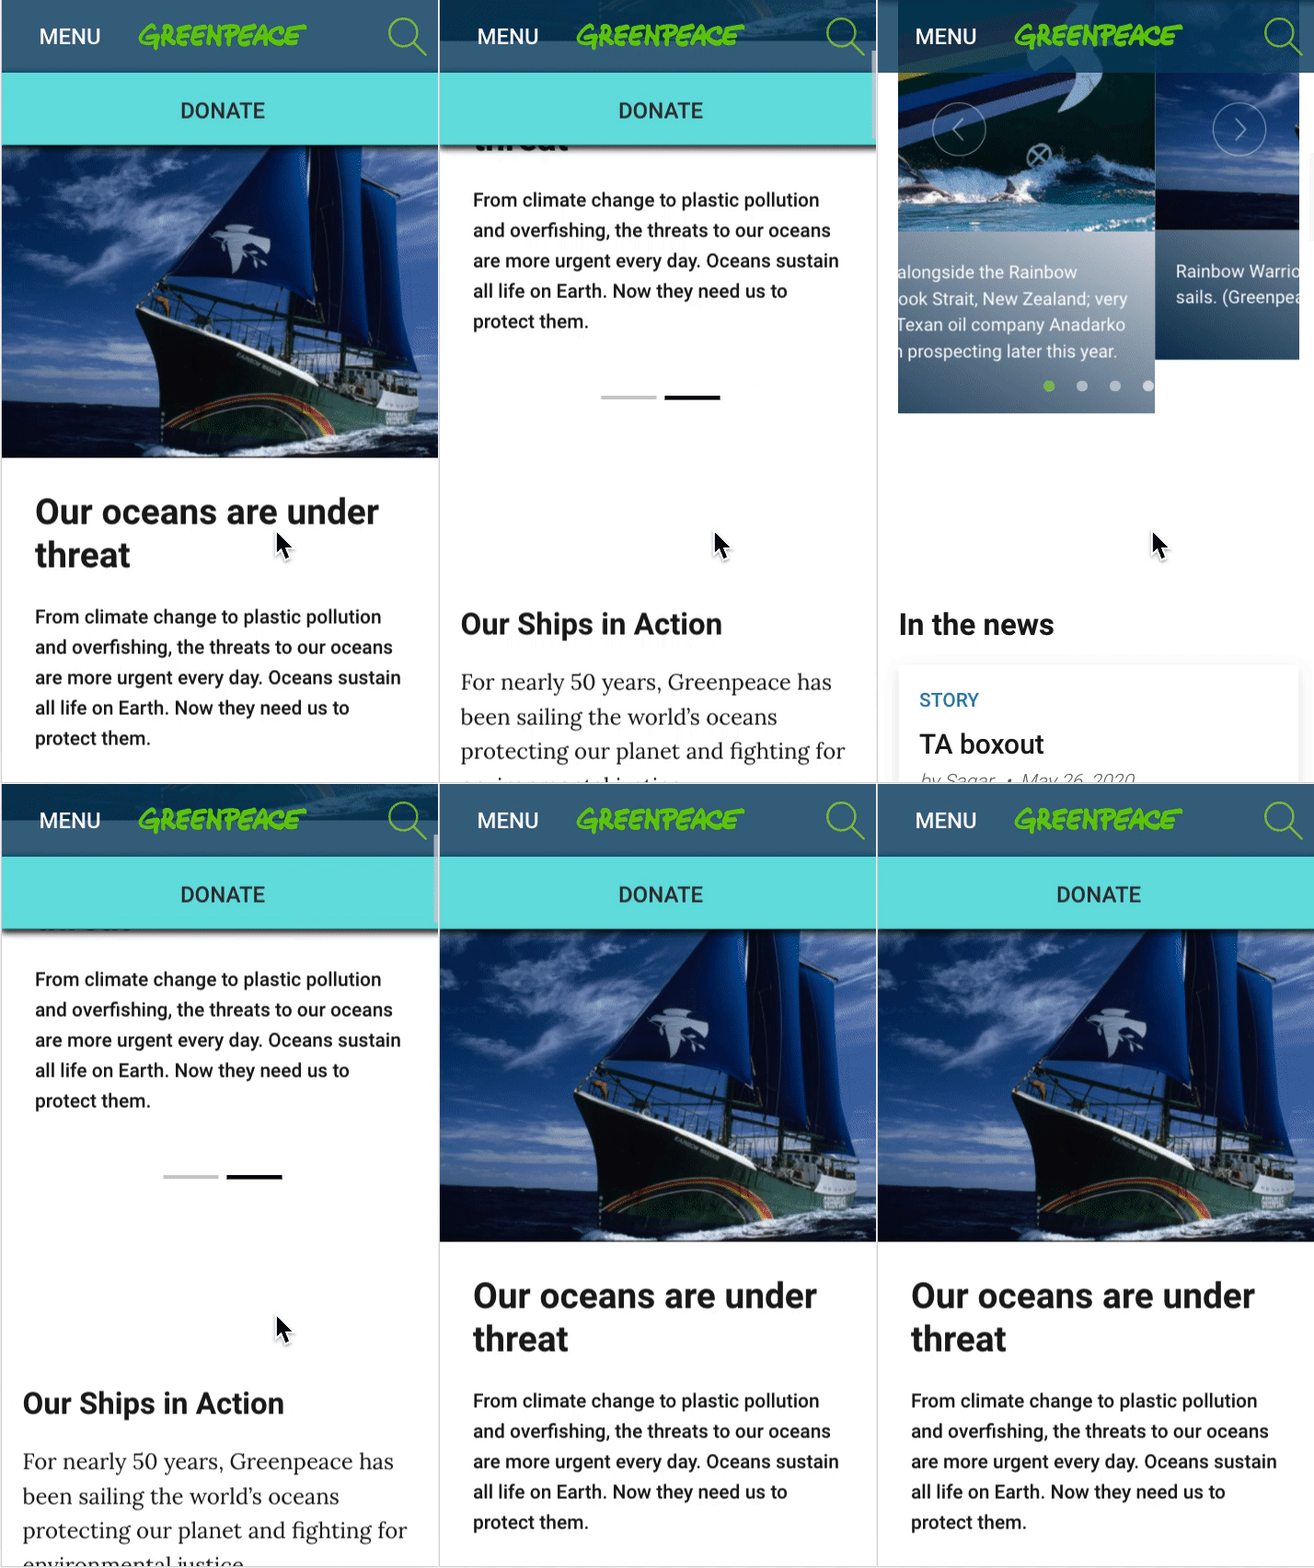
- By ticking the check box “Donate button visible on mobile“, you will Enable visibility of the donate button on the homepage*.

By default, is checkbox is unchecked. When you check it, here is how it will show up in the frontend.
Images use for the donate button visible on mobile*
When ticking the box, you should also check legal restrictions on images associated with this button before using it.
If you make the donate button visible for S screen size – the donate button is displayed below the navigation bar on the homepage – you need to make sure you have all the necessary rights associated with the images shown in the Carousel Header block.
Images of people (including children) may not be used without their (or their legal guardians) explicit permission for a fundraising ask. You can see the restriction on a specific image when you pick an image from the Greenpeace Media Library on P4. If you are not sure about a use of an image please contact your local legal team or the GPI legal team.
404 page
Dashboard > Planet 4 > 404 Page
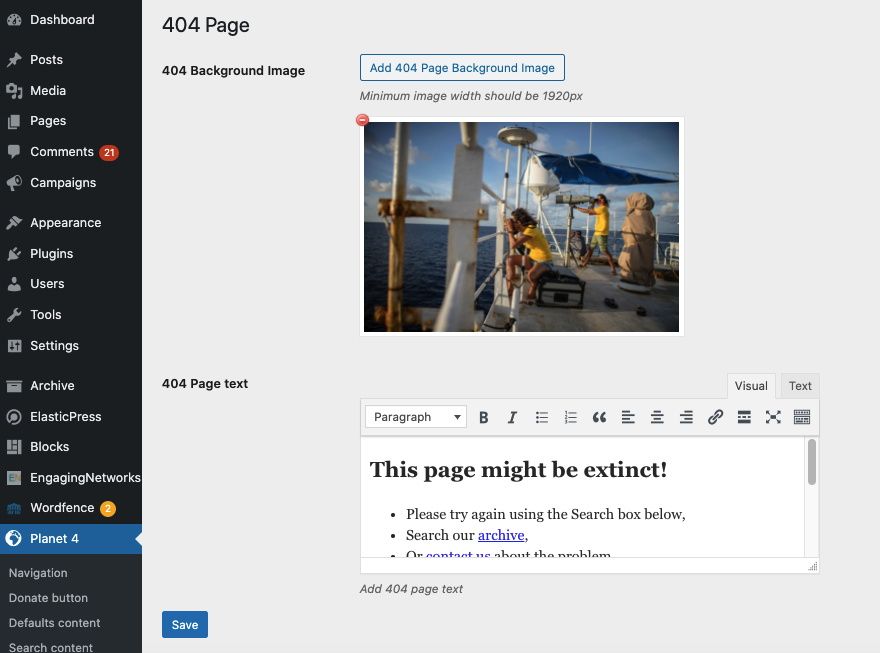
404 background image and 404 page text
The 404 error page gets set up in the P4 settings menu. Here’s what it looks like on the International site – https://www.greenpeace.org/international/ciao-I-am-a-404/
Cookies Text & Enforce Cookies Policy
Dashboard > Planet 4 > Cookies Text
- The Cookies text is what users see when accepting the Cookies (see below a snapshot of the International site and see “legal checks ” for more info).

The “Enforce Cookies Policy” setting is related to the Block: Cookies Control, and complement the functionality.
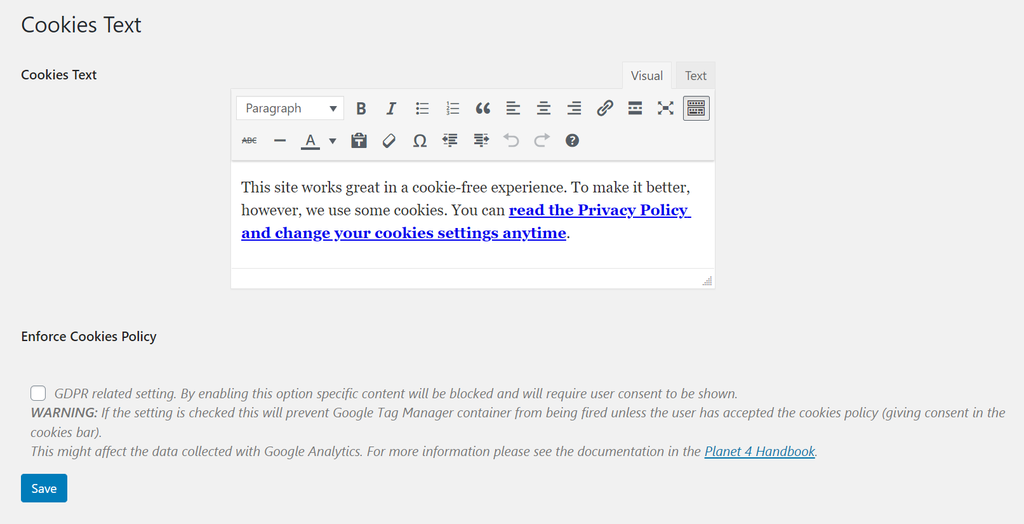
- If the setting is checked -> The acceptance of the visitor means that cookies are allowed to be stored on the browser. If the visitor does not accept, then no cookies are stored on the browser.
- If the setting is NOT checked -> The acceptance of the visitor means only that the visitor is aware that cookies are stored. Not accepting it does not block cookies from being stored, this is how every site was behaving before GPDR. Sites based outside of EU do not have to check that by law, therefore they can choose if they want to go by the stricter GPDR rules (recommended), or by the rules of the rest of the world
MORE AT Block: Cookies Control
Campaigns
If you want to disable theme style of the campaign pages when importing a campaign, you have one more setting to check.
KEY INFO – This is extremely useful for NROs using child themes, since campaign styles are incompatible with those.
From the menu on the left, go to Settings -> Planet 4 and at the end of the page there is the Exclude campaign styles when importing is ticked.
KEY INFO – If you want to change this setting, make sure you are in contact with the admin of your site.

Anti-Spam (Akismet)
Dashboard > Plugins > Akismet
Activate the Akismet account (WordPress Spam blocker)
To ensure the minimum standards to block spam, each Planet 4 site has an Akismet subscription assigned to it. The P4 project has an enterprise subscription to Akismet, covering the planet4 website. When new sites are deployed, the Akismet should already be configured. If for any reason yours isn’t please contact the P4 Team.
How to activate the Akismet account
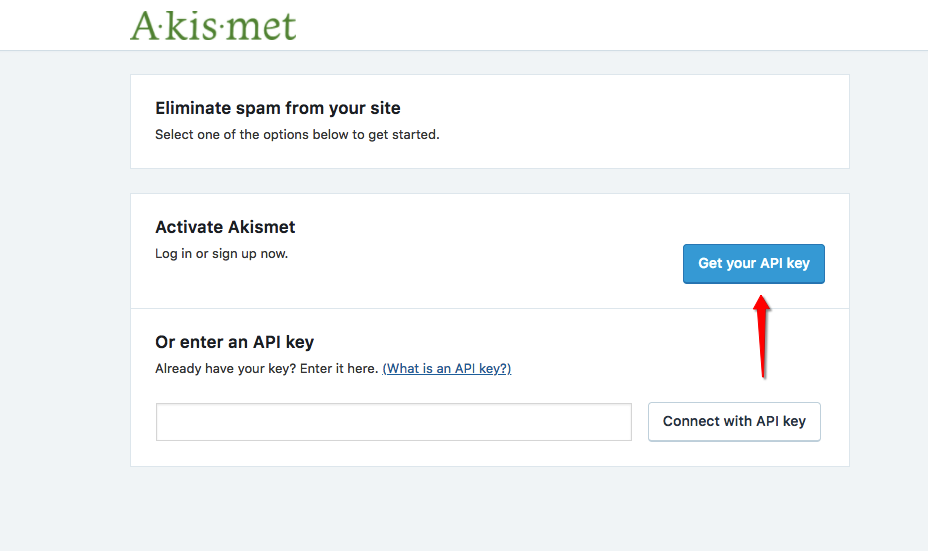
- As an Admin go to > plugins administration. If Akismet is not active, you should see a green bar with a message saying “Set up your Akismet account”:

- Activate the Akismet free plan with the generic email address.
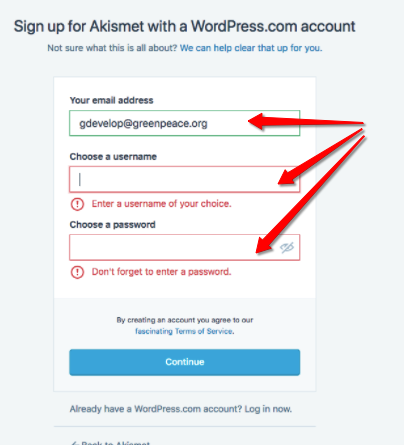
- Sign up on Akismet
- Use your generic email account (xxxxx_AT_greenpeace.org)
- Choose the Username (xxxx)
- Choose a Password (make sure you capture this somewhere!)
- Hit “Continue“
- You should receive an email for the activation (to your generic inbox). Click “Activate” and sign in to Akismet.
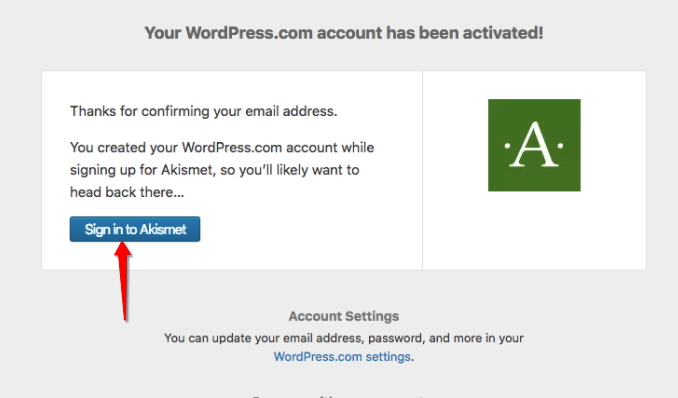
- Once logged in Akismet, go back to the Planet 4 Akismet menu, and hit “Get your API key”

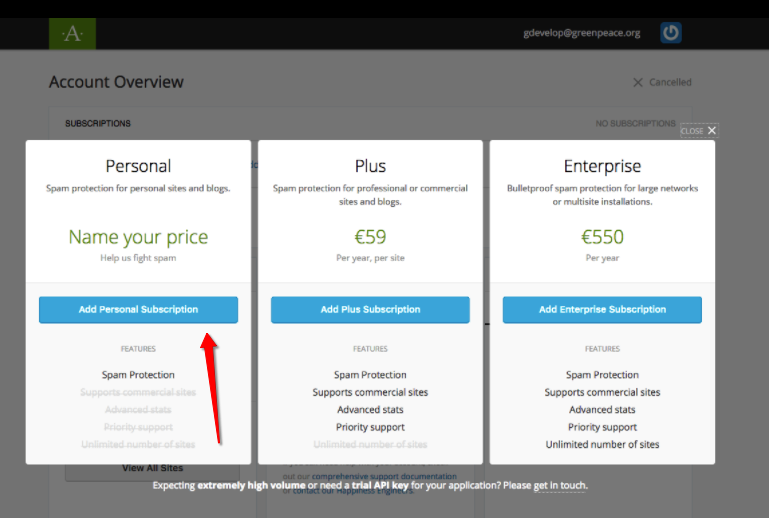
- Among the subscription proposals (Plus, Enterprise, etc) hit “Personal”
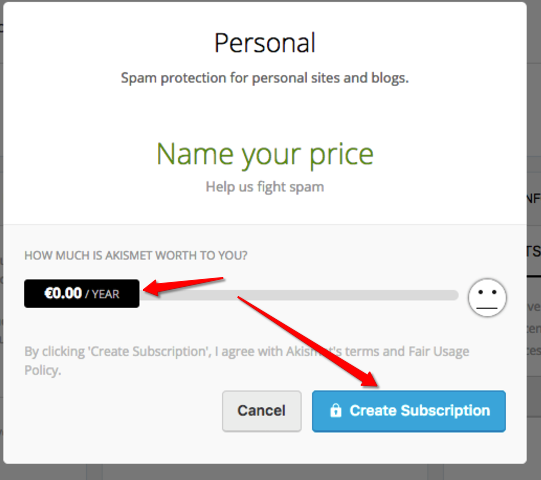
- Drag the price indicator all the way to ZERO (0 USD)
- Copy your API key and “Save Changes”
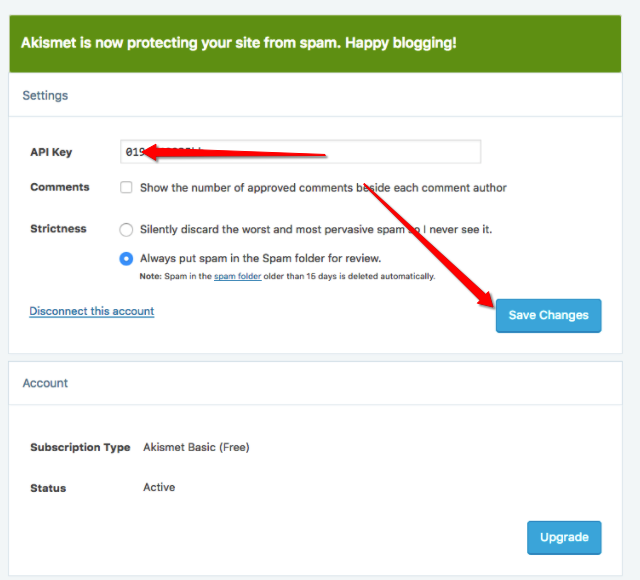
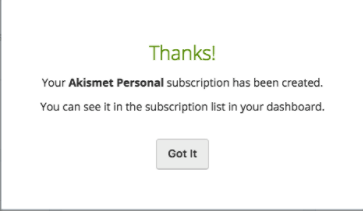
- You should get a confirmation message
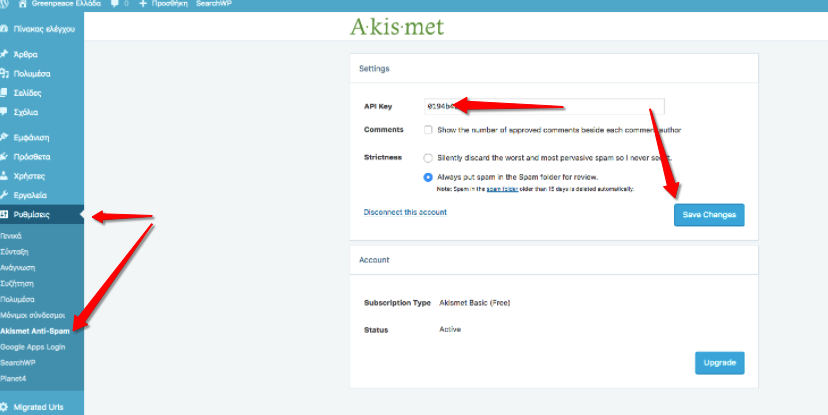
- Go back to the Planet 4 Plugin menu, check the API Key in the Akismet Plugin settings and hit “Save Changes”
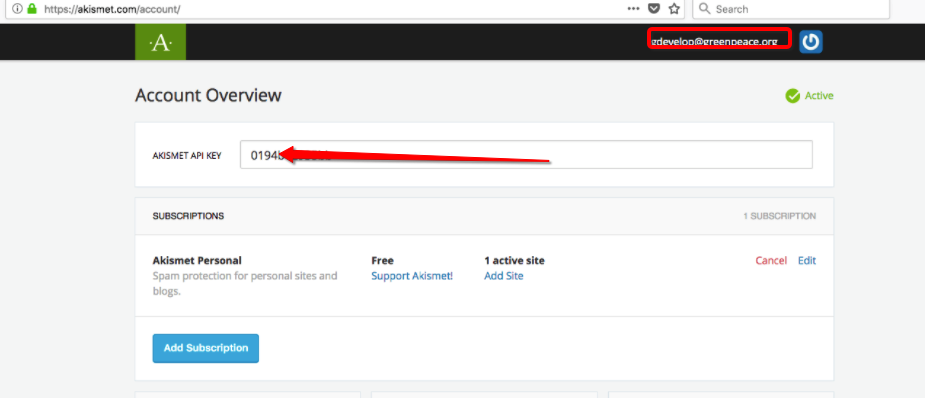
NOTE >> you can get your Planet 4 API Key at any time by logging into your Akismet account
Redirects & URLs
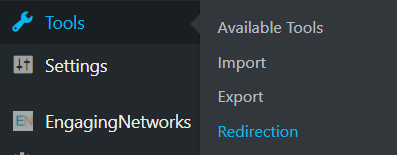
Dashboard > Tools > Redirection
P4 redirects are managed by a wordpress.com Plugin called redirection.me.
In the P4 Admin dashboard, go to the left side menu and click on Tools – > Redirection
All you need to know about links, redirects, slugs and URLs is at >> Master URLs, Links, Page Parenting and redirects
Plugin Blocks Usage
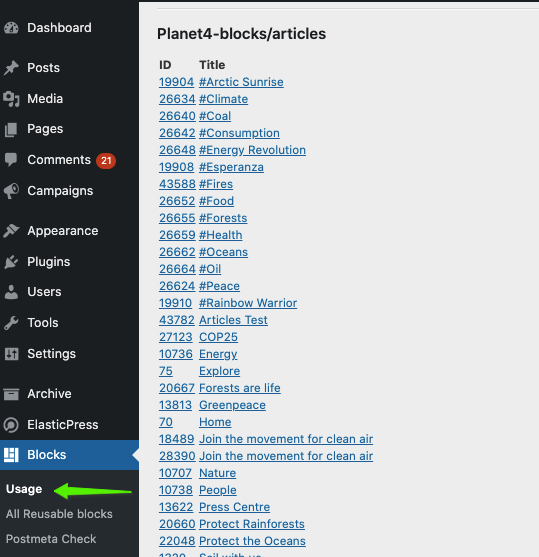
Dashboard > Blocks > Usage
This (very useful) command provides an overview of which blocks are being used in which pages throughout the site. Blocks are alphabetically ordered and page links open directly the edit mode of the page.
The block also pulls out which Tag pages are using a redirect.
Engaging Networks settings
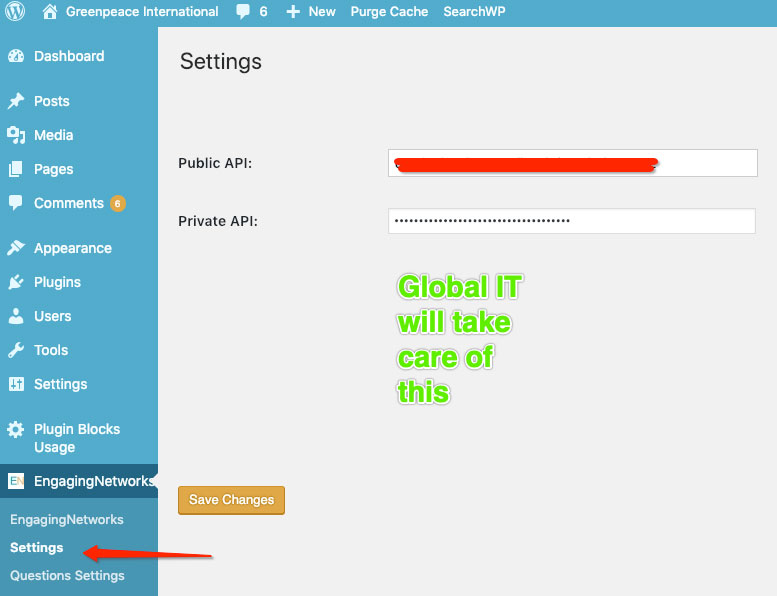
Dashboard > EngagingNetworks > Settings
Only for NROs using Engaging Networks. Please contact Greenpeace Global IT to know more.
EN API settings
P4 must connect to both public and private APIs of your NRO EN account:
- This setup is done only ONCE – NO NEED to update each time you publish an EN form / page
- This setup is done by Greenpeace Global IT – NO NEED for P4 Admins to do anything
- Have just launched your P4 site or just adopted Engaging Networks and need this setup? Just contact Global IT
KEY INFOS >> Every NRO using Engaging Networks (EN) has the P4 API fields already populated by Global IT. NO NEED to update the keys each time you publish a form in your EN account
This setup allows the information to be automatically sent from P4 to EN accounts, whenever a user signs up the Block Form.
- Learn how to set up and use the Block: (Engaging Networks) Form
What happens if your office does not use Engaging Networks? Editors can turn off the menu if needed. Here’s how:
Dashboard > Planet 4 -> Features -> Engaging Network Integration
Un-ticking the Engaging Network Integration will turn off the Engaging Networks integration. This toggle will be on by default. Turning it off removes the following things from the admin area:
- The Engaging Networks menu item.
- The EN form block.
- The “Progress Bar inside EN Form” style of the counter block.
GPI Media Library
Connect your site with the GPI Media Library
Dashboard > Planet 4 > GPI MediaLibrary
Our in-house made P4 plugin allows P4 connection with the Greenpeace Media Library. When you receive both Staging and PRODUCTION sites, the plugin is already configured and working with standard API credentials. Should you need to change those with a personal one, please contact the Greenpeace media library administrators.The Media Library grants image access to Greenpeace staff based on the following guidelines:
KEY INFO >> Your Planet 4 website is already connected to the Media Library account API. If you need to replace the existing default account, contact the Greenpeace Media Library administrators and ask them to give API access to your account.
- All content is protected by copyright and must be credited
- The user agrees that the content of a photograph will NOT be changed or manipulated in any way
- The user may receive links to 2500 pixel still images and broadcast resolution video media releases for a 14 day period from initial release (30 days for video). As an authorized representative, users are allowed to grant usage directly related to Greenpeace campaigns on the following basis: no resale, no archives, editorial use only, not for marketing or advertising campaigns, credit line compulsory.
- The user agrees that photos higher than 800 pixel will not be posted on any external website without library permission
- The user agrees to read and respect any additional restrictions displayed with an image.

Do you need to learn how to insert images from the media library to your P4 pages? Check images & videos > Use images from the GP Media library
Turn on the Greenpeace Image Archive Feature
Dashboard -> Plane 4 -> Features
To avoid confusion with the WordPress media library, we decided to give the integration a new name, “Greenpeace Image Archive“.
For this we’re trying out the “feature toggle” approach. This means that we deploy the code to production at an early stage, but hide the feature with a settings toggle that is off by default, until we have made the needed iterations to make it fully production ready.
We don’t recommend already turning the new media library on in production yet. But you can have a look on your develop or staging site. Watch the GIF below to check how you can turn this option on.
Watch the P4 Settings Video
All you need to know about the main settings of a Planet 4 website is in the video below:
- TIP! Need subtitles? Enable them in the Video progress bar!
