Greenpeace is the only global environmental charity that accepts no corporate or government donations to maintain a much needed independent voice. This means we rely on individual supporters to fund our work, and the online donation pages connected to our P4 sites are extremely important to our cause.
This page will help you integrate your donation tools with Planet 4.
Why, what and how
Online donation pages represent the classic way to fundraise in institutional Greenpeace websites, providing easy way to donate to our Organisation.
Online donation pages usually consist of two subpages. The first page usually holding the form, donation amounts, accepted forms of payment (Credit Cards, PayPal, Direct Debit, etc..). The second page is the one people are redirect to once they submit the donation, also called “thank you” page.
Online donation pages are usually set up in external tools, usually custom pages connected to a local payment processor (or Gateway), which collects the donation and process it, before injecting it in the Organisation’s bank account.
Tracking donations
Generally, donation pages are hosted on external pages, rarely in P4. This because connections with local payment processors (or gateways) are easier to be made at local level, rather than with a global solution.
In any case, your P4 Tag Manager setup should have:
- Two Tags, one for DataLayer push, one for the transaction / event type
- One Trigger, which needs to be fired only when appropriate (keep reading, it’s called DOM)
- One (or more) cross-domain, including the donation url (e.g. https://greenpeace.donorportal.ca/)
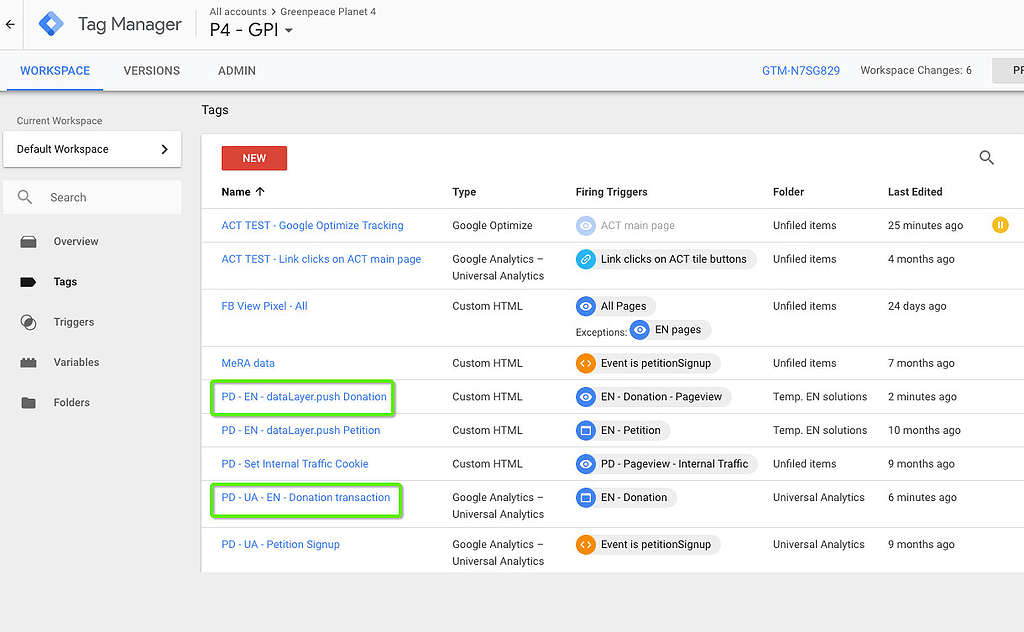
Google Tag Manager Setup
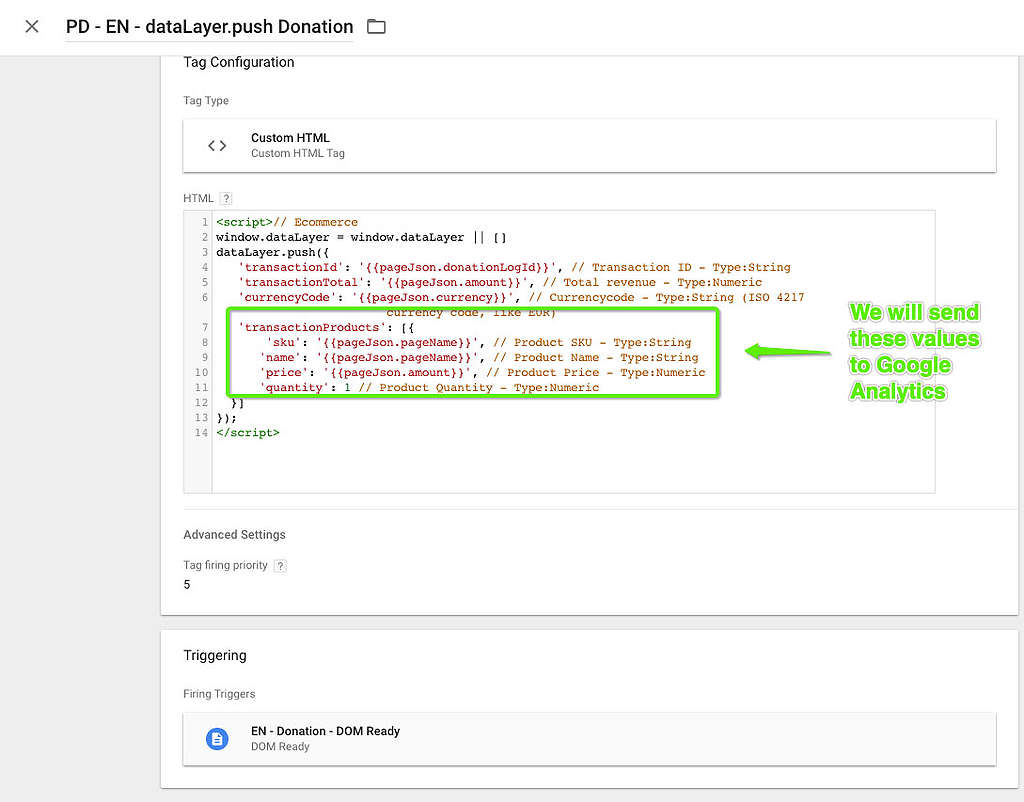
Tag 1 – DataLayer Push donation
Create a Custom HTML tag. Here’s the code:
<script>
// Ecommerce
window.dataLayer = window.dataLayer || []
dataLayer.push({
'transactionId': '{{pageJson.donationLogId}}', // Transaction ID - Type:String
'transactionTotal': '{{pageJson.amount}}', // Total revenue - Type:Numeric
'currencyCode': '{{pageJson.currency}}', // Currencycode - Type:String (ISO 4217 currency code, like EUR)
'transactionProducts': [{
    'sku': '{{pageJson.pageName}}', // Product SKU - Type:String
    'name': '{{pageJson.pageName}}', // Product Name - Type:String
    'price': '{{pageJson.amount}}', // Product Price - Type:Numeric
    'quantity': 1 // Product Quantity - Type:Numeric }]
});
</script>
And here’s how it looks like
Tag 2 – DataLayer donation transaction
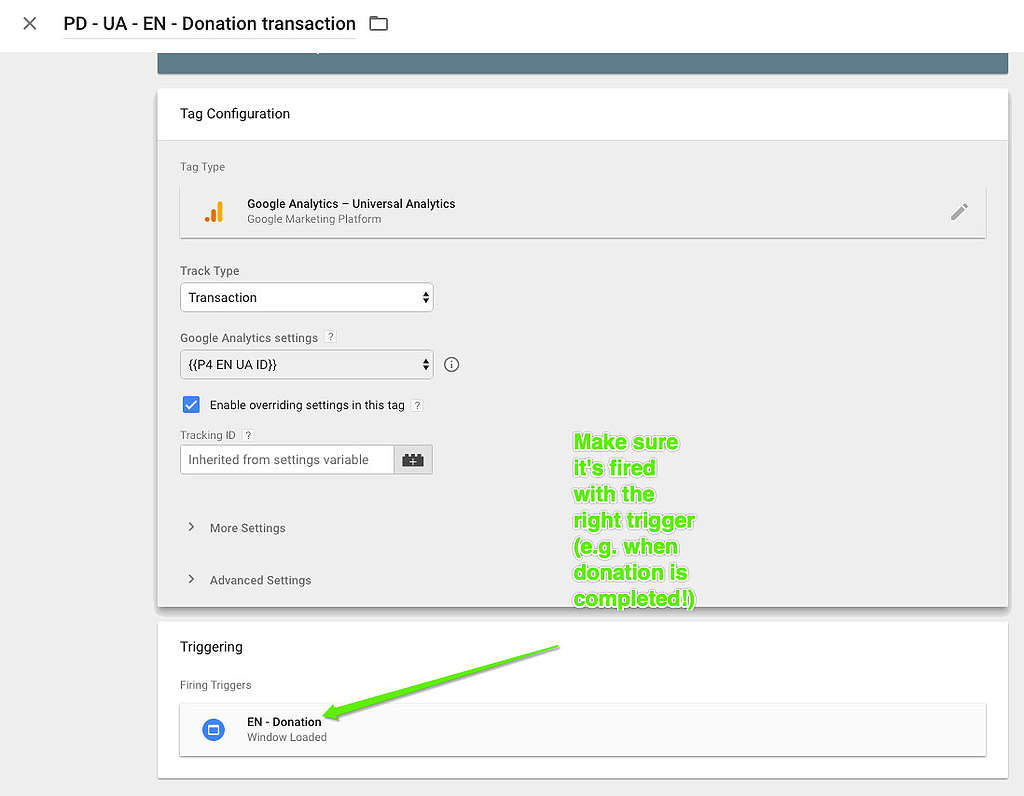
Once the DataLayer tag is created, we need to connect the event to the E-Commerce transaction we will visualise in the P4 Google Analytics view.
Just create a Google Analytics tag and give it a Transaction Type.
Donation-related Triggers
Let’s make this example. We have a donation module composed of:
- A Home donation (Page #1)
- A “Thank you for your donation” (page #2)
- A “Sorry, a problem has occurred / Transaction failed” (page #3)
We want to:
- Donation page loaded (Page #1) > Page view event fired > DOM READY Trigger > Window loaded
- Donation completed (Page #2) > Page view event fired > Donation transaction TAG fired > DOM READY Trigger > Window loaded
- Visualize Donation in the P4 Google Analytics view.
We set up 2 Triggers:
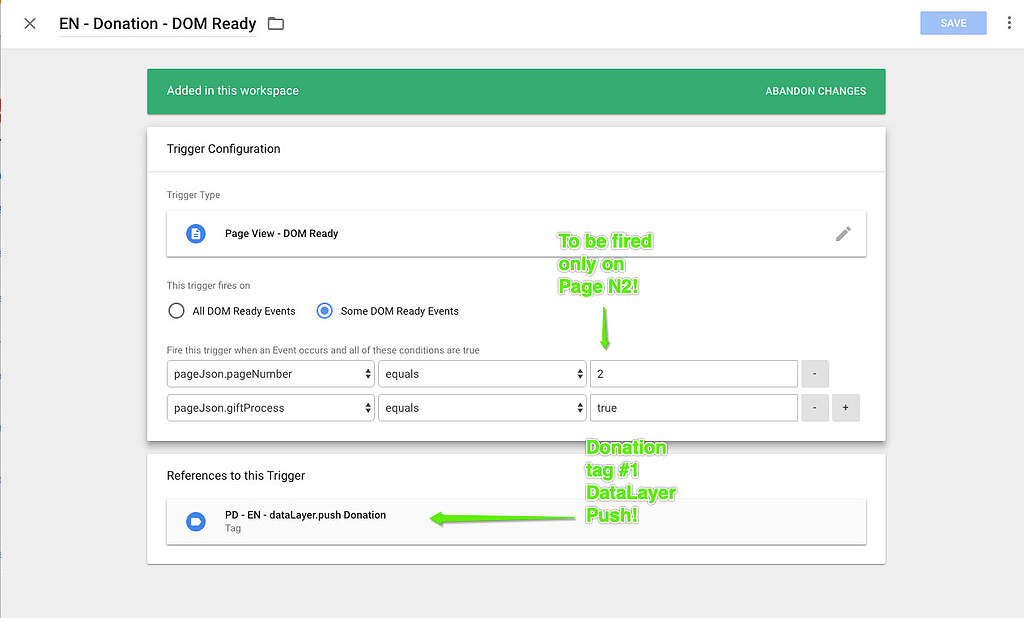
- A DOM Ready trigger (= Document Object Model) to determine the right order and make sure we populate the right elements (amount, currency etc) >> Connected with Donation Tag #1 (above) – DataLayer Push Donation
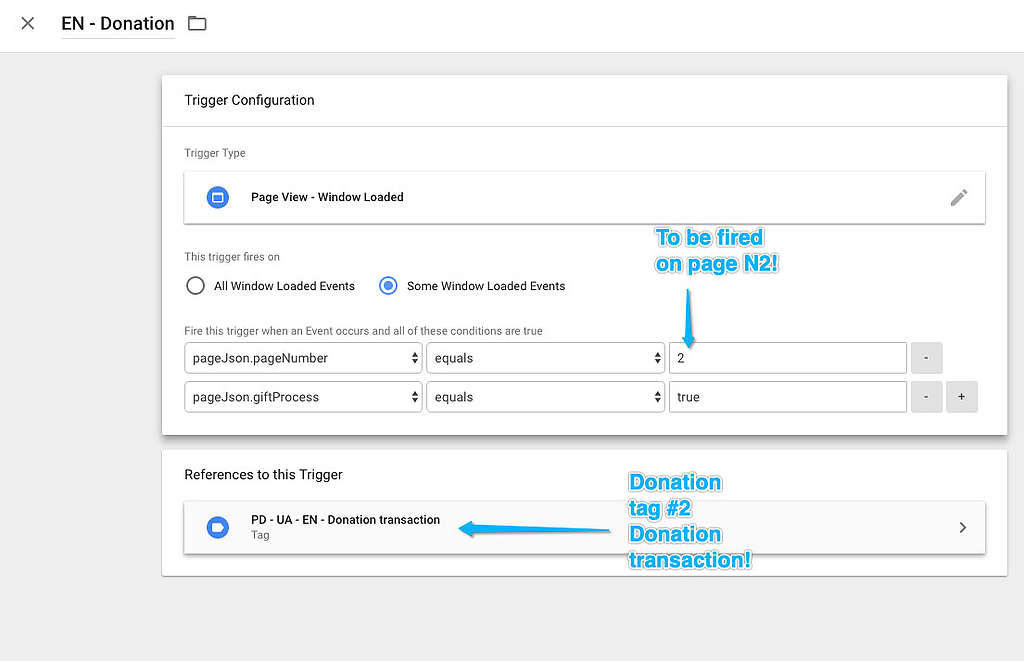
- A Page view donation trigger, which needs to be connected to the Json values of your Container Variable >> Connected with Donation Tag #2 (above) – DataLayer Push Transaction
Order / Sequencing of donation Tags & Triggers
Again, this is what we want to do:
- Donation page loaded (Page #1) > Page view event fired > DOM READY Trigger > Window loaded
- Donation completed (Page #2) > Page view event fired > Donation transaction TAG fired > DOM READY Trigger > Window loaded
- Visualize Donation in Google Analytics
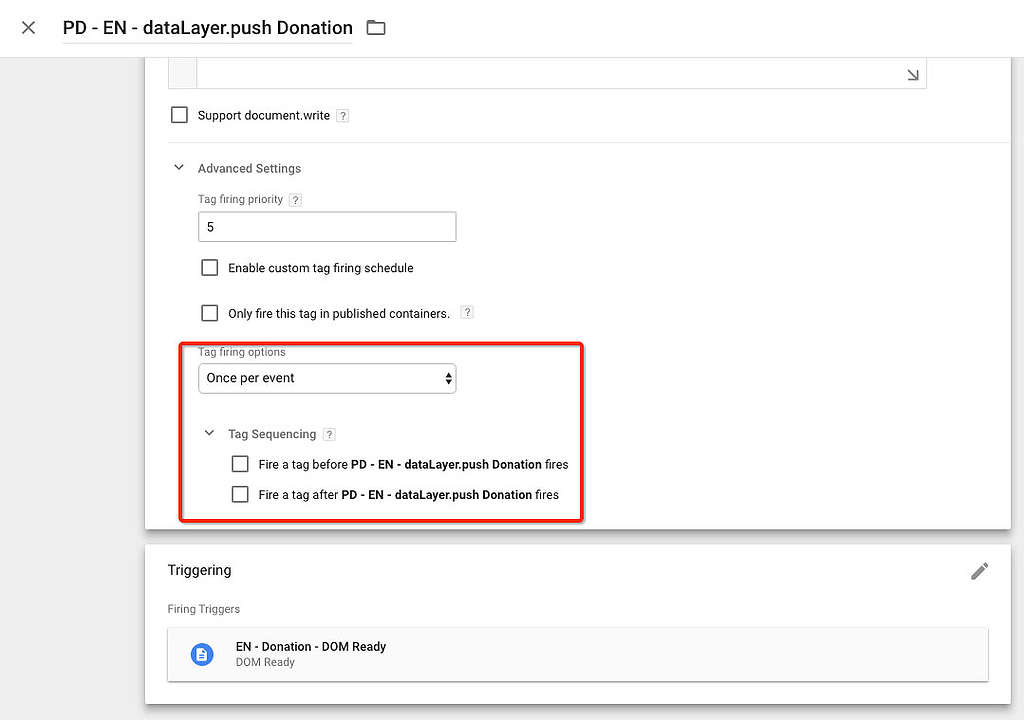
GTM setup (Advanced > tag Sequencing)
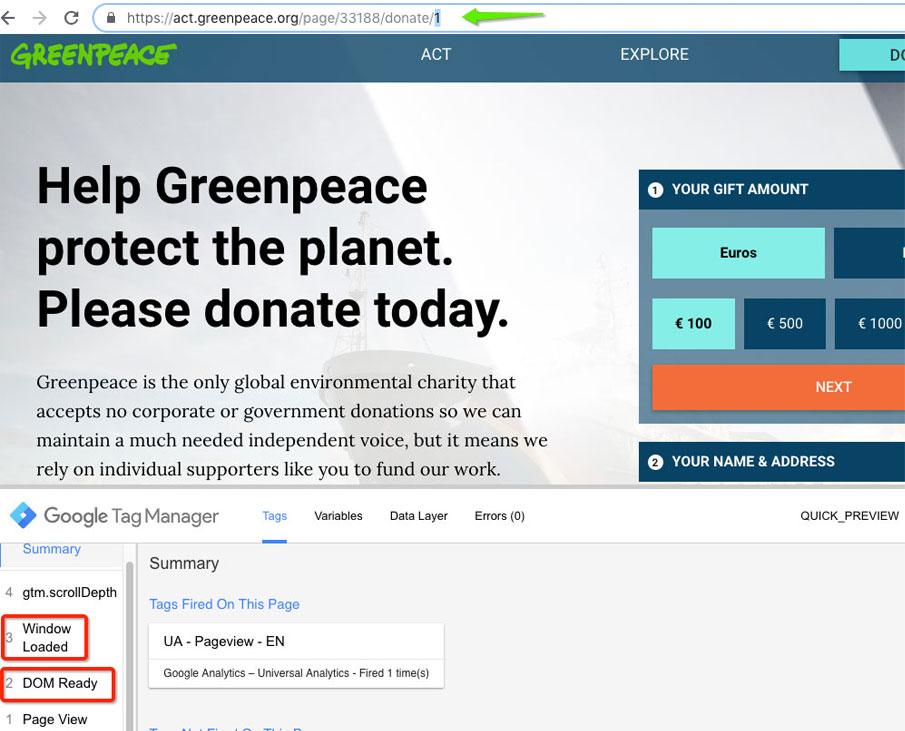
Check Donation tags & triggers in GTM preview
1. Donation page loaded (page #1)
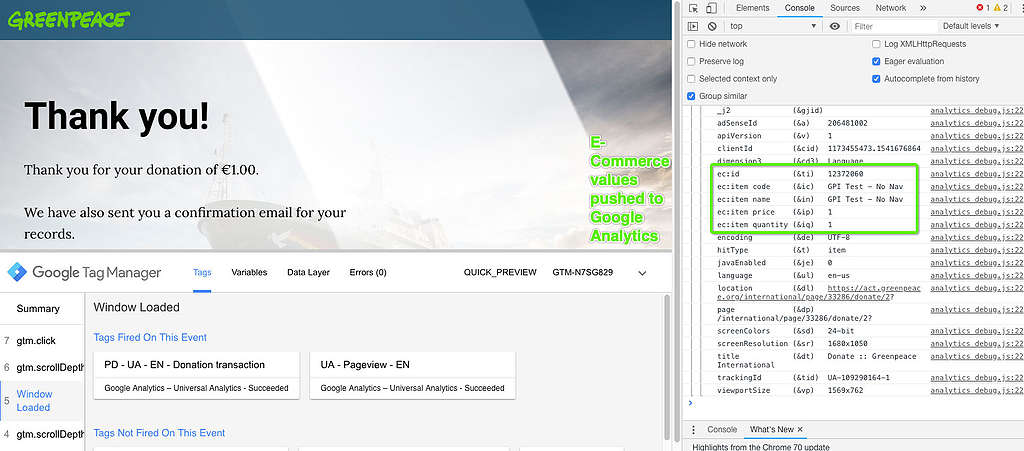
2. Donation Completed! (page #2)
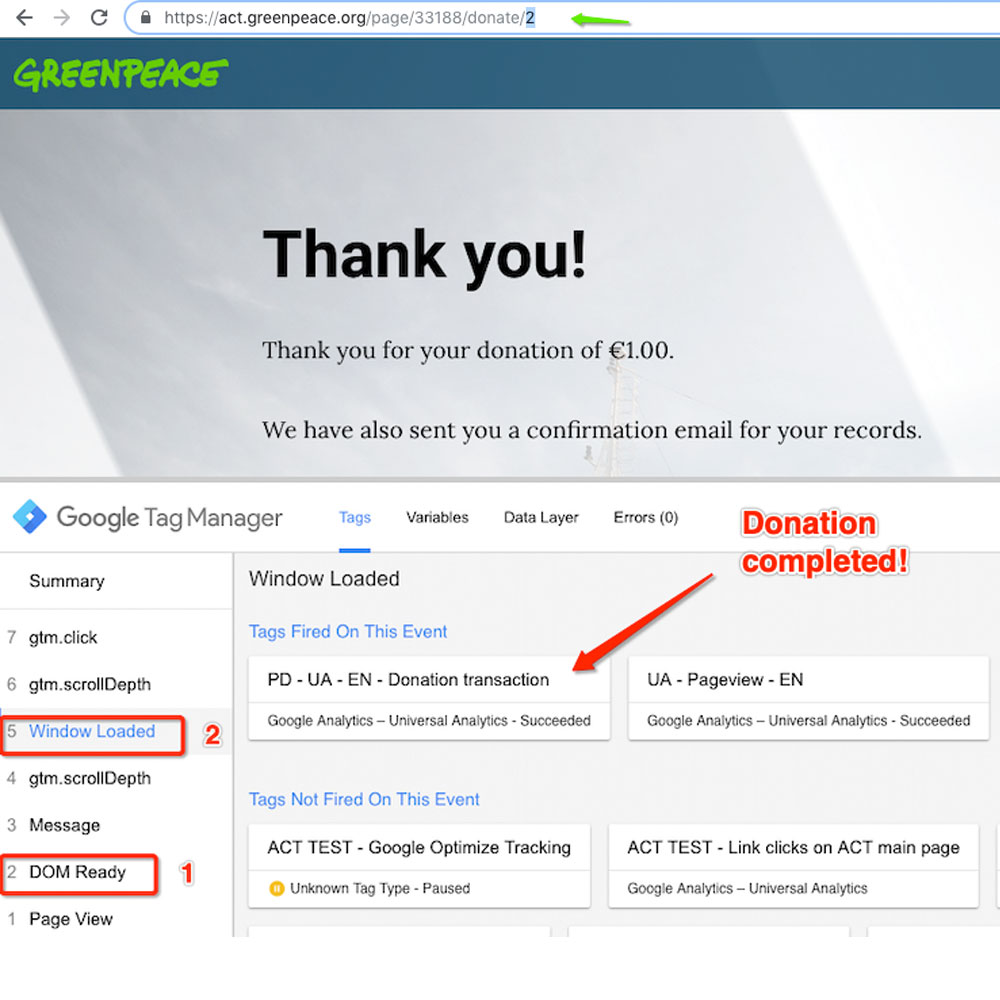
Check Donation data sent to Google Analytics
While still in GTM Preview, you can right click in any browser and select > Inspect, opening the debug window. In the “Console” tab you should be able to see all the data that have been sent to your P4 Google Analytics view.
Insert GTM Donation Datalayer in WordPress donation pages
On a custom WordPress donations page, a dataLayer-push is required when a donation is successfully submitted.
This dataLayer-push should only occur on the confirmation page (e.g. #page 2) , when a user completes a donation, and should only be sent once, it should not be sent again if the user reloads the page at a later time
For Google Analytics to be able to read the data we need to treat a donation as a purchase of a product. This means that we need to pass information in the ‘transactionProducts’ array, about what type of donations are being made. This means that product name equals ‘xxx’ and SKU should be generated accordingly. Price is the amount donated, and quantity should always be set to ‘1’.
The script should be implemented on the donation page in the <head> Tag, and below the dataLayer.push for the E-commerce Tag:
// Ecommerce
window.dataLayer = window.dataLayer || []
dataLayer.push({
  'transactionId': '[variable]', // Transaction ID - Type:String
  'transactionTotal': [variable], // Total revenue - Type:Numeric
  'transactionAffiliation': '[variable]'// Country - Type:String
  'Currencycode': '[Variable]', // Currencycode - Type:String (ISO 4217 currency code, like EUR)
  'transactionProducts': [
       {
       'sku': '[variable]', // Product SKU - Type:String
       'name': '[variable]', // Product Name - Type:String
       'price': [variable], // Product Price - Type:Numeric
       'quantity': [variable] // Product Quantity - Type:Numeric  },
       {
       'sku': '[variable]', // Product SKU - Type:String
       'name': '[variable]', // Product Name - Type:String
       'price': [variable], // Product Price - Type:Numeric
       'quantity': [Variable] // Product Quantity - Type:Numeric  }
  ]
});
The values in this script, should be populated dynamically. One way to do this would be using a PHP-script that collects this information from the server.
Insert GTM Donation Datalayer in Engaging Networks donation pages
If you set up an Engaging Networks donation page, make sure the P4 Tag Manager container is included in the header.
Set up Engaging Networks donation pages
Here’s how to set up a donation page like the International one, based in Engaging Networks (EN).
If your NRO is not already using Engaging Networks for donations pages, contact Michael to find out about set up and pricing
As with every tool, donation pages built in Engaging Networks require an active payment gateway to process gifts.
EN has a list of available integrations with payment gateways, for the GPI donation page, as example, the Stripe payment gateway is being used.
You must also first add all of the necessary fundraising fields to your account before starting, learn more here.
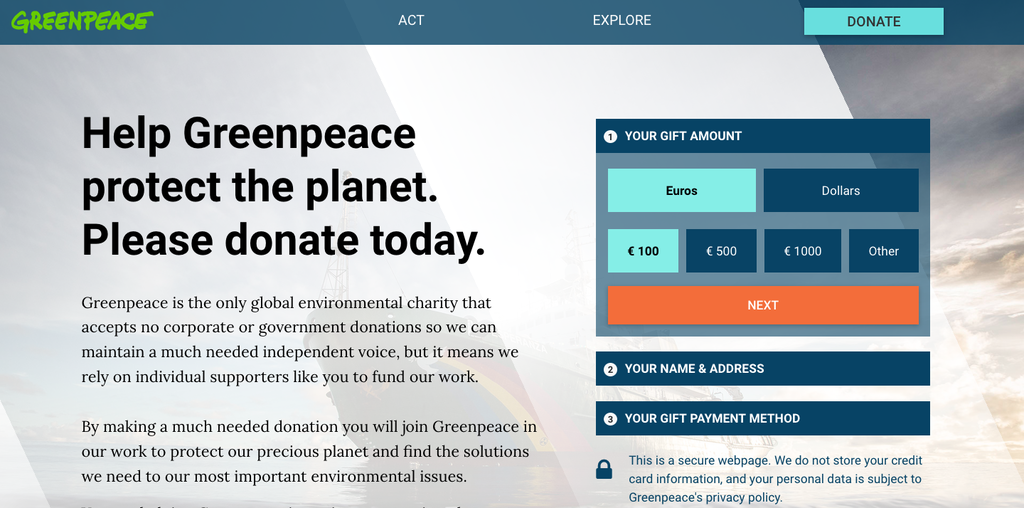
1- Create your P4 HTML Template in EN
While logged in your NRO Engaging Networks account, go to Pages > Components > Templates > New Template > Start from Scratch
Once the editor is open, name your template (remember that name in order to use it on the next step!)
Copy-paste header & footer source codes into your template.
|
At the top of the header you’ll find the place to add your GTM (also in the body). Find more about GTM and EN here.
While editing the header, use CTRL (or cmd) F to find “Act“, “Explore“, “Donate” and replace the urls with your P4 site main navigation urls..
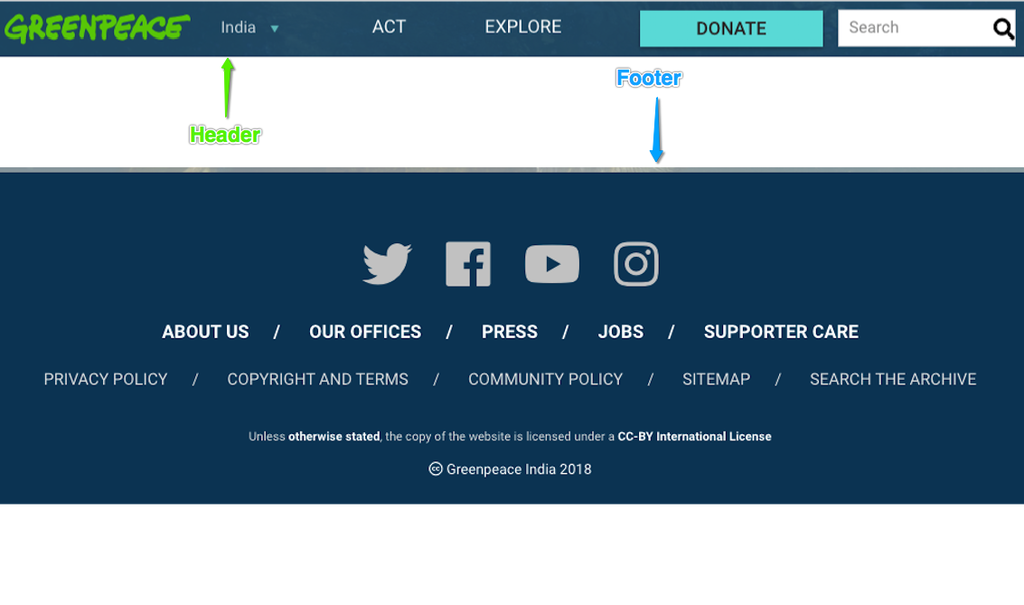

Do the same with all the links in the footer. Remove any links that your NRO is not using in your footer.
Click “Save”.
2 – Create the P4 Donation Page in EN
Pages > Manage pages > New Page
From the “New Page” menu choose the Donation Page option, and click Next.
|
Once all details above are settled, click Next >>
3 – Connect the page to the Payment Gateway/s
If you have not yet set up a TEST Stripe Account (or any test gateway). Now is a good time to do that.
|
- go to Stripe and set up a test account
- In your Stripe account, under the Developers tab, you will find a test Stripe api key
- Write to Global IT Support if you do not have access to your Engaging Networks payment gateways. They can add the test api key to your EN account.
More information over the Stripe gateway and Engaging Networks.
- If your NRO is are also using / accepting PayPal, you can select “I would like to add additional gateways…” and add Pay Pal there as well.
More information over the PayPal gateway and Engaging Networks.
For this initial set up, it is best to choose one test gateway. Once the page is tested, you’ll come back here and change the gateway to your live gateway (which requires adding a live API token provided by Stripe (and PayPal).
Once you have selected your test Gateway, click Next >>
Here is where you can set up notifications to people on your fundraising team. If, for instance, you all want to receive an email when someone donates a large amount or makes a monthly donation, you can set it here.
More on custom notifications in Engagging Networks.
Notifications are not mandatory, if you do not want to send notifications to anyone (or not yet), click Next >>
4 – Edit page Layout
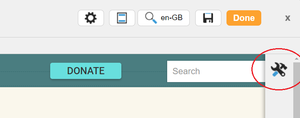
On top right corner, there is a hammer and a wrench symbol. Click on that to be able to edit the layout of the page.
Drag over Two column and drop it in the middle of the page.
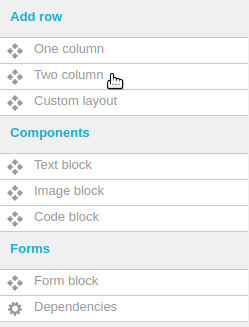
Go back to the hammer & wrench > Components > Text block
Click and drag a text block to your column on the left. Add your donation page text to your text block on the left.
5 – Customise Form Fields
Go back to the hammer & wrench > Components > Form block
Hopefully you have already referred to the EN page that lists all your required fields.
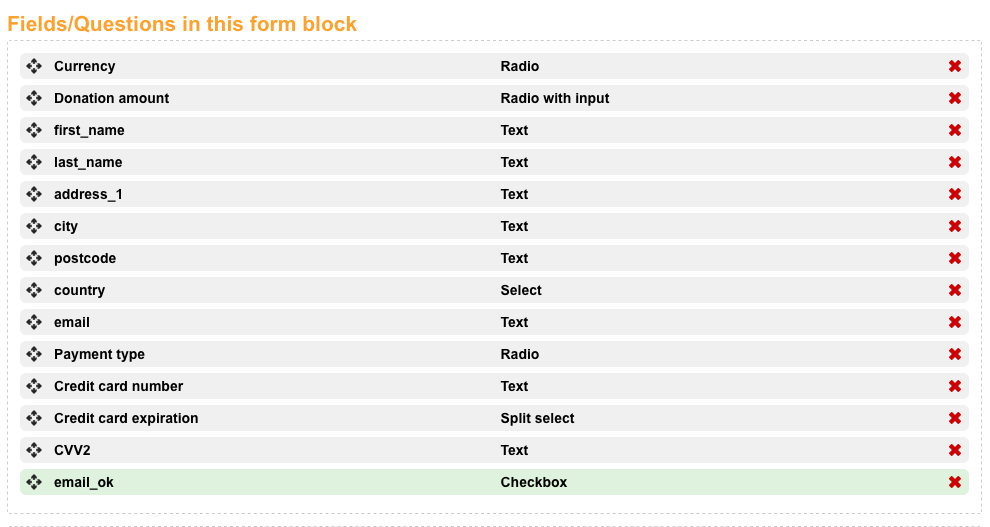
Here are the fields you are dragging over to your form:
You need to pull over each of these form fields and edit them each to fit your page needs.
For adding a monthly donation option, you must have add three fields:
Recurring payment Recurring frequency and Recurring day
Review this help page from Engaging Networks for setting up monthly or recurring pages.
To default to monthly and to be charged on the day that the gift is being made, then for “Recurring day”: hide the field and add “999” as the default value:
Each form element is mandatory and each will have its own set up. Click on the field you need to edit and your options will drop down:
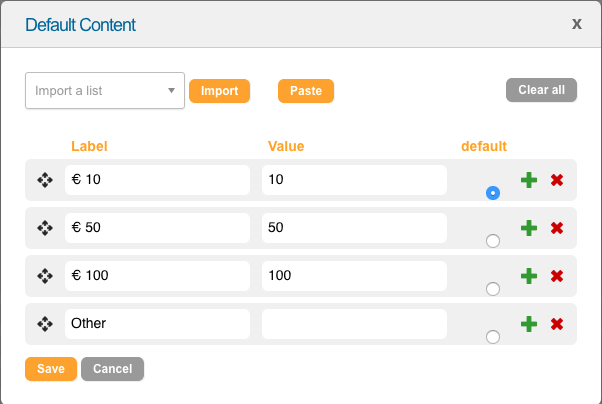
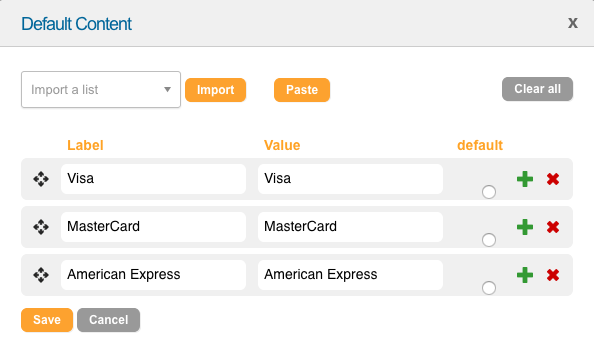
Click on the “Default Content” button to manage the options for each field (e.g. pre-set donation amounts), and set up your default content:
The value you enter must not include currency symbols, and the credit card (Payment Type) must use the listed value of your payment gateway (all accepted values in EN are listed here).
Your expiration date set up requires “Split Select” set up, with / as the delimiter.
Under “Edit select #1 values”, use 01 – 12 and under “Edit select #2 values,” use 2019 … up to 2030 (or however high you want to go).
6 – Customise the background image
To change the default background image you need to add a new row below the main one (if there isn’t already a row beneath your two columns already).
This can be a “One column row”.
Drag an Image block inside from the Components. You can upload an image in EN or paste an existing url form a Planet 4 image (here’s an example).
Add a custom class named page-background.
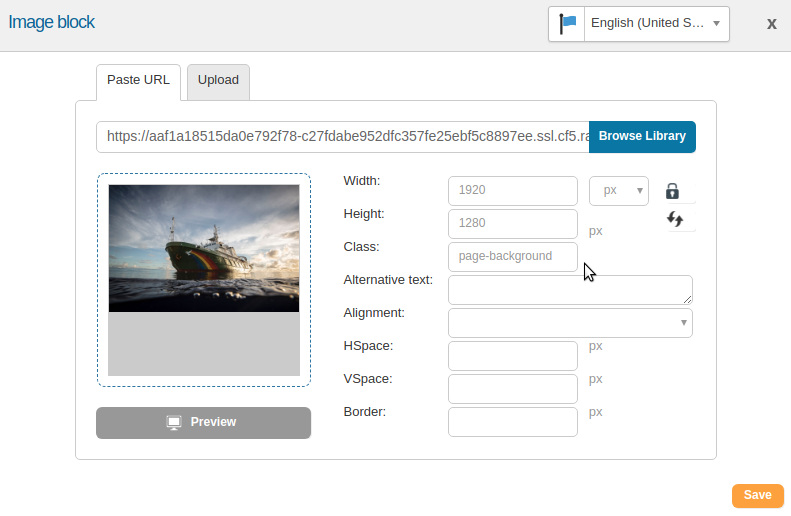
Click “Save” if you are happy
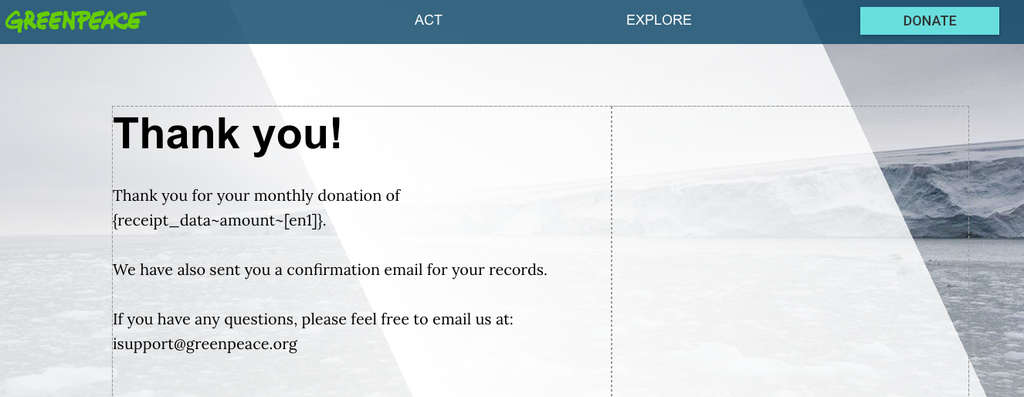
7 – Set up the “Thank you” page
“Page 2” will get you to the page that people are redirected to once they submit the form.
In this page you add an “Two column” block from the Row section on the right toolbar.
Inside the left Column drag one Text block and add this to the <>source:
<h1>Thank you!</h1>
<p>Thank you for your monthly donation of {receipt_data~amount~[en1]}.<br />
<br />
We have also sent you a confirmation email for your records. <br />
<br />
If you have any questions, please feel free to email us at: <span class=”go”>[email protected]</span></p>
<p> </p>
Add your custom background image. Drag over an image block and add it to the single row beneath your two columns, add your image and your custom class page-background.
8 – Test, test, test
Before sharing your page with the whole wide world, it is important to test your page.
Test in different browsers and on mobile, make test donations with each payment type.
9 – Launch!
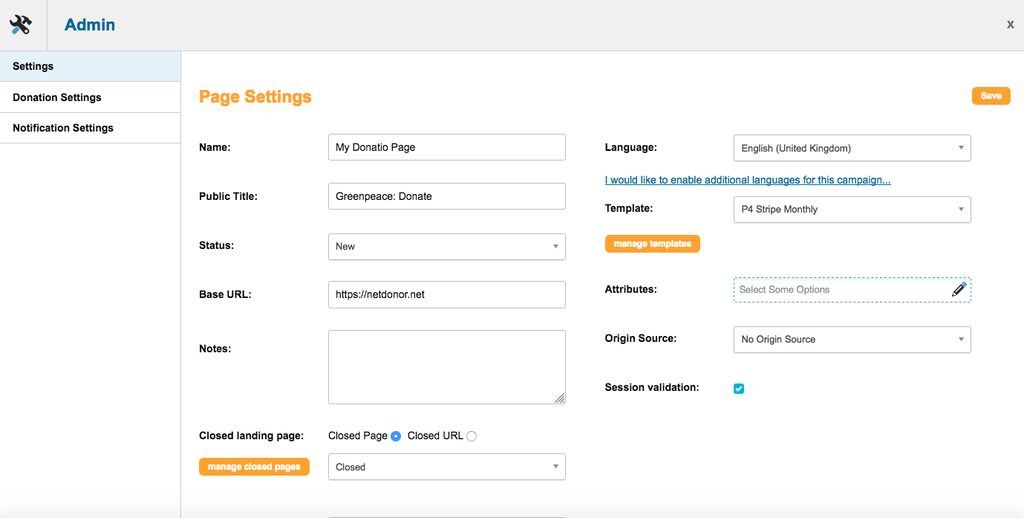
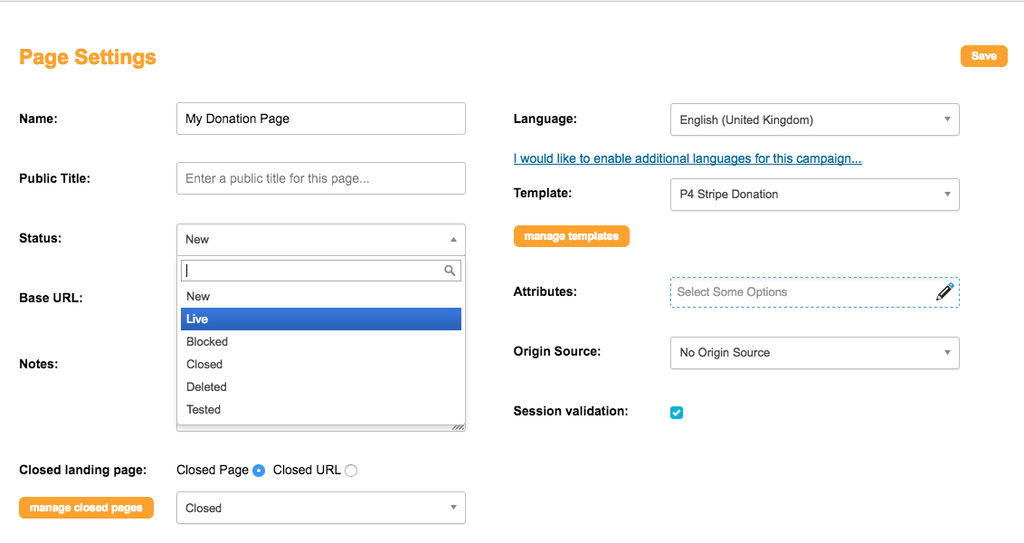
Remember step #2? Go back to the Admin page and change the status to Live.
You can link to your new donation page for all the world to see! Good work!
Links & Resources
- Handbook
- Engaging Networks (EN)
- Stripe:

