With the EU’s General Data Protection Regulation (GDPR) coming into effect, the P4 team decided to go one step ahead, developing a “Cookies control” feature, allowing users to have complete control over which cookies to accept in any of the P4 sites.
- Live Example? International privacy policy or this Google doc Template
This block should generally be used in the “Privacy & Cookies” pages (see Legal check), and makes the cookies management in our P4 sites 100% compliant to the highest web security standards.
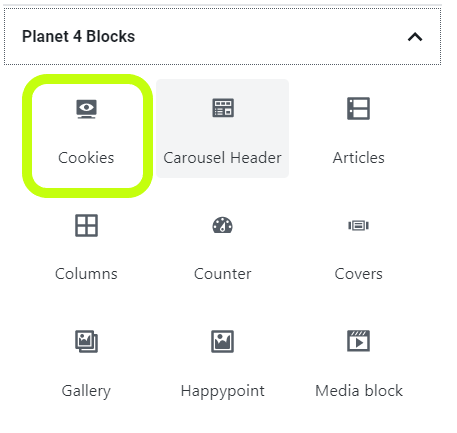
Add the block to your page
You will be presented options to disable Necessary cookies (which are the same for all P4 sites) and other cookies, which depend on which 3rd party cookies you will have installed in your P4 site.
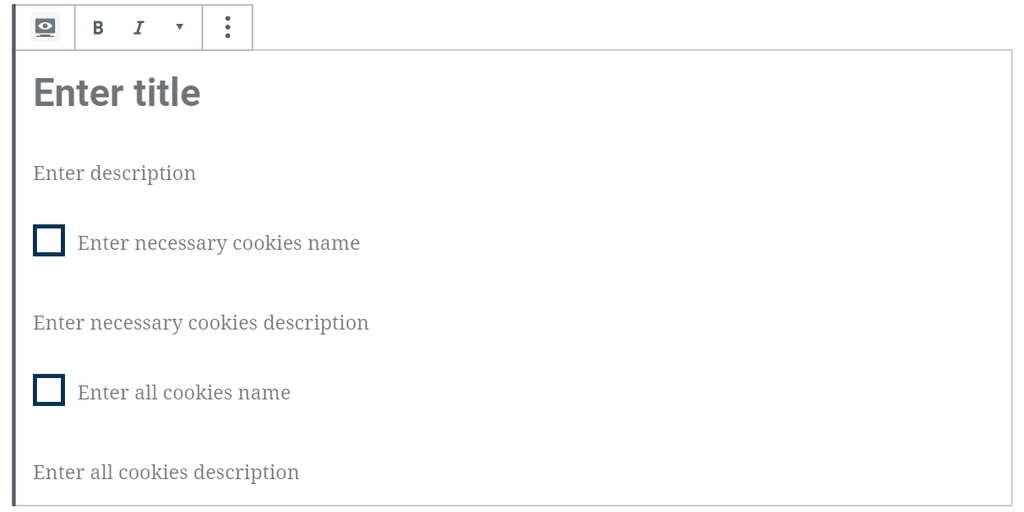
1 – Not accepting the strictly necessary cookies will, of course, make the cookie message appear in every screen
2 – If users accept the “All cookies” (2nd option) the system will automatically accept the Necessary cookies
3 – All EU NROs must enable the “Enforce Necessary cookies” setting (Step #2 – below) – for GDPR
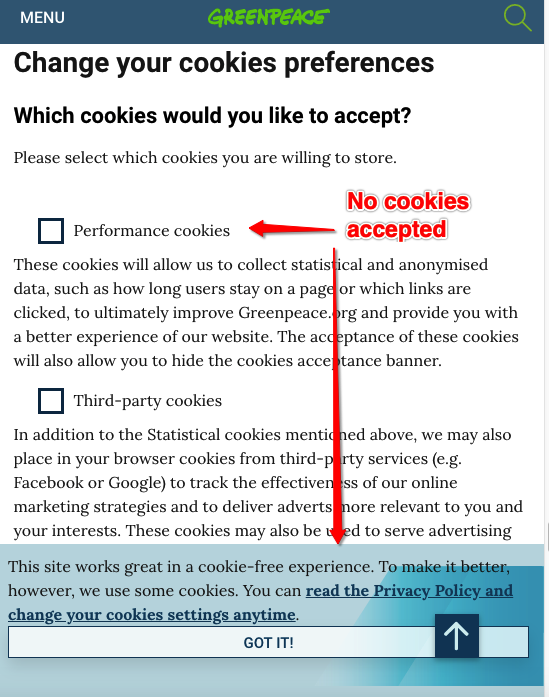
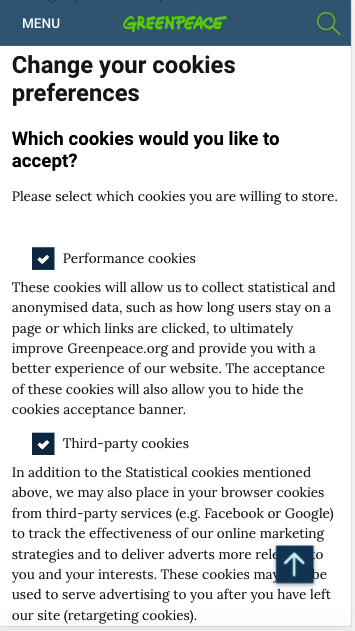
“Enforce cookies” in P4 Settings
In > Planet 4 > Cookies Text , the “Enforce Cookies Policy” setting is related to the cookies block, and complement the functionality.
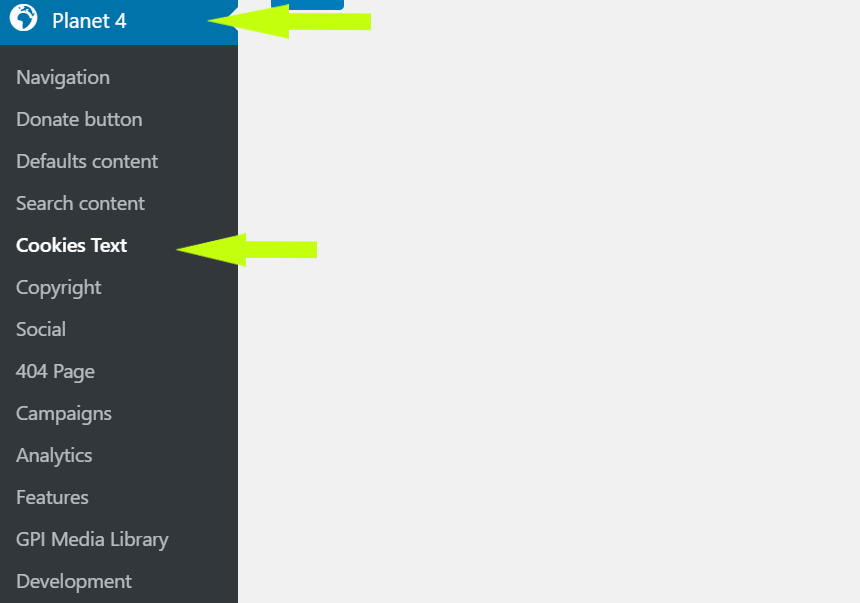
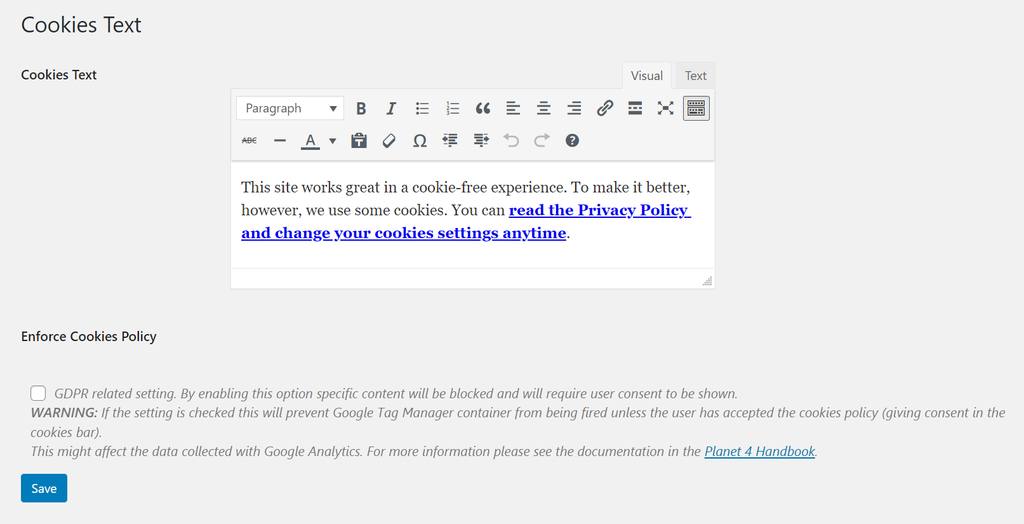
- If the setting is checked -> The acceptance of the visitor means that cookies are allowed to be stored on the browser. If the visitor does not accept the cookies, the P4 Google Tag Manager is not fired.
- If the setting is NOT checked -> The acceptance of the visitor means only that the visitor is aware that cookies are stored. Not accepting it does not block cookies from being stored, this is how every site was behaving before GPDR.
Please keep reading to understand the behaviour of the cookies block in combination with the right Tag Manager setup.
Understand Planet 4 Cookies
The P4 dev team created two 1st party cookies that will help us to understand and record the user’s preferences. Those cookies will be used inside Google Tag Manager to create specific triggers:
| User Stories | Cookie | Value |
| When the user lands on the website | – | – |
| When the user accepts the cookies banner or when the user manually allow both types of tracking (at the Privacy page) | greenpeace | 2 |
| When the user allows only analytics tracking | greenpeace | 1 |
| When the user manually removes all types of tracking (manually at Privacy page) | no_track | true |
User flow and cookies:
Instead of avoiding Google Tag Manager to load before user consent, we have taken a new approach. By disabling the “Enforce Cookies Solution” (on WordPress) we are able to control what types of tags are going to be fired based on user preferences.
The user flow proposed below will allow us to track statistical and anonymized data for our analysis, while still being compliant with GDPR.
(!) Important: Before applying this setup to your live website, please make sure that you have done your due diligence and verified this setup against your local legislation for cookies and privacy. There may be local variations as to the interpretation and implementation of GDPR and other rules with regard to cookies.
Here’s the cookies flow in a Google Drawing:
Google Tag Manager Setup
To allow the User Flow above, and have the Analytics tag to be fired as soon as users land on a page, follow this:
>> Download the P4 Cookies Block GTM Recipe <<
This file includes the variables and triggers that you will need for this setup. You can import the JSON file to your existing container and merge with your current settings. Don’t forget you still need to do some manual work – check the steps below!
Create new variables and edit Google Analytics settings
1. Disable the Enforce Cookies Policy at WordPress
(WordPress > Settings > Planet 4 > Enforce Cookies Policy)
Start with the release website. You should test and debug the setup before making any changes to the live website.

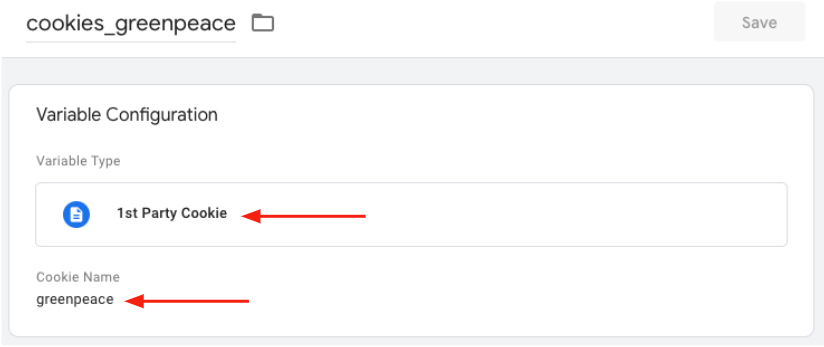
2. Create two new 1st Party Cookie variables:
This variable will capture the cookies value once its placed on the user browser.
Use the table and image below for reference:
| GTM Variable | Cookie name |
| cookies_greenpeace | greenpeace |
| cookies_noTrack | no_track |
3. Create a Lookup Table variable to capture user consent.
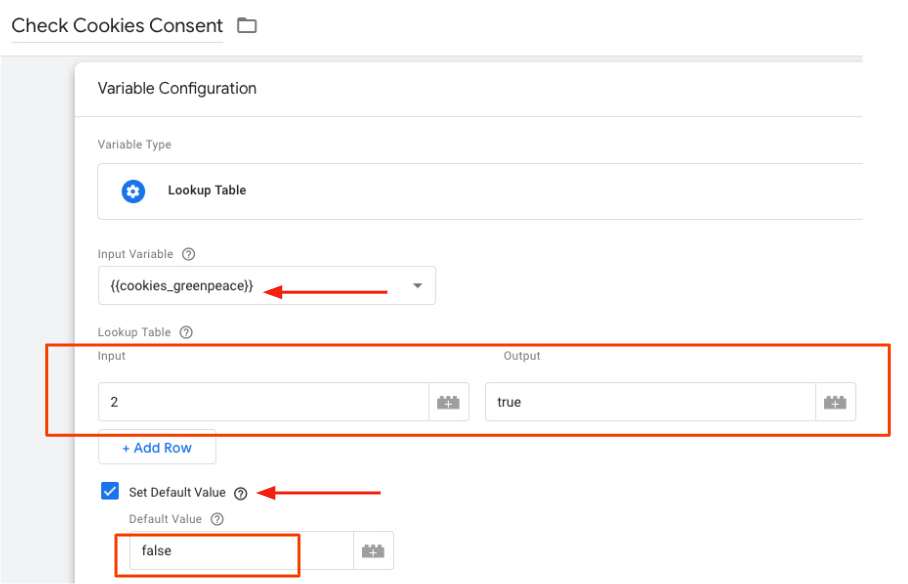
This variable will help you to block or allow Google Advertising features. By default, the advertising features should be blocked unless the user gives explicit consent (e.g. by accepting the cookies block).
Create a Lookup Table variable {{Check Cookies Consent}} and select the input variable as {cookies_greenpeace}. Don’t forget set the default value as ‘false’.
| Input | Output |
| 2 | true |
4. Edit Google Analytics settings variables.
Select the GA settings variables {{P4 GP UA ID}} and {{P4 EN UA ID}} and add a new field called allowAdFeatures with value based on the {{Check Cookies Consent}}.
*You should block the advertising features for the Global Property on both variables (Planet 4 and Engaging Networks).

Create your triggers based on user consent
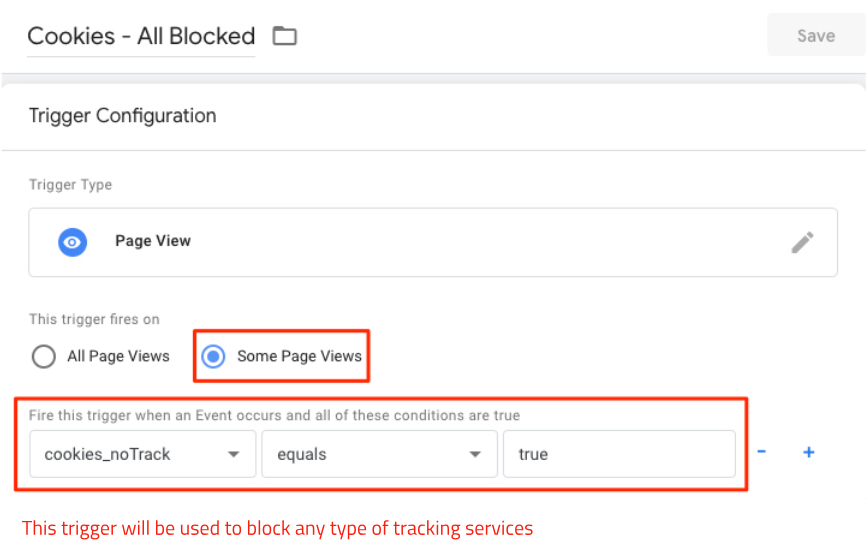
1. Create a general blocking trigger called [Cookies – All blocked]
- Trigger Type: Page View
- Fire on some page views when: {{cookies_noTrack}} equals true
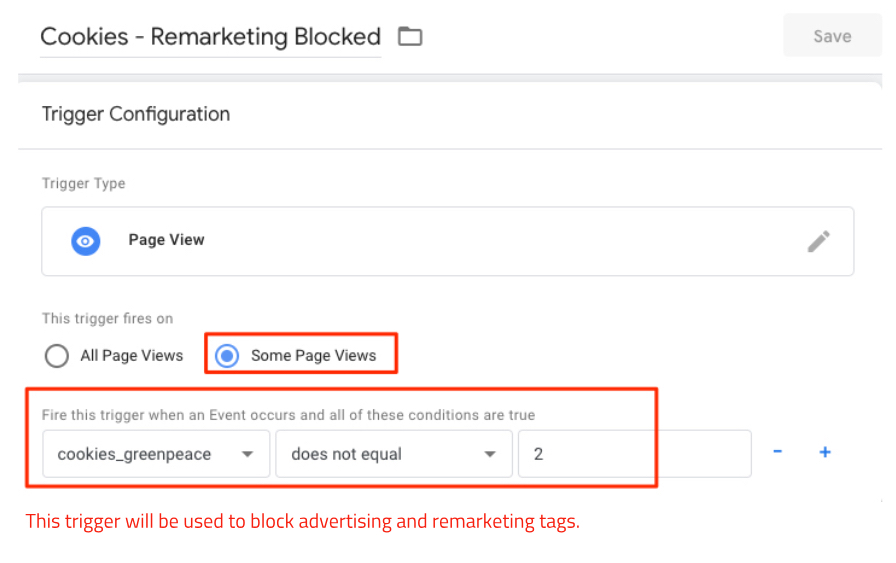
2. Create a remarketing blocking trigger called [Cookies – Remarketing blocked]
- Trigger Type: Page View
- Fire on some page views when: {{cookies_greenpeace}} does not equal 2
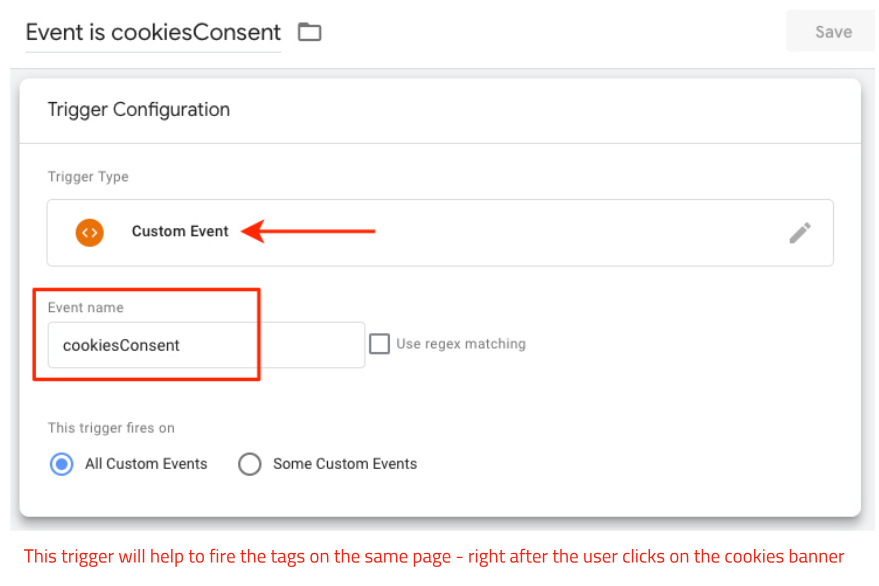
2. Create an event trigger called [Event is cookiesConsent]
- Trigger Type: Custom Event
- Event name: cookiesConsent
Edit your existing tags and apply the triggers created
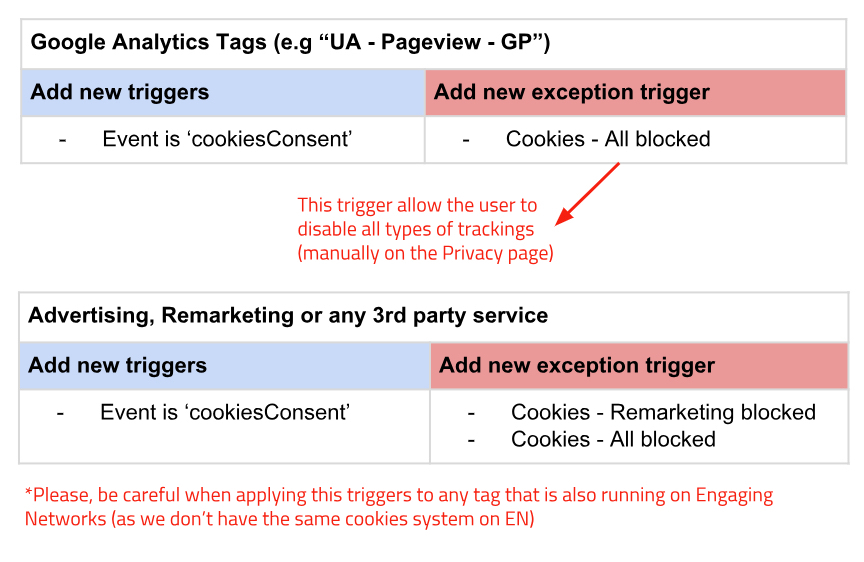
Make sure you are not firing any remarketing, advertising or any 3rd party tracking service that could capture personally identifiable information before user consent. On those cases, you should add both exception triggers (All Blocked + Remarketing Blocked.
Check the image below for reference:
Test and debug:
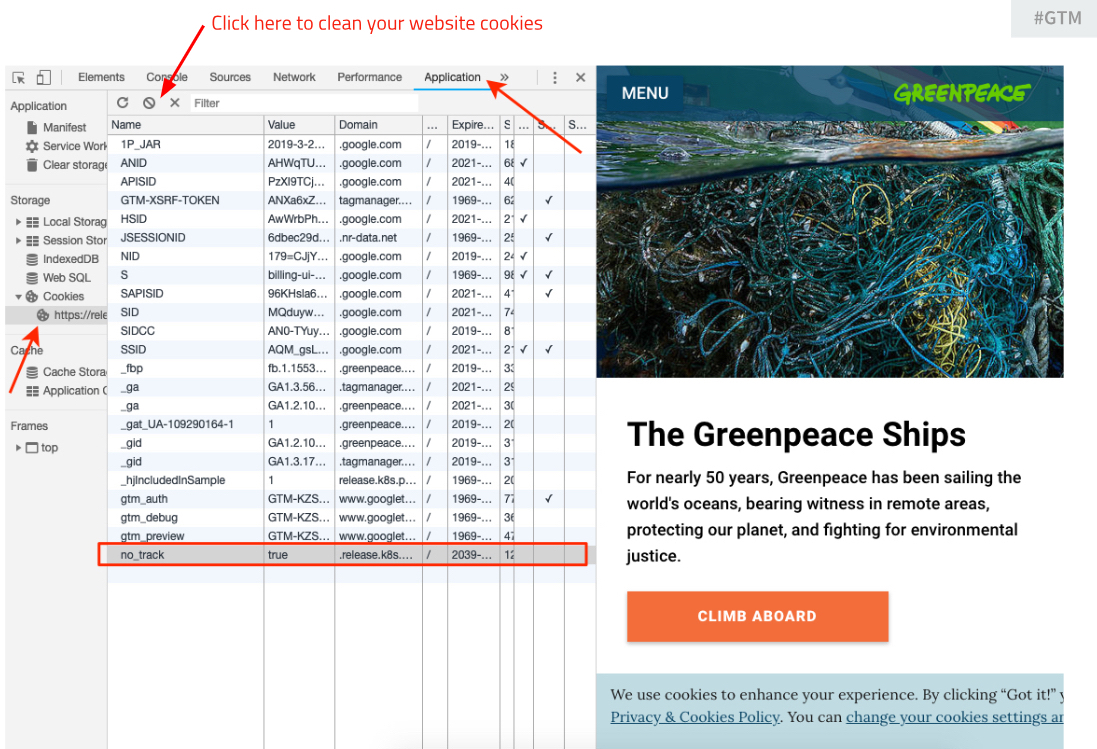
1. Clean your cookies before starting the debug
Open the Developer Tools (right-click on the website and select Inspect) and select the Application Tab. Under Storage expand Cookies, then select a website (check detailed instructions here). Select the “blocked symbol” to clean your cookies:
2. Check if your variables and tags are being triggered
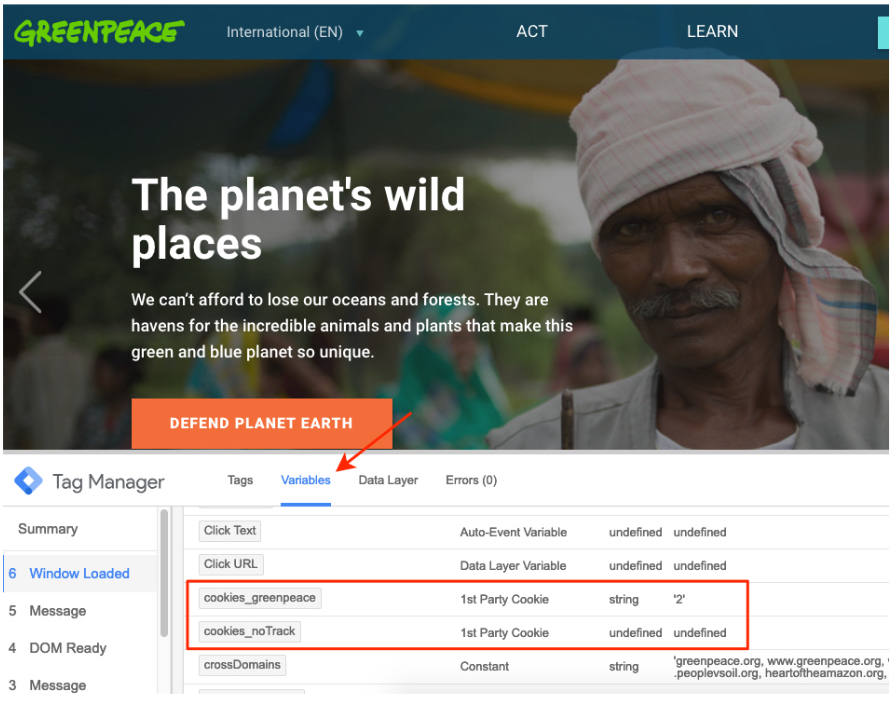
The 1st party cookie variables should change the value according to the user stories described above – make sure you are testing all of them.
You can use the DevTools window (above) or the GTM Debug (below) to test your setup:
3. Watch this live debug video.
We recorded a video testing all user cases on the Planet 4 website. Watch here to understand how you can also debug your setup (also below)
Debug Google Advertising features:
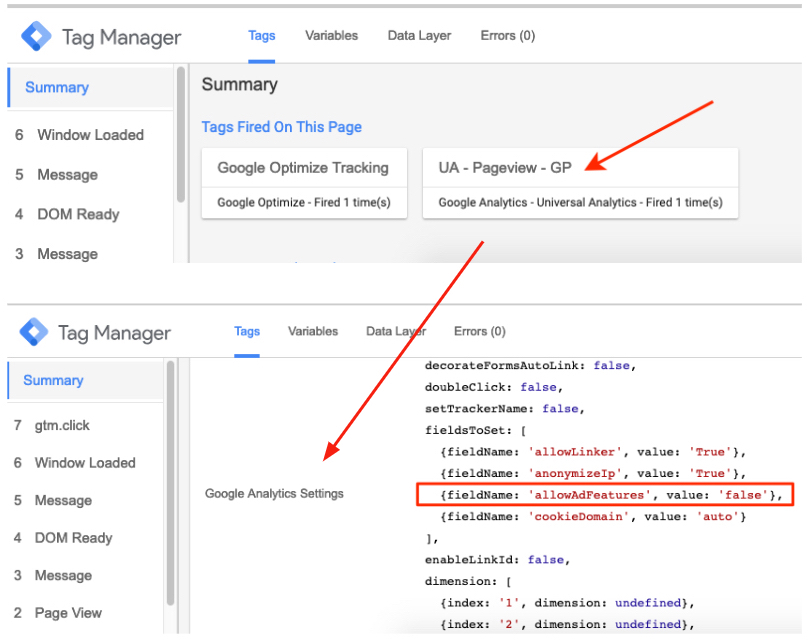
1. On GTM debug window you should verify your Google Analytics Settings
Clicking on the Google Analytics tag. Eg: “UA – Pageviews – GP” to check the details. The field ‘allowAdFeatures’ should be false by default unless the user gives full consent (when ‘greenpeace’ cookie = ‘2’)
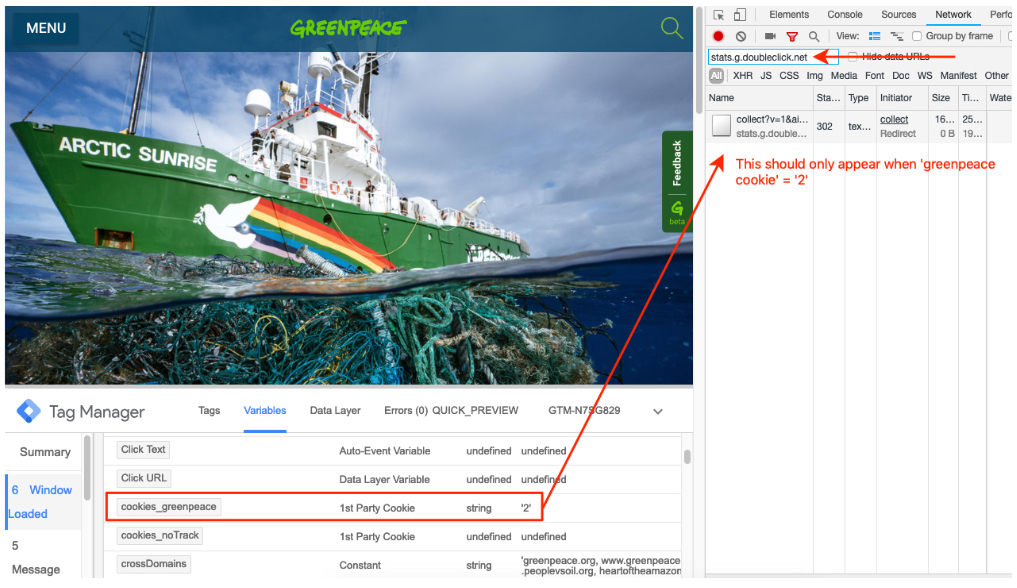
2. Open the tab Network (Developer Tools) and filter results for stats.g.doubleclick.net
You should only see a connection with stats.g.doubleclick.net if the user has given consent (‘greenpeace’ cookie = ‘2’). Otherwise, there should be none results on this panel.
Publish your container and disable the Enforce Cookies Policy:
Are you comfortable with the new setup? Have you tested it and signed off?
If so, please, remember to disable the Enforce Cookies Policy on the live website and track the performance for the next weeks to see if it was responsible for any changes in your traffic performance.
Design Elements
All design files of the block are available in the P4 Design Systems > Blocks > Cookies
Links & resources
- Handbook
- Live Pages
- About Us” – see the international page;
- “Our Offices” – see international page;
- “Privacy and Cookies” – see international page;
- “Copyright” – see international page;
- “Community Policy” – see international page;
- “Terms” – see international page;
- GDPR Useful documentation
- MEDIUM

