Set up the P4 Google Tag Manager
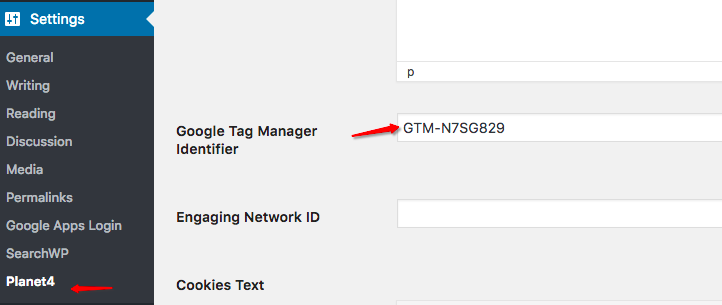
Google Tag Manager (GTM) helps you to deploy other tracking codes through ONE Central Javascript code, called the Container. By connecting the GTM identifier in Settings > Planet 4, you automatically deploy the tracking code in the entire site. This is why each NRO implementing P4 must have a Google Tag Manager container under the Planet 4 GTM Account.

Get started
Here’s the Planet 4 “Google Web Stack” to track and visualize performances. This page is dedicated to the technical implementation using Google Tag Manager.

Add the GTM container to your website or advocacy pages
Google Tag Manager (GTM) contains the Google Analytics (GA) tracking code, so all tracking / triggers / events and so on are set up in Google Tag Manager but consolidated in Google Analytics
- Planet 4 Pages
Add directly at WordPress Planet 4 settings: - Engaging Networks or other external pages:
To implement GTM, these two snippets must be implemented on all pages of a website, preferable in a master template. Insert this code as high as possible in the <head> Tag of the page, as possible:<!-- Google Tag Manager --> <script>(function(w,d,s,l,i){w[l]=w[l]||[];w[l].push({'gtm.start': new Date().getTime(),event:'gtm.js'});var f=d.getElementsByTagName(s)[0], j=d.createElement(s),dl=l!='dataLayer'?'&l='+l:'';j.async=true;j.src= 'https://www.googletagmanager.com/gtm.js?id='+i+dl;f.parentNode.insertBefore(j,f); })(window,document,'script','dataLayer','YOUR-GTM-CONTAINER-ID');</script> <!-- End Google Tag Manager -->In addition, paste this code immediately after the opening of the <body> Tag:
<!-- Google Tag Manager (noscript) -->
<noscript><iframe src="https://www.googletagmanager.com/ns.html?id=YOUR-GTM-CONTAINER-ID" height="0" width="0" style="display:none;visibility:hidden"></iframe></noscript>
<!-- End Google Tag Manager (noscript) -->
Get your codes at Google Tag Manager > Admin > Container > Install Google Tag Manager
Understand the P4 Default Container
All containers associated with Planet 4 Tag Manager account. The container is comprised of a set of macros, rules and tags:
When you start the implementation process, you will receive an updated copy of the Greenpeace International container. Here are a few acronyms used in the setup:
- DLV = DataLayer Variable
- DOM = Document Object Model
- EN = Engaging Networks
- GP – Greenpeace
- MeRa = Members Returning for Action – see the full KPI list
- PD = Precis Digital, the Agency who helped us with this setup
- UA = Universal Analytics
- VPV = Virtual Page View
- UX = User Experience
Need instructions on how to import/export a container? Check this out
Connect Google Analytics
Connect GTM to Google Analytics (GA)
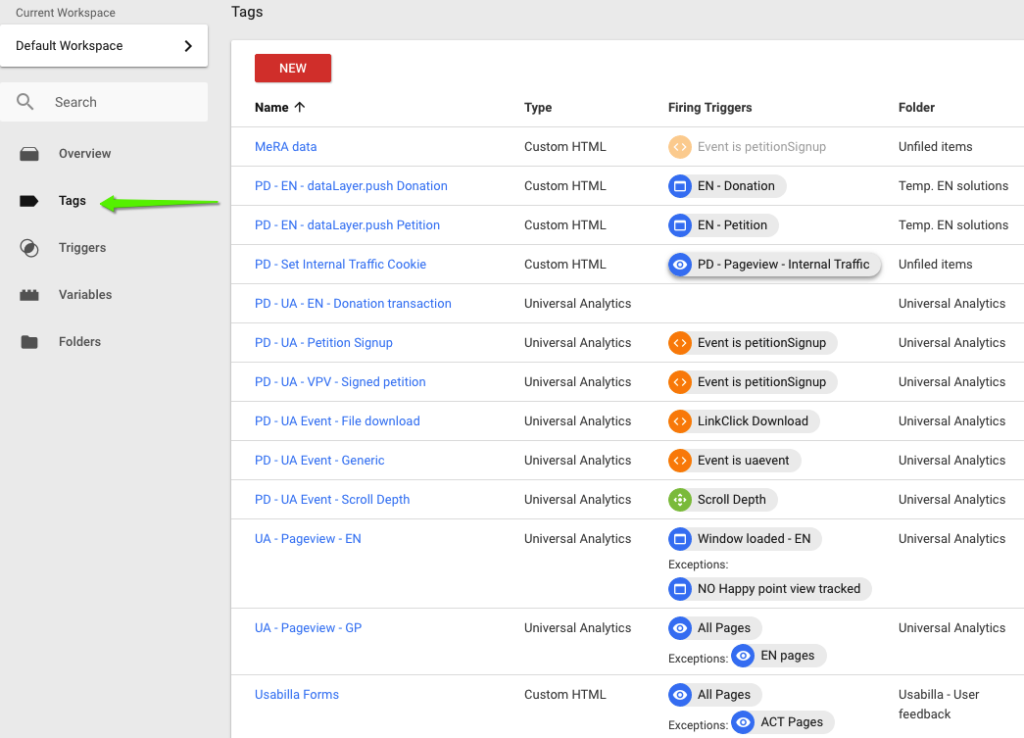
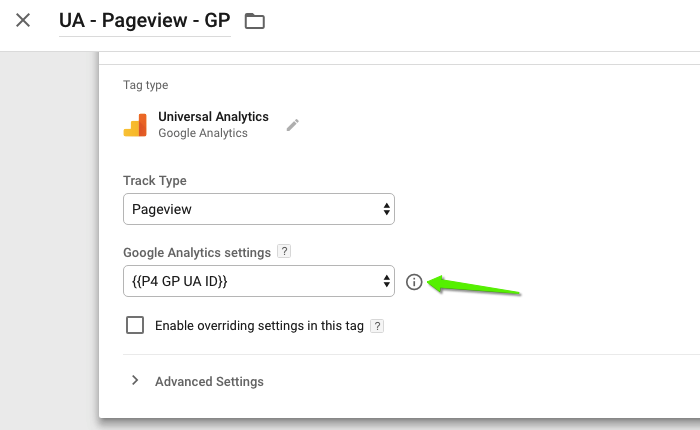
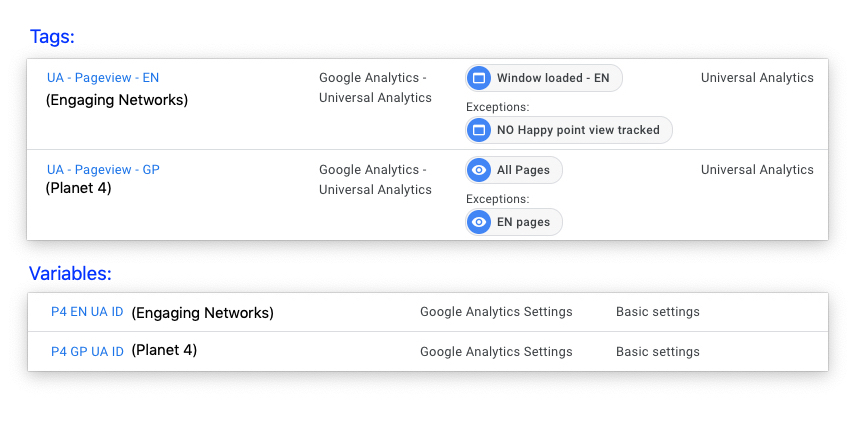
By importing the default container template (see above), your GTM Container will already be connected to the P4 Global Property (Google Analytics). You will be able to see two Universal Analytics (UA) tags and two Google Analytics variables.
The tags will help you to define which pages you want to track (using triggers) and the variables will help you to define which information do you want to send:
Connect multiple Google Analytics properties to the same container
If you want to add another Google Analytics property, you can easily duplicate those tags and change the settings.
- 1. Create a copy of the Universal Analytics tag.
To differentiate those tags, it may be wise to rename the copied tag, something like UA-Pageview-GP-Saturn
Google Analytics view setup for multiple websites
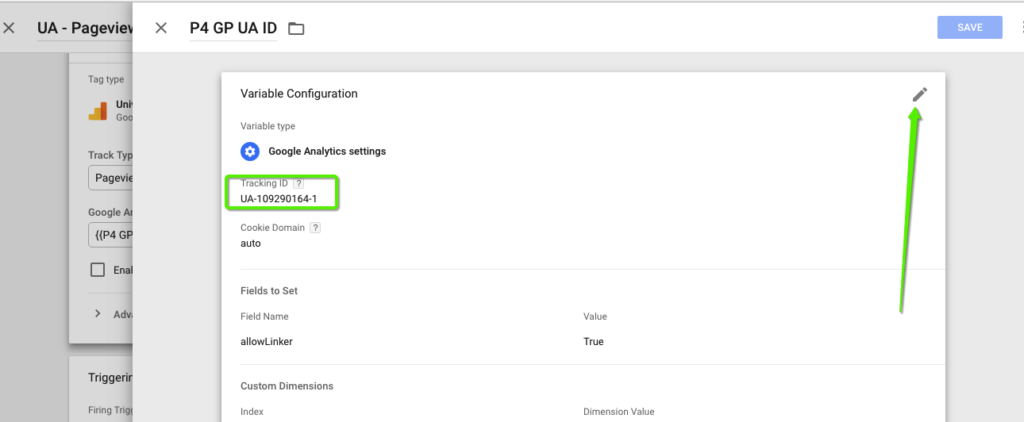
All data from Planet 4 websites is being sent to the same P4 Global Property (UA-109290164-1). Inside this property, we are using custom filters to create a specific view for each NRO or office.
For this setup, we are sending some specific values (as custom dimensions) through Google Tag Manager. Please follow these instructions to apply the same settings:
1. The first step is to update the Google Analytics settings (variable) that you are using for your pages (e.g P4 GP UA ID).
Don’t forget to edit this for both Planet 4 and Engaging Networks.
2. Check the custom dimensions that you are using for both variables and make sure they are using the same index the GA Property.
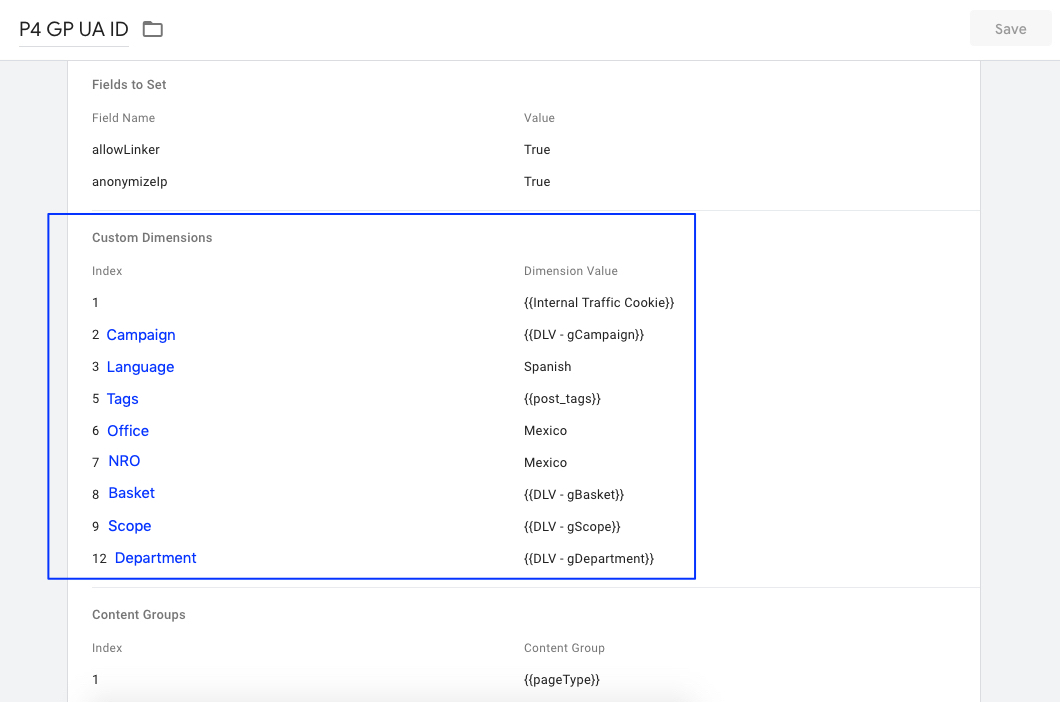
- P4 GP UA ID (for Planet 4 pages) should use variables to capture the values for ‘Office’ and ‘NRO’:
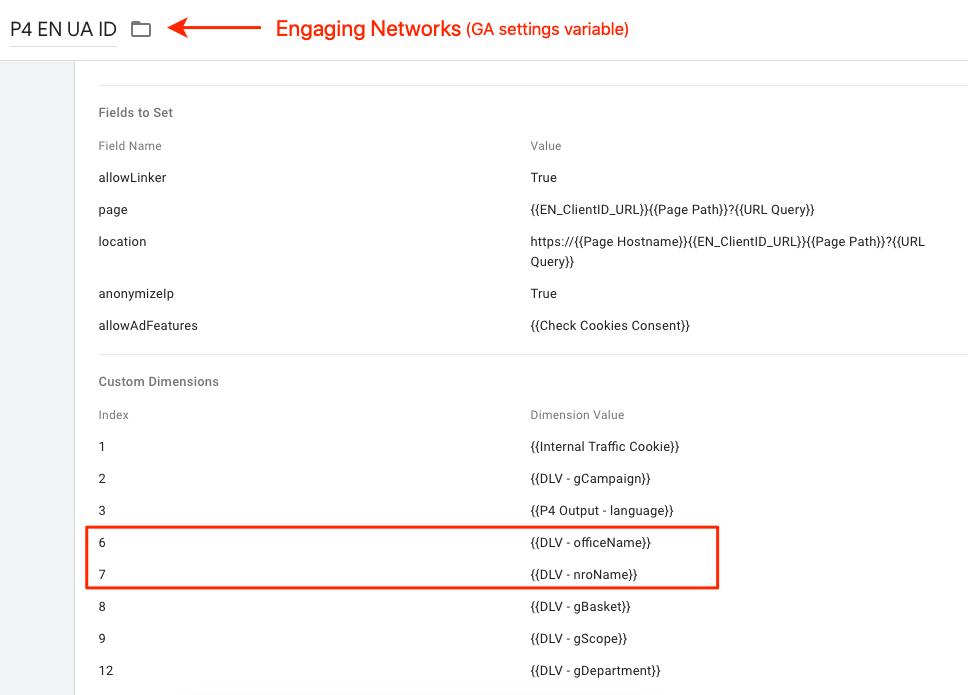
- Same thing for P4 EN UA ID (for Engaging Networks pages). Use the dataLayer variables to capture ‘Office’ and ‘NRO’ custom dimensions.
For Engaging Networks pages, you must manually add the dataLayer.push code on the <head> of the page (see below). Otherwise, you won’t be able to extract those values through Google Tag Manager.Check here how to add office and campaign information to your pages.
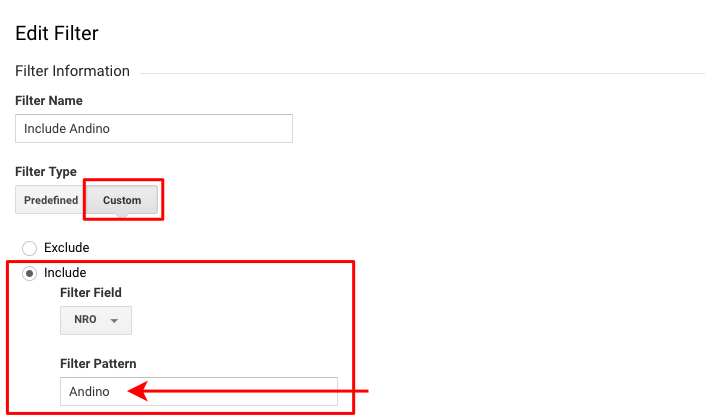
3. Once the custom dimension value is sent from all pages, you can create a filter in Google Analytics.
Remember to use the same custom dimension and value that you inserted in GTM. (GA > Admin > View > Filters > Add or edit existing filters)
The P4 GTM standards (list)
Use this checklist to ensure your GTM container complies with all the standards before being published:
- IP anonymization (see below)
- E-commerce Module Enabled
- Cookies Block Setup (GDPR) (See below)
- Google Advertising features blocked by default (GDPR)
- Event Tracking:
- Petition Signup (on both P4 and Engaging Networks)
- Action Alert (Newsletter)
- Scroll Depth
- Social Shares
- File Downloads
- Goals:
- Petition Signup (+ goal funnel setup)
- Social Sharing
- Scroll to bottom
- Donations (+ goal funnel setup)
- Custom Dimensions
Privacy / GDPR Compliance
IP-anonymization
All Planet 4 Tag Manager containers are by default set up with anonymised IP Address collection. Make sure the IP is anonymized in both Planet 4 pages (“P4 GP UA ID”) and Engaging Network pages (“P4 EN UA ID”).
As mentioned in the General Data Protection Regulation (GDPR), IP addresses do qualify as personal information. We decided, therefore to turn on IP anonymization in Planet 4 Google Analytics to ensure that full IP addresses are never written to the disk.
Turning on IP anonymization is easily set up Tag Manager, just by adjusting your tag or Google Analytics Settings variable by clicking into More Settings -> Fields to Set and then add a new field named ‘anonymizeIp’ with a value of ‘true’:
Cookies Block and Settings
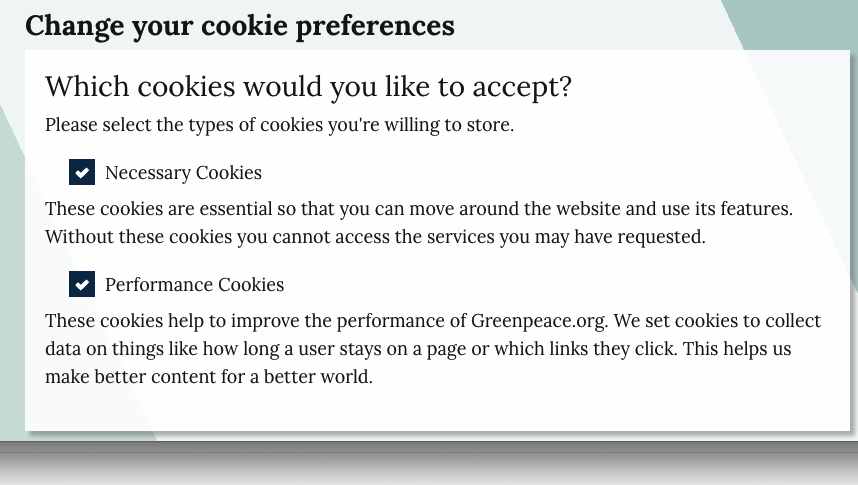
The last step of the fully compliant P4 analytics setup is the understanding of the Cookies Control Block and its relationship with the P4 settings.
- Set up the Cookies Control Block in your Privacy & Cookies page (see International as example)
- Set up the P4 Settings, including Cookies text and Cookies control setting
Exclusion of Internal (GP) Traffic
Given that we are not tracking IP addresses, it is important that all employees add one additional step to exclude internal traffic from being consolidated. This can be done by placing a custom cookie in all employees’ browser. This must be done on all devices and in all browsers an employee might use to access any site of P4.
The scope of this custom cookie is restricted to the host. So if the host is www.greenpeace.org, it always works in www.greenpeace.org only.
For other hosts like act.greenpeace.org, you’ll need to do the same thing by sending the staff a link with “?internal” at the end of it.
To place the cookie in a browser, please visit this URL https://www.greenpeace.org/international/?internal (or any /yourdomain/?internal)
A regular reminder asking GP staff to place this cookie in their browsers is enough to exclude of 80% of internal traffic!
This will redirect you to the Home of your P4 site, and place a cookie in your browser that excludes your browsing behaviour from showing up in Google Analytics reports, regardless of which IP the employees is accessing the site from. This is crucial, as employees browsing behaviour is irregular and will skew the reporting in Google Analytics.
It possible to have this cookie to exclude IP Address in other GA views than the GPI one (UA-10290164), just add the filter in your local view once you set it up in Google tag Manager.
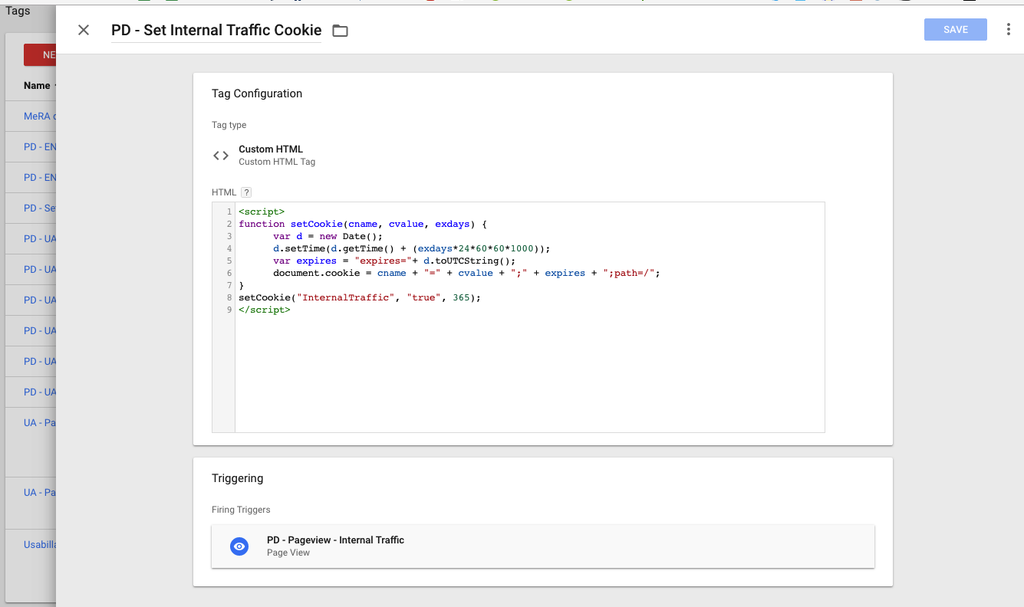
The ‘PD – Set Internal Traffic Cookie’ is the tag that will set the internal cookie.
Once you checked that the cookie is referenced to the right GA view, you have to add the filter to the view. It is a domain cookie, so it works on any of the local sites that use the same cookie…
For other hosts (aka cross-domain, see below) like act.greenpeace.org, you will need to do the same thing by sending the staff a link with “?internal” at the end of it and it should work fine.
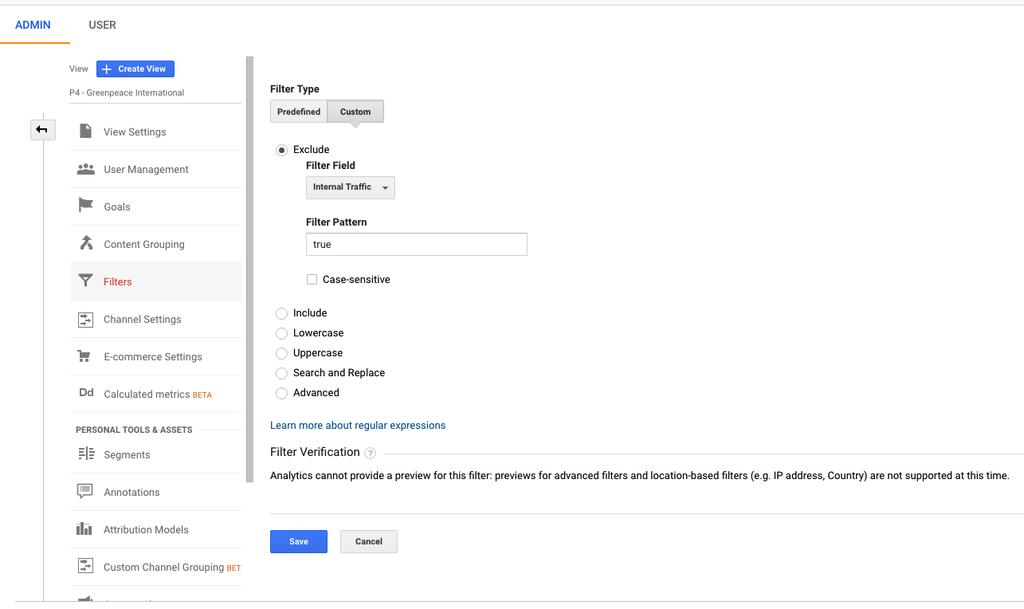
The Filter in Google Analytics to reference the cookie places via GTM
Understand DataLayer
GTM heavily relies on the data layer, normally named as “DataLayer”. The dataLayer is a global JavaScript variable, observed by GTM, that serves as a source of information. The dataLayer can be populated dynamically with the dataLayer.push() method. When data is pushed, GTM will react and may fire tags if certain conditions are met.
Make sure to declare the dataLayer array, in <head> before the GTM container snippet. The array is used by Google Tag Manager to retrieve information:

Whenever we are interacting with the dataLayer after this declaration in any of the following sections, make sure that we are always using the push-function when passing information to the dataLayer, as opposed to declaring it. Otherwise any information already in the dataLayer may be flushed
More? Read an in depth explanation of this by Simo Ahava here
Verify DataLayer though the dev. Console
Should you need to develop new pushes beside the “out of the box” ones, we recommend that each dataLayer push is verified by the a developer. Verify the setup from the Console allows developers to check data is being pushed correctly and sorted properly, before sending the setup back to your digital department or partner agency.
To verify this, you need to use the Console in the Google Tag Manager Developer Tools. Here you type; “dataLayer”. This will provide a list of all the information currently stored in the dataLayer.
Here each event that was triggered can be found, with the relevant information as it has been presented in this guide. Please pay special attention to the events firing properly, as well whether they are sending the correct pieces of information.
The below example shows the console and the list of objects in the dataLayer. This is an example taken from another website.
By doing this check with each new implementation, we will limit the number of iterations and errors. GTM heavily relies on the data layer, normally named as “dataLayer”. The dataLayer is a global JavaScript variable, observed by GTM, that serves as a source of information. The dataLayer can be populated dynamically with the dataLayer.push() method. When data is pushed, GTM will react and may fire tags if certain conditions are met.
DataLayer Push Callback
This only applies to events that should fire on interactions/links that take the user to a new page (or page refresh). Since link clicks normally take the user away from the page, the request to Google Analytics (from GTM) will not always have time to be sent.
A recommended solution is to pass a callback function to GTM in the same object, that fires when the request is done. The link functionality will have to be turned off, and the redirection is handled by the function passed. Like this (donations in this example, but could be anywhere):
dataLayer.push({
  'event' : 'donation',
  'ecommerce':{
     //the ecommerce data
  },
  eventCallback : function() {
   document.location = "/petition-signup.html"
   }
});
In the above example, the eventCallback is a function that redirects to the donation page when the GA request is fully completed. When using this, also set a fallback redirect that fires if the above method would fail for any reason. This could fire after 500 ms, for example.
Default Variables of DataLayer
At the base of all tracking that will be passed using GTM, a set of information must be declared through the dataLayer on all pages of Planet 4 websites. This push to the dataLayer, should occur before the GTM container is loaded, so that the information is ready when the Pageview Tag fires.
Default Planet 4 dataLayer push should contain the following variables:
pageType |
The type of page or what it relates to, eg. articles, press releases, blog posts, act, donations etc. This should adhere to the Content Groupings – see Set up the Google Analytics view |
signedIn |
Contains info on whether a user is signed in, either: ‘true’ or ‘false’ |
visitorType |
The type of visitor that is visiting, for signed in users |
userID |
Contains the User ID for signed in users. This value must be consistent for each unique logged in users, and blank for users not signed in. This value should be available whenever it is possible to identify a user, including users who registered their email for newsletters, or signed a petition, and consistent for each user across these types of identifiers. |
Post_Tag |
Contains all #Tags used in a post, to determine most popular tags in Google Analytics |
CrossDomain Tracking
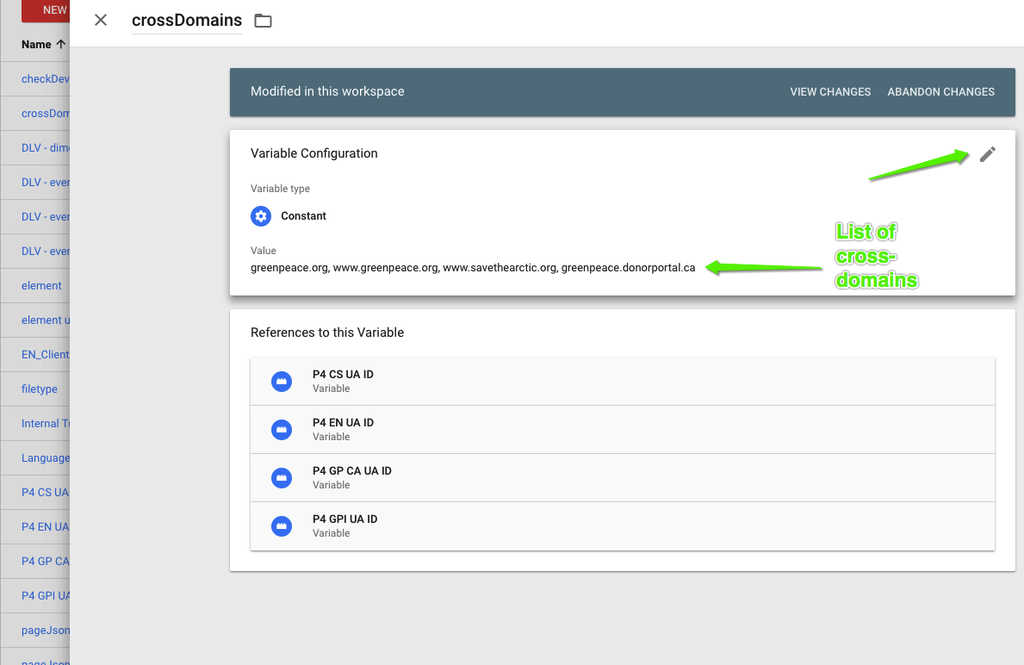
To track users across domains, we place the same _ga cookie in users’ browsers when they click from one domain to another. This is handled entirely in GTM, using the allowLinker field, which appends the _ga ID to the URL on which a user click, and a variable that contains all the domains that should be linked. This variable is named “crossDomains” and contain a comma-separated list of domains.
Add new domains to your GTM container
In GTM, select Variables > User-Defined Variables > crossDomains. Edit this variable, add your new domain and have the container published by the designated owners.
Events & Goals Tracking
All events tracked on P4 site are based on dataLayer.push events, normally containing a single variable, the ‘event’ name. A few of the events also include custom variables, to provide more information that we can import to analytics through Google Tag Manager.
Tracking conversions
What you must have
Check on the pages below how to track each type of Planet 4 and Engaging Networks event:
-

Create and track Donation Pages
Set up P4-alike donation pages and connect them to your payment gateway!
-

Track petitions data in Google Tag Manager (GTM)
Learn how easy is to extract data from your forms and petitions, for both local and global campaigns
-

Set up events in Google Tag Manager (GTM)
GTM allows you to track anything, learn how to set up events and conditions.
Event naming convention
The event pushes should be consistent in naming across all P4 sites, that makes it easier to benchmark and compare.
Please follow these guidelines when setting up events in P4 GTM container:
- MeRa = Members Returning for Action – see the full KPI list
- PD = Precis Digital, the partner Agency who set this up with us
- UA = Universal Analytics
- EN = Engaging Networks
- VPV = Virtual Page View
- DLV = DataLayer Variable
- GP – Greenpeace
- Signup – Event where a user inserts an email (Petition, Subscribe..)
- Share – Event where a user share a piece of content (email, social etc)
Tagging Standards
Default custom dimensions
The custom dimensions below are automatically enabled in each view of the P4 Google Analytics (GA) property:
Index |
Field |
Example |
Scope |
DataLayer variable |
1 |
Internal Traffic |
True; False |
Mandatory |
– |
2 |
Campaign |
Ocean Sanctuaries; Plastics Free Future; etc |
Mandatory |
gCampaign |
3 |
Language |
English; French; etc |
Optional |
– |
4 |
Tracking ID |
not standardized |
Optional |
– |
5 |
Tags |
not standardized |
Optional |
post_tags |
6 |
Office |
Belgium; Argentina; Brasil; Indonesia; etc |
Mandatory |
– |
7 |
NRO |
Belgium; Andino; Brasil; Southeast Asia; etc |
Mandatory |
– |
8 |
Basket |
Forests; Good Life; Oceans; etc |
Mandatory |
gBasket |
9 |
Scope |
Global; National |
Mandatory |
gScope |
10 |
MeRA Status |
Existing; New |
Mandatory |
– |
11 |
Author |
not standardized |
Optional |
– |
12 |
Department |
Campaign; Engagement; Fundraising; etc |
Optional |
gDepartment |
13 |
Project |
not standardized |
Optional |
– |
Check here how it looks like in Google Tag Manager:
If you connect your website to another / your NRO GA property, you will have to enable the custom dimensions yourself:
Create your own dimensions
You can create custom variables and add them to your GTM container. More info in this blog by Simo Ahava.
Always make sure the index (number) is the same in both GTM Tags / Variables and GA Custom dimension!
Language identifier (multi-language P4 sites)
We can use GTM to extract the language from our URL path (e.g. https://www.greenpeace.org/canada/en/act/ or https://www.greenpeace.org/canada/fr/agir/ ) and consolidate it in Google Analytics as a Custom Dimension.
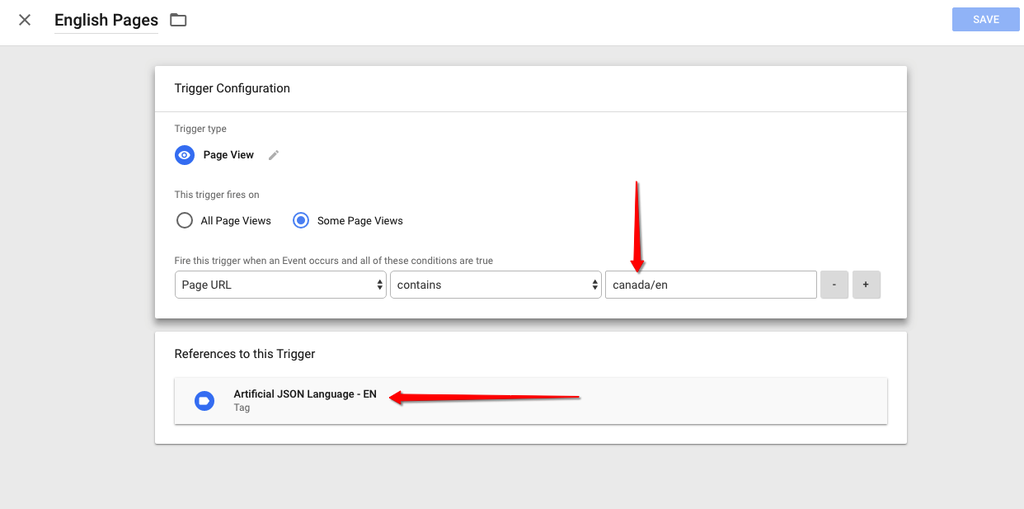
1. Create a Trigger in your GTM Container to extract the language from your site URL (P4)
- Hit “NEW“
- Name it : ‘English Pages’ (or any other language)
- Trigger type : page view type
- Fires on : some page views
- Select : Page URL contains > country/en (or any other language identifier)
- Hit “SAVE“
Repeat the process for all your languages. One trigger for each Language!
2. Create a Tag using an artificial JSON to populate the value “locale” through GTM variable and triggers.
This is for Engaging Networks or other platforms not using language path in the URL.
- Hit “NEW“
- Name it : ‘Artificial JSON Language EN’
- Tag type : Custom HTML
- HTML Code :
- <script>
var pageJson = {
“locale”: “en-US“
}; </script>
- <script>
- Fire it to the corresponding Trigger ‘English Pages’ or others
- Hit “ADD“
- Hit “SAVE”
- Repeat the process for all your languages (ONE TAG for each Language!)
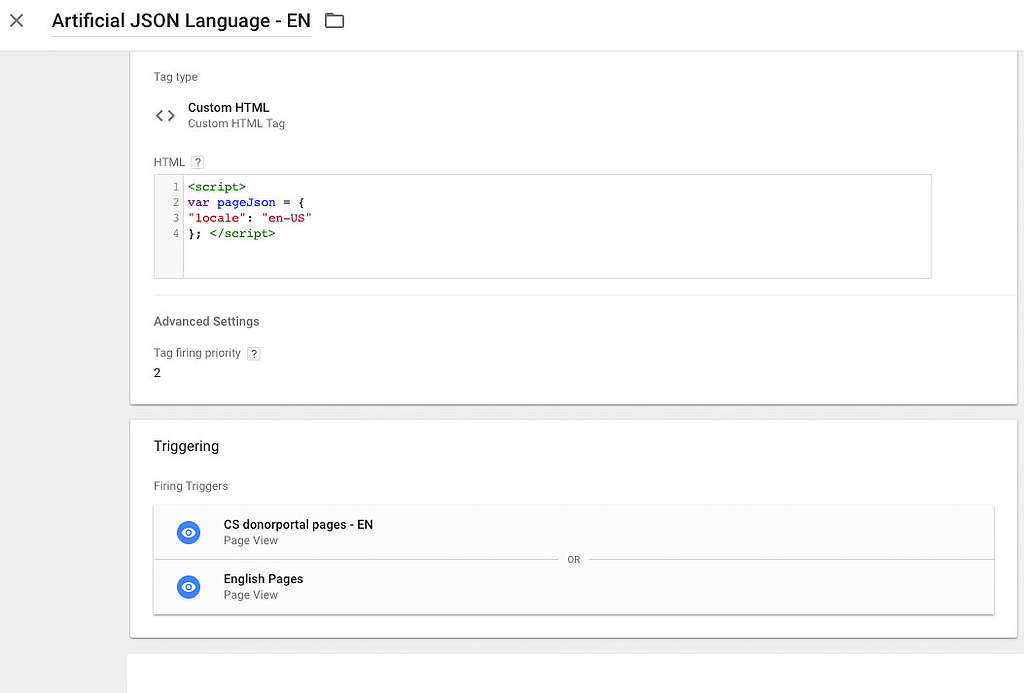
Step 2) Create a Custom HTML Tag ‘Artificial JSON Language EN’ to identify Language in Engaging Networks
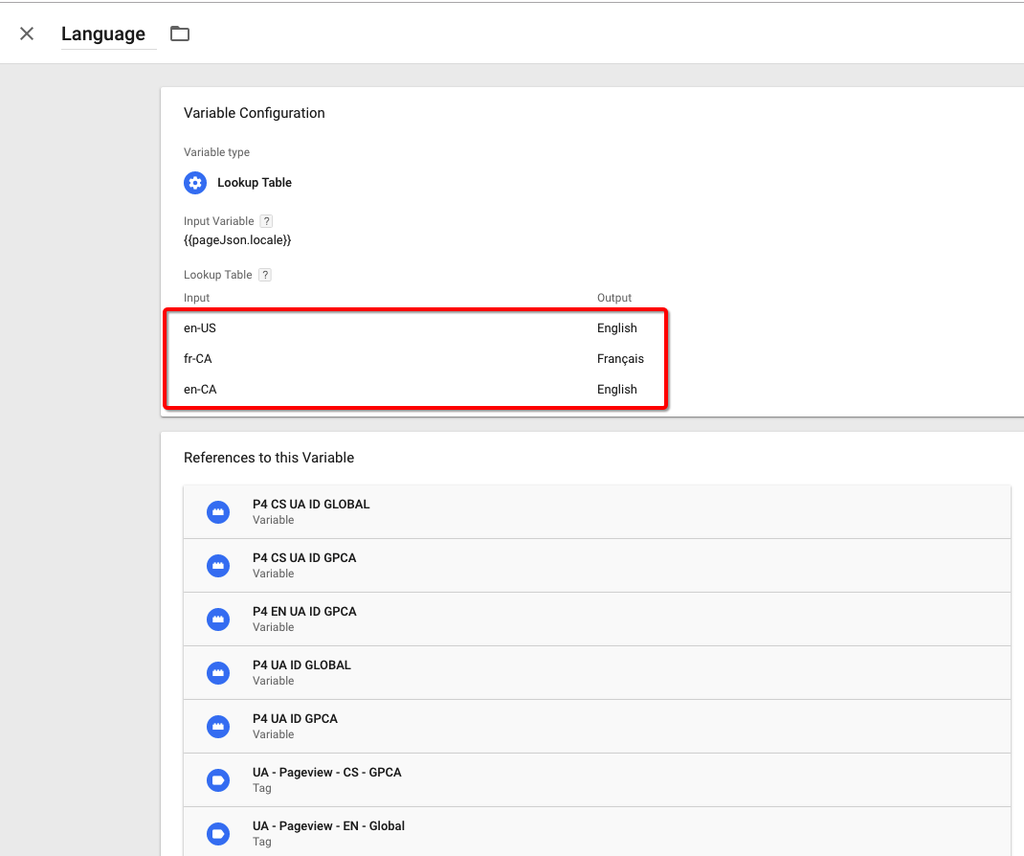
3. Create a Variable to output the same language name
- Type : lookup table
- Input variable : page.Json.locale
- INPUT >> en-US – OUTPUT >>> English (or other language your P4 site is using)
- ONE Input for each Language!
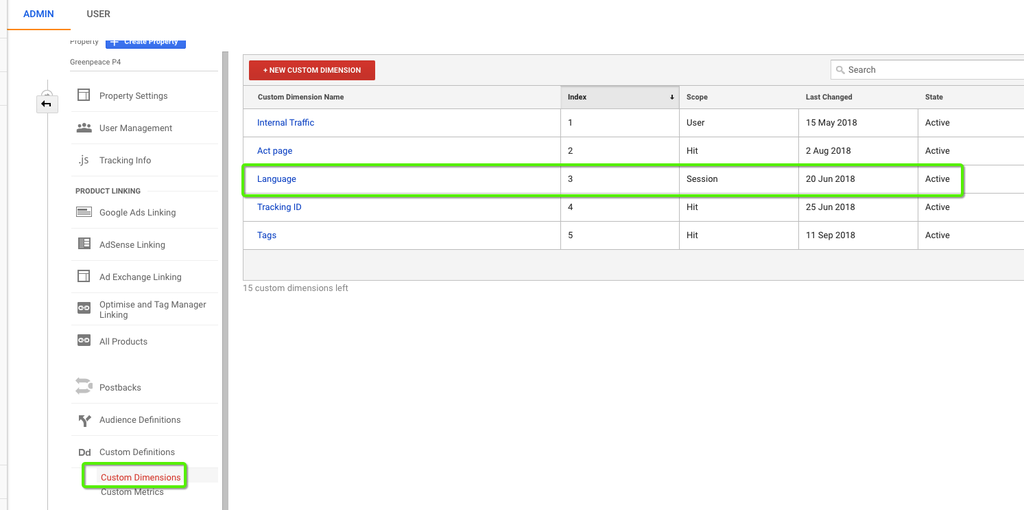
4. In GOOGLE ANALYTICS, create a Custom Dimension
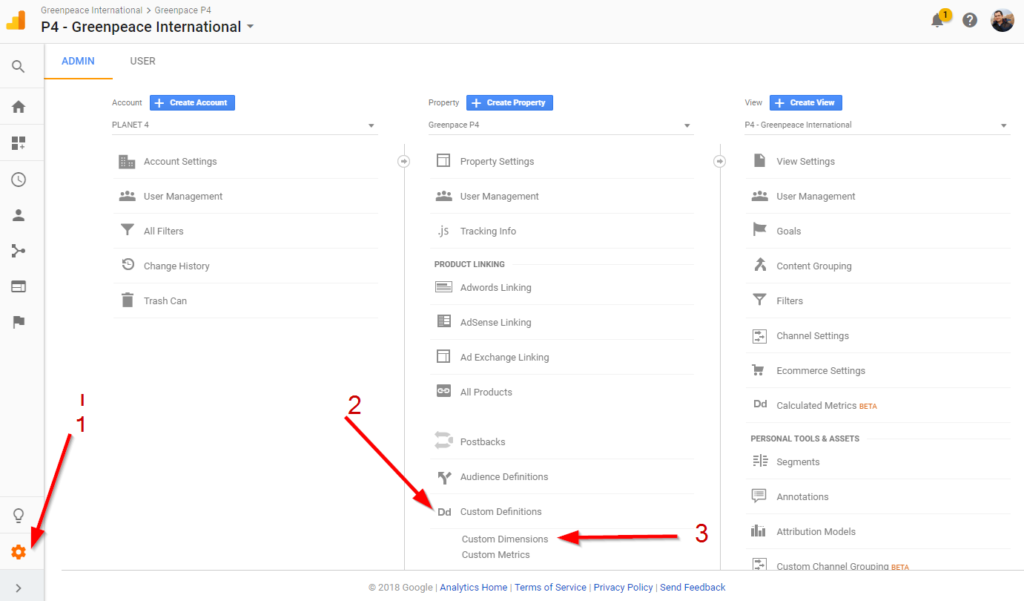
(Property Settings > Custom Definitions > Custom Dimensions)
-
- Name it ‘Language’
- Scope : session (or Hit if you want to track the language switch later on)
- Activate it
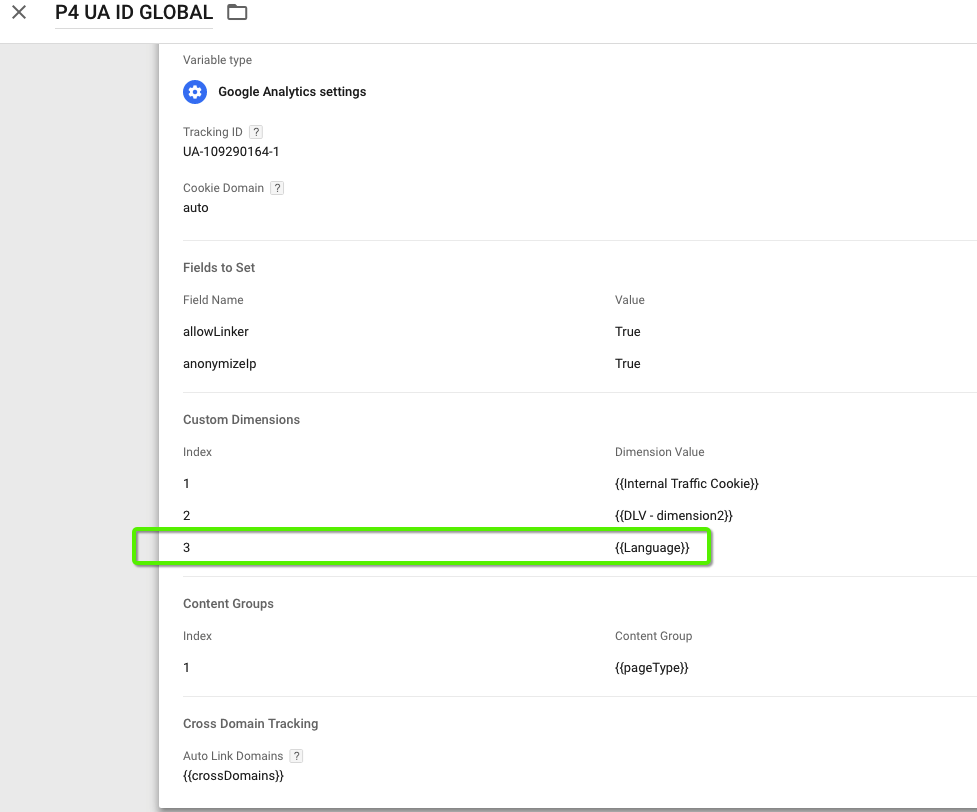
5. Back to Google Tag Manager, link your GA Custom dimension to your relevant UA (Universal Analytics = related to Google Analytics) GTM tags and variables
- index ‘3’
- dimension value ‘Language’
- HIT “Save“
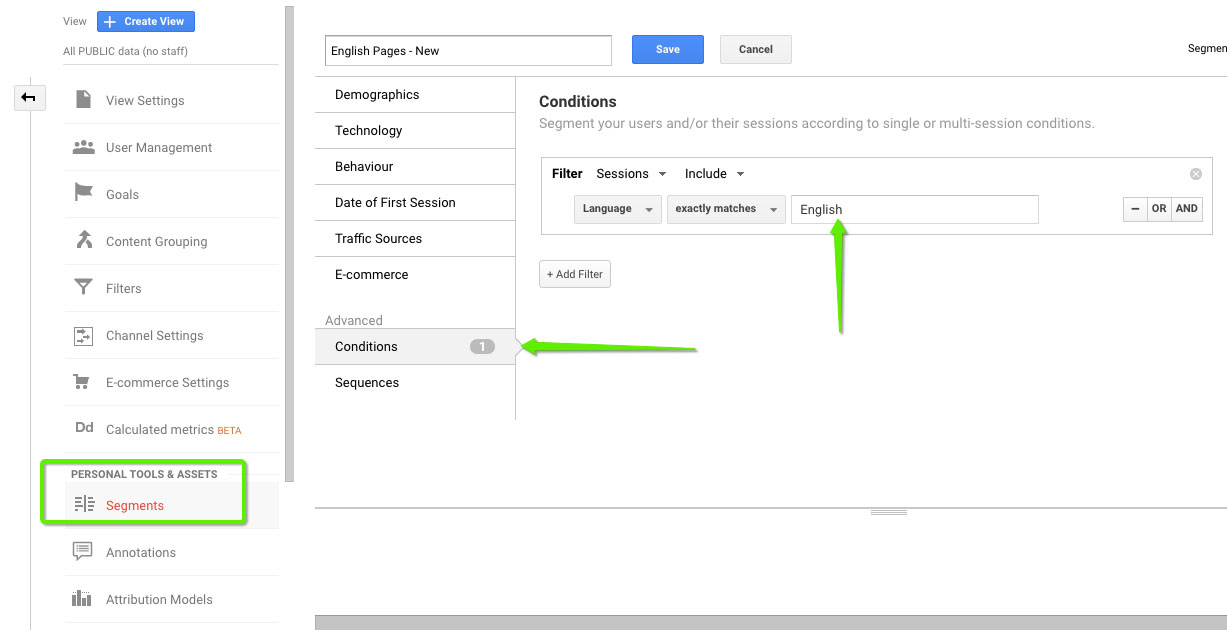
6. In GOOGLE ANALYTICS, create your language segments to simplify your analysis:
- Go to View Settings > Personal Tools & Assets > All segments > New segment> conditions
- Name your the segment ‘English Pages’
- And apply : Language /matches exactly/ English
- Repeat the process for all your languages (ONE Segment for each Language!)
7. Apply the LANGUAGE Segments in your Google Analytics view, and you will be able to tack and compare all pages by language.
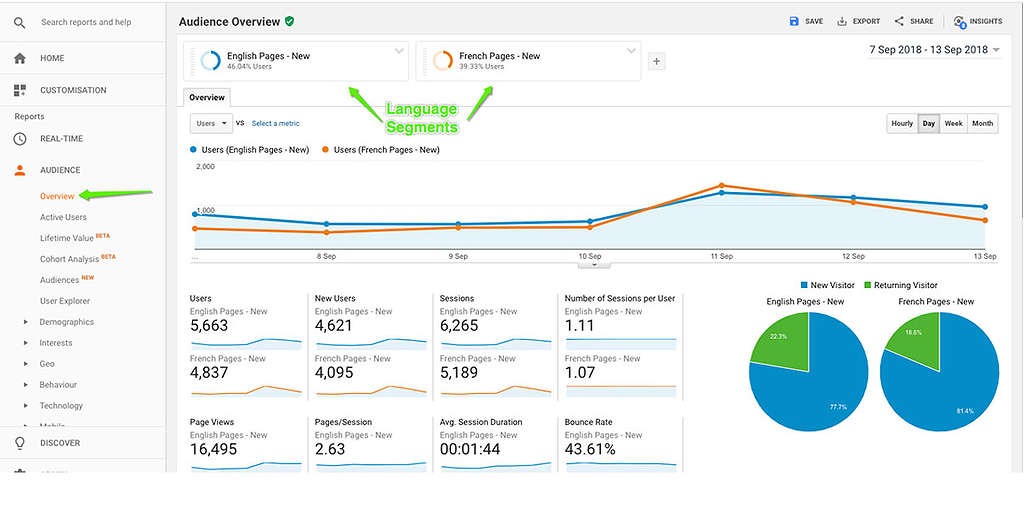
Step 7) Visualising Language segments in your Google Analytics reports
Most Popular Tags (of P4 posts / pages)
In the case below we need the variable that extracts the Post_Tag in the datalayer, to obtain a custom dimension in Google Analytics.
See the red bold variable in the code below? That’s what we are “asking” GTM to extract:
//Array for all pages
window.dataLayer = window.dataLayer || [];
dataLayer.push({
  'pageType' : '[variable]', //What type of page is loaded
  'signedIn' : '[variable]', //Boolean - Is user signed in?
  'visitorType' : '[variable],' //Type of User
  'userID' : '[variable]' //Assigned ID of signed in users
  'Post_Tags' : '[variable]' //Assigned Tag/s to the post
});
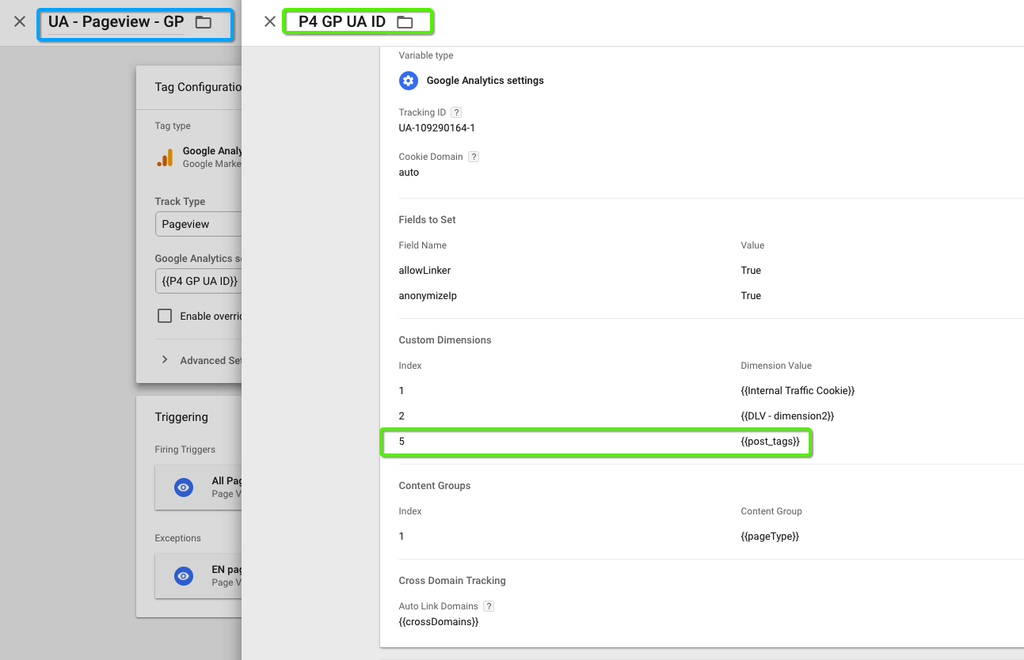
1. In Tag Manager > Variables > User-Defined variables we select “Add New” and give the variable the same name as the Data Layer one (in our case “post_tags”)
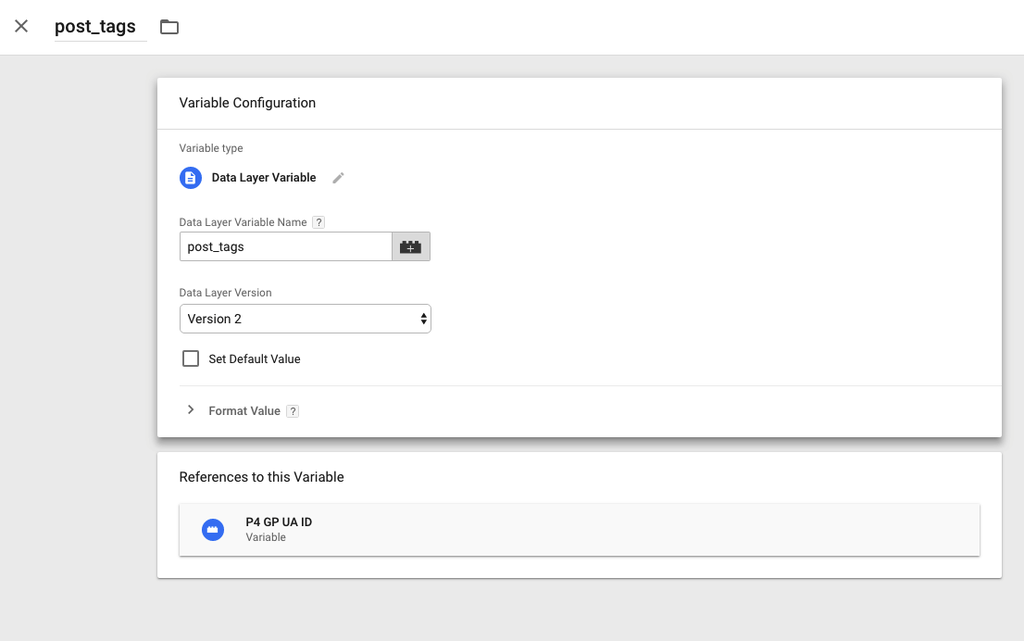
Creating a variable in Tag Manager to identify and extract Post_Type
2. We add the Custom Dimension in Google Analytics view to consolidate the information (in our case the ‘Post tags’ information)
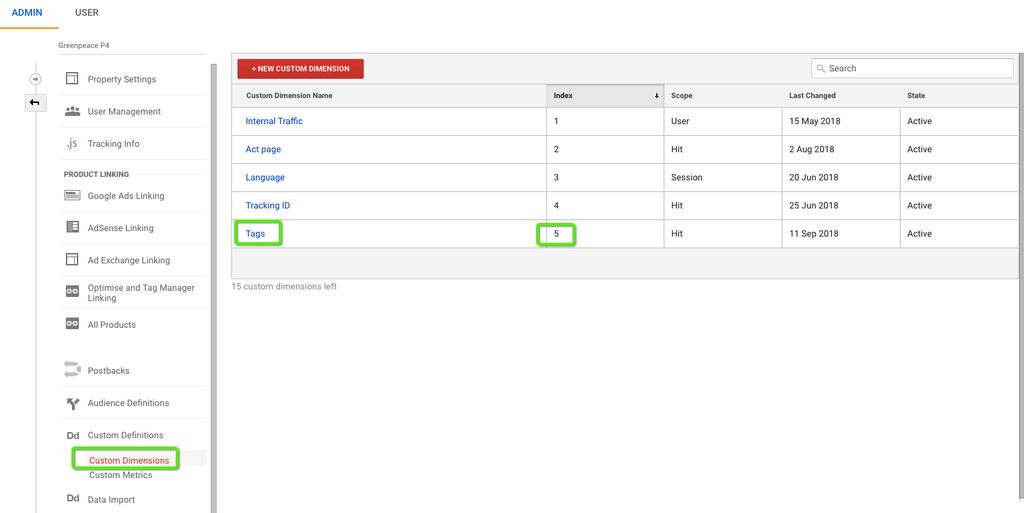
New custom dimension in Google Analytics (Property Settings > Custom Definitions > Custom Dimensions)
3. We add the Variable to the Tag UA (Universal Analytics) – Page view – GP to establish the connection GTM > GA
3rd party Tools and GTM
Facebook pixel
Facebook pixel fires events to track site visitors who are logged in FB. This data allows you to retarget those users with Facebook ads in the future, as well as tracking conversion rate for Facebook ads. Learn more on FB pixel.
Installing FB pixel via Tag Manager is easy:
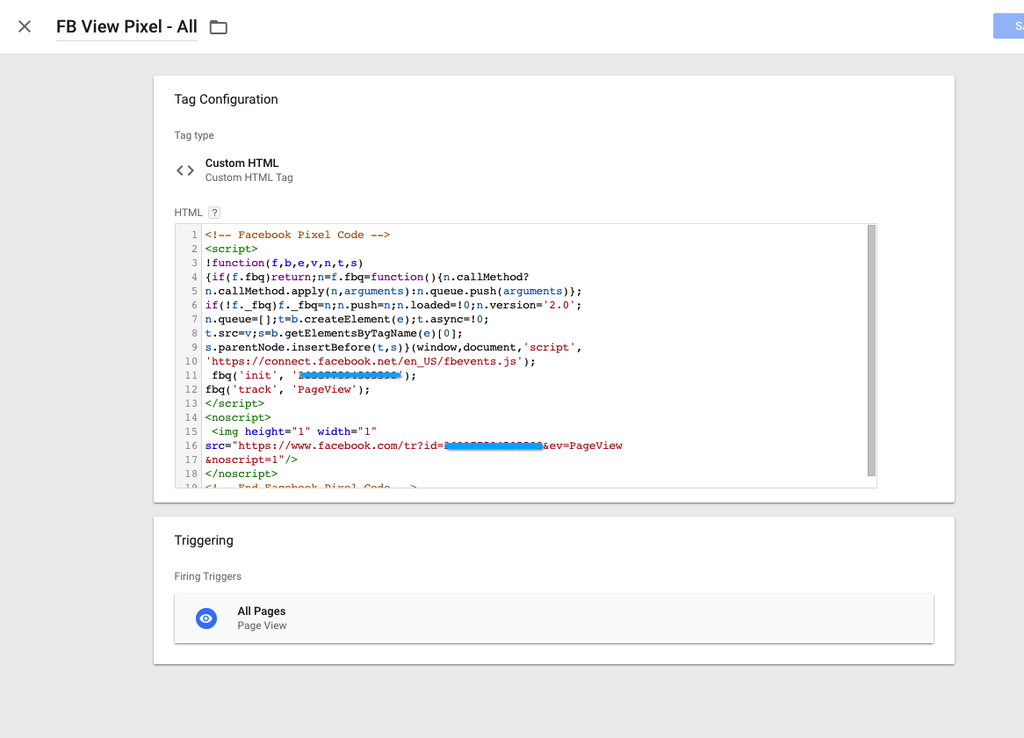
1. Create a Custom HTML Tag and paste the code below (or follow these instructions):
<<!-- Facebook Pixel Code -->
<script>
!function(f,b,e,v,n,t,s)
{if(f.fbq)return;n=f.fbq=function(){n.callMethod?
n.callMethod.apply(n,arguments):n.queue.push(arguments)};
if(!f._fbq)f._fbq=n;n.push=n;n.loaded=!0;n.version='2.0';
n.queue=[];t=b.createElement(e);t.async=!0;
t.src=v;s=b.getElementsByTagName(e)[0];
s.parentNode.insertBefore(t,s)}(window,document,'script',
'https://connect.facebook.net/en_US/fbevents.js');
fbq('init', 'YOUR-FB-ID');
fbq('track', 'PageView');
</script>
<noscript>
<img height="1" width="1"
src="https://www.facebook.com/tr?id=YOUR-FB-ID=PageView
&noscript=1"/>
</noscript>
<!-- End Facebook Pixel Code -->
2. Determine the trigger/s:
3. Verify if your pixel is working: https://www.facebook.com/business/m/pixel-set-up-step-4
Usabilla
This guide will help you install the Usabilla tag on your Planet 4 pages (for usage, see > Set up and manage your Usabilla account)
1. Login in Usabilla to get your button’s installation code:
(Setup > Choose your button > Options > Installation Instructions)
(!) Repeat this action for both Desktop and Mobile button
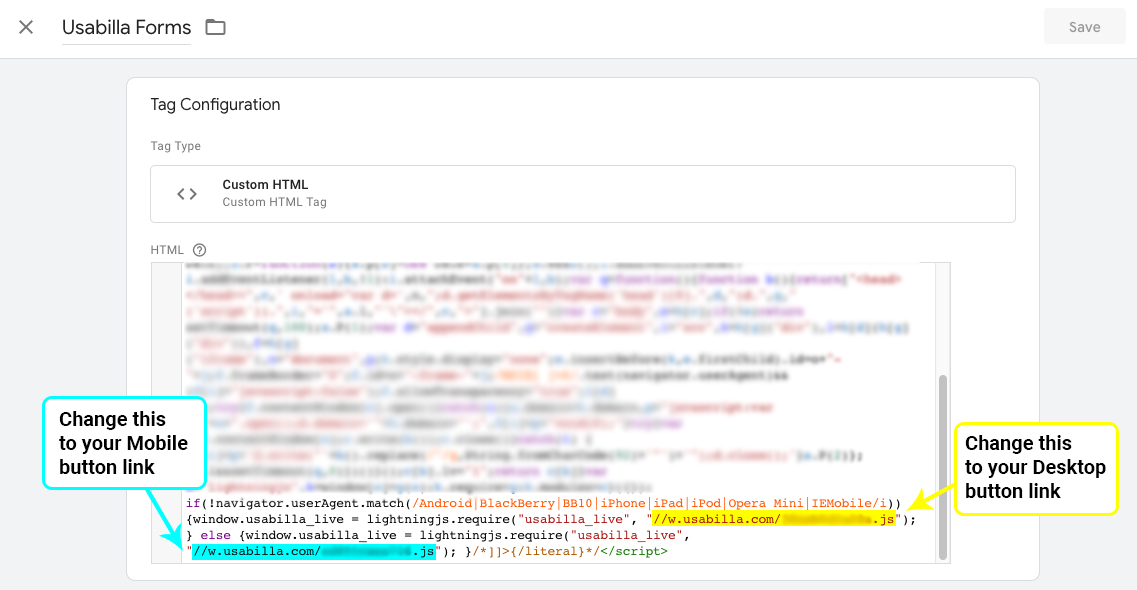
2. Edit Usabilla tag in Google Tag Manager
Usabilla is a Custom HTML tag. You will need to edit the last lines of the code and insert the link for Desktop and Mobile buttons:
3. Don’t forget to check the triggers.
With this setup, you will fire the Usabilla tag only on Planet 4 pages – but you change this and choose where do you want to use the tool.
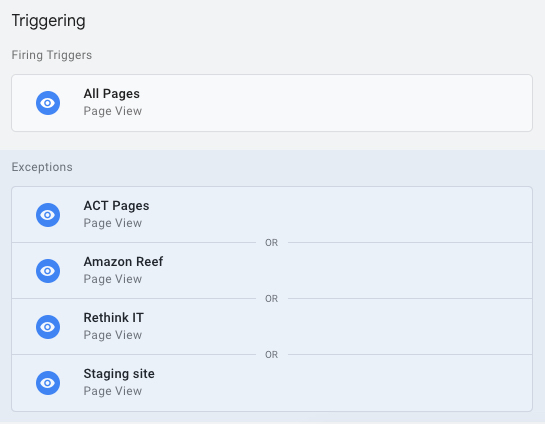
4. Preview your container! Check if Usabilla feedback button is appearing in your website before publishing it
GTM workflows
Test (Preview) your GTM Container
Since GTM can de facto change a lot of things in your P4 website 9at least form the front-end perspective) it is highly recommended to test your GTM container in Preview mode. It’s easy, you only have to select “preview” on top right.

Previewing the container in GTM – the orange banner shows you that you can test without publishing the container
By loading your P4 website in the same browser where you are in preview mode, you will see which tags are being fired at what point, to test triggers and variables.

Debugging is easy in preview mode, you can quickly check which tags are being fired and which are not
Publish (Submit) your GTM Container
All good? Ready to rock with all your variables, tags and triggers? Great, just hit “Publish” and sing like no one is listening…
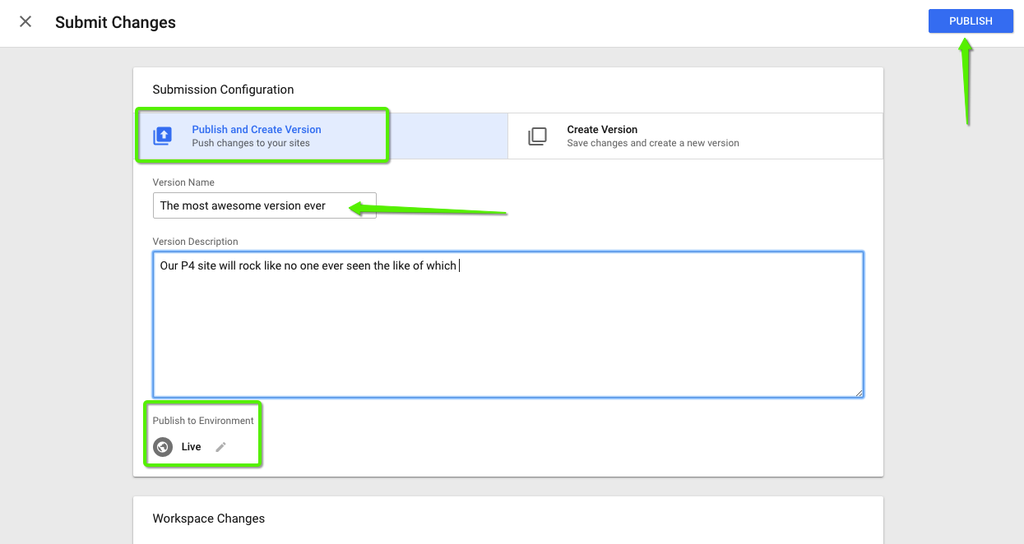
Publishing a version of the GTM Container, see where you can add details of what this version contains or select the environments?
LAST TRIPLE CHECK! you should have already done it, but did you remember to connect your GTM container to your P4 site in Settings? Yes, cool, just checking…
Links & Resources
- Documentation
- FULL P4 GTM – GA implementation guide (this page in a GDoc)
- GTM-N7SG829 full setup (Tags, Triggers / rules and variables) (Google Sheet list)
- Greenpeace Engaging Networks IDs for each domain and NRO – FULL LIST (Accessible only to staff – privacy reasons)
- MEDIUM
- Videos

