If Google Tag Manager (GTM) is where Tags, Triggers and DataLayer are set up, Google Analytics (GA) is where data are consolidated, filtered and grouped for deep insight analysis.
|
Why Google Analytics (GA)?
Google Analytics (GA) is where data is collected and stored, based on the set up in GTM, filtered according to specific criteria for each View and available for deep insight analysis.
GA tracks users’ behaviour and provides deep insights and great option for goals setup, filtering and grouping. Google Analytics is where the deep Insights analysis must take place.

The P4 global GA property (UA-109290164-1)
If correctly setup in Tag Manager, all P4 websites should be sending data to the Google Analytics property (UA-109290164-1), which enables us to track everything coherently across P4 sites.
Individual Google Analytics views allow the collection of subsets of data, which are sent to the property overall and individual views within that property. By assigning filters to views, we can determine which data will be sent to each view, and allows us to alter the data as it is processed.
| KEY INFO >> All view filters have permanent effect on the data collected, and we can only change how data is collected moving forward, not on historical data. |
In the standard Google 360 suite, the maximum amount of views within the same property is 25. As of today, the UA-109290164 property contains these views:
- ‘P4 – All Planet 4 sites’ – a view that collects data from all P4 sites globally
- ‘P4 – Greenpeace Brazil’ – The local view for the Brazilian P4
- ‘P4 – Greenpeace Canada’ – The local view for the Canadian P4
- ‘P4 – Greenpeace Greece’ – The local view for the Greek P4
- ‘P4 – Greenpeace India’ – The local view for the Indian P4
- ‘P4 – Greenpeace International’ – A view that only contains data from the .org/international website
- ‘P4 – Greenpeace Netherlands’ – The local view for the Dutch version of P4
- ‘P4 – Greenpeace New Zealand’ – The local view for the Kiwi version of P4
- All subsequent views should follow this naming convention
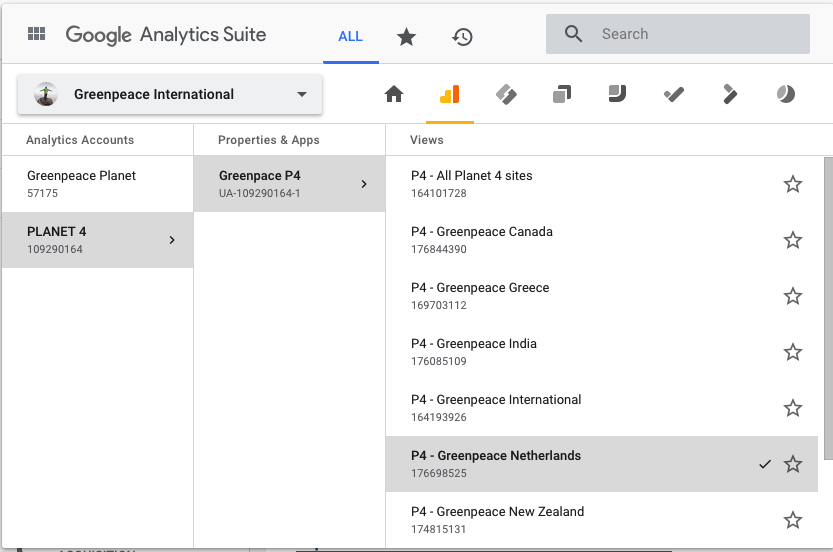
The views in the UA-109290164-1 Planet 4 Google Analytics global property
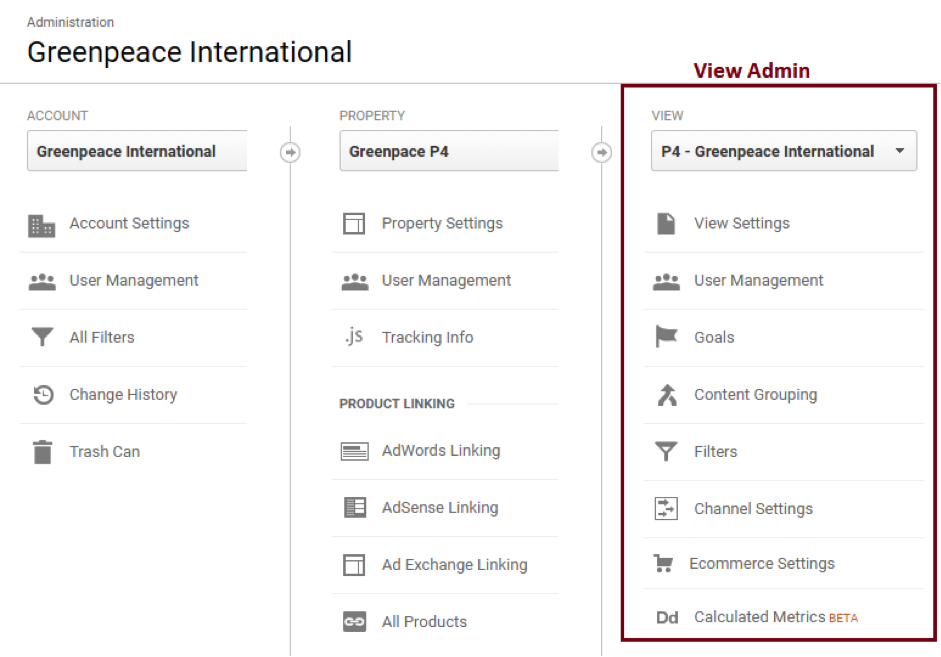
Access your VIEW Admin section
There are three admin sections in the UA-109290164 account of Google Analytics, each operating at different levels (ACCOUNT | PROPERTY | VIEW).
This page covers the items to be configured in the View Admin for newly created views
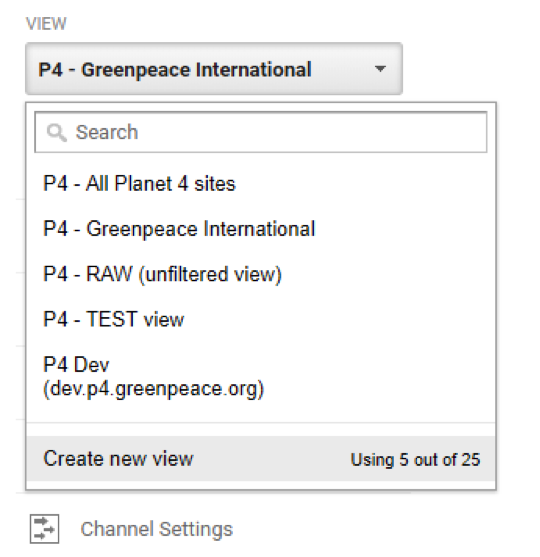
Creation of a new View
In the UA-109290164 dropdown where views are selected, chose the option to create a new view:
On the following page please give your View a name according to the P4 naming convention, and choose the timezone in which you are located.
|
That’s it, you view is created, and you are ready to make a few configurations.
View settings
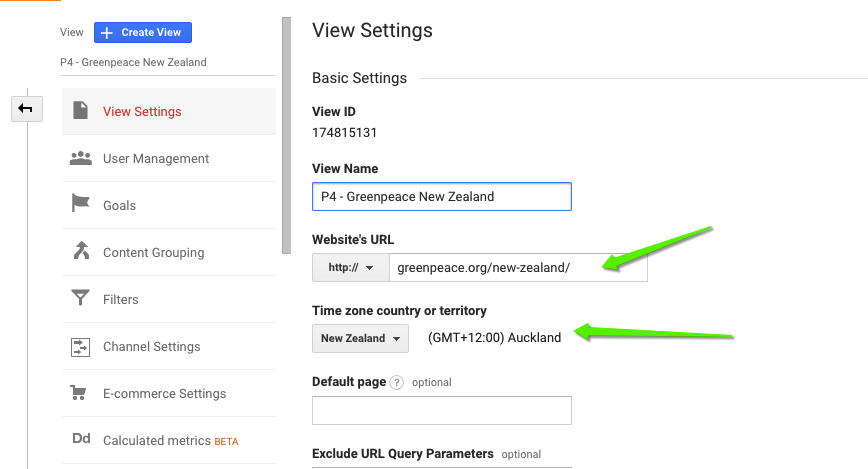
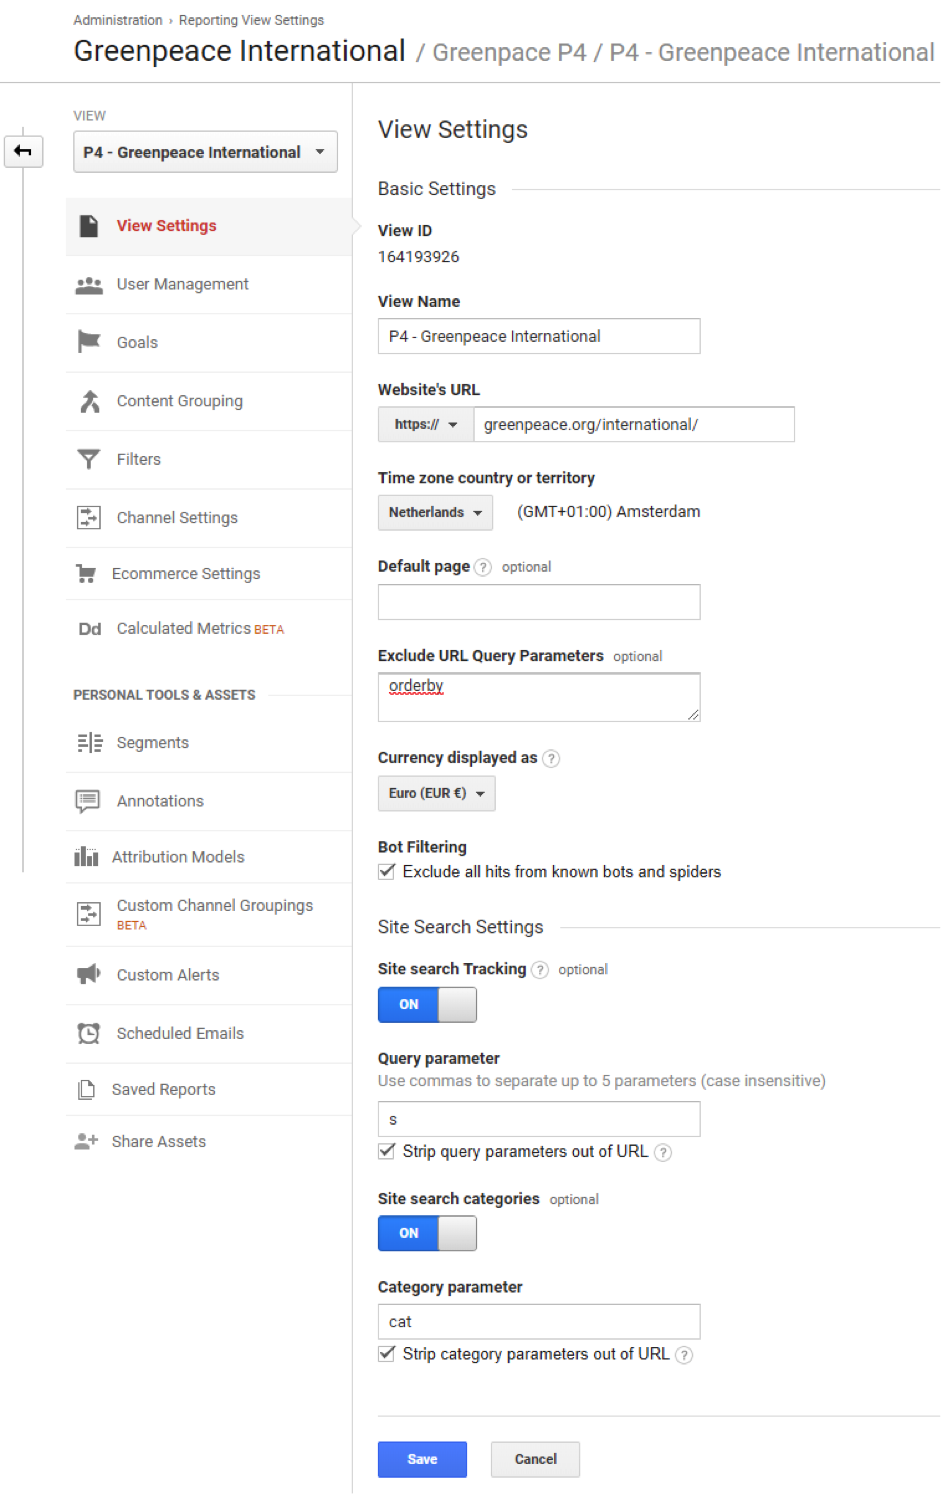
After all filters have been added, we are ready to adjust the view settings the below example is taken from the View P4 – Greenpeace International. Please use the settings shown below, with the only difference that Website’s URL should be updated to match the URL for your site and use your local timezone, as selected in previous steps:
Goals
At the very least, you should create 4 goals in your GA view:
- Petition singnup
- Action Alert
- Social share
- Scrolled depth (aka “scrolled to bottom”)
- File Download
In Admin > View select Goals
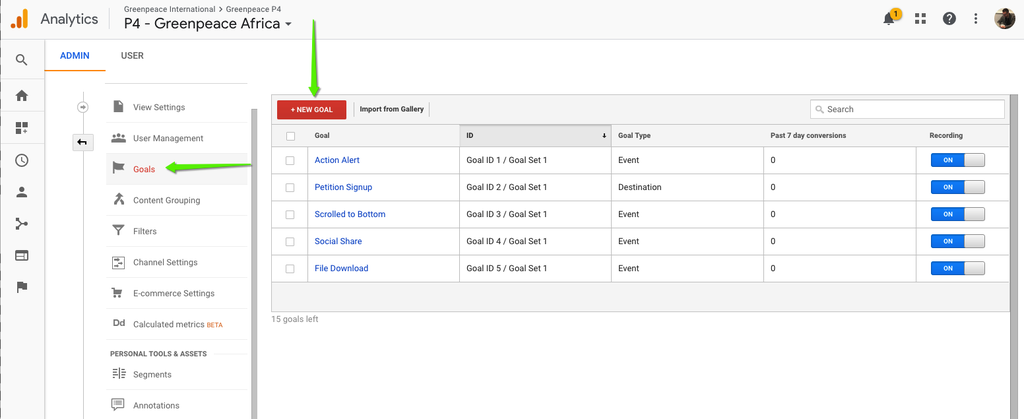
Setting up goals in Google Analytics. Settings > Goals
Petition Signup
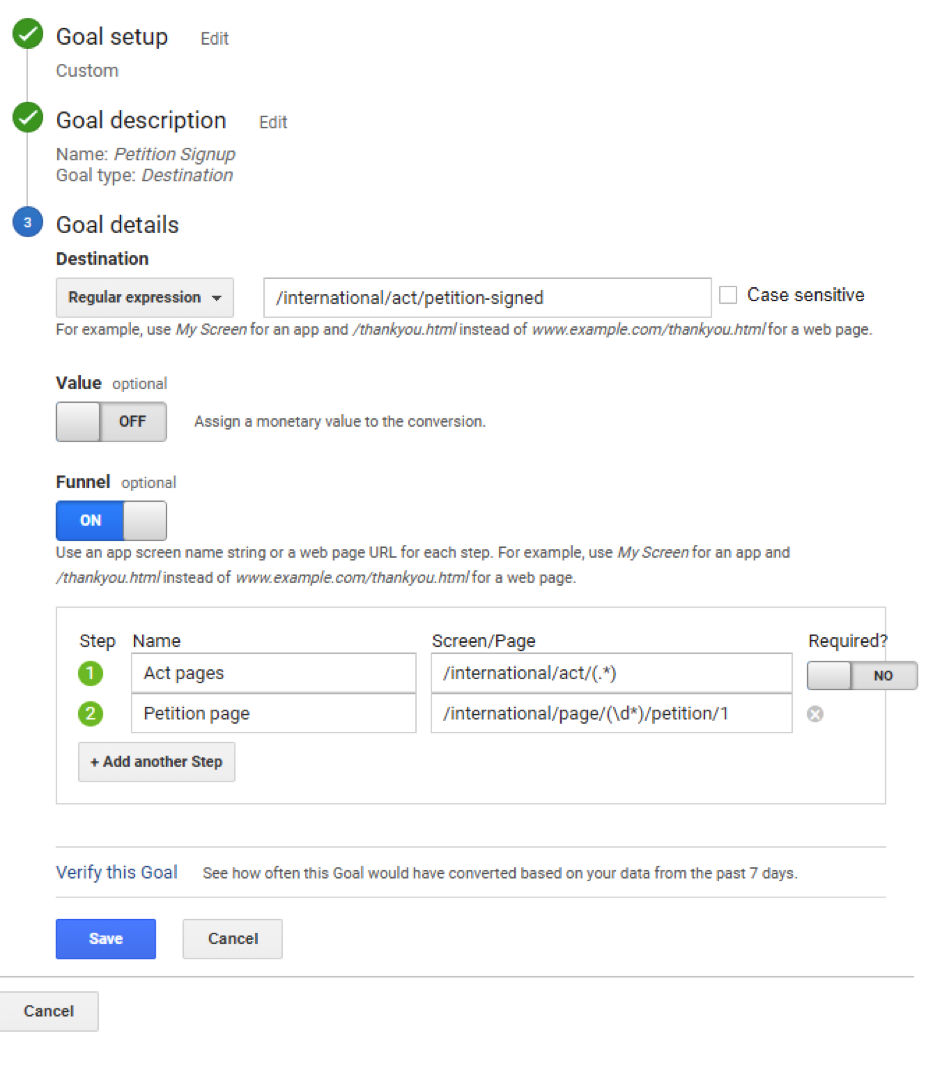
For Initial rollout there is one active Goal Funnel in Google Analytics that needs to be created in all new Views. This Goal counts Petition Signups.
In View Admin go to the Goals section and create a new Goal with the following setup:
|
| Copy paste-able of the above:
Destination – Regular Expression: /country/act/petition-signed Funnel step 1: /country/act/(.*) Funnel step 2: /country/page/(\d*)/petition/1 |
Action Alert
Using the P4 GTM container, the setup will send events to the Google Analytics view you connected whenever someone will hit “subscribe” in your Block: Happy Point. If you successfully set it up in GTM, here’s how to configure your GA Goal:
- Goal Set-up > Custom
- Goal Description > Action Alert / Type > Event
- Goal Details > Category – Equal to – Action Alert
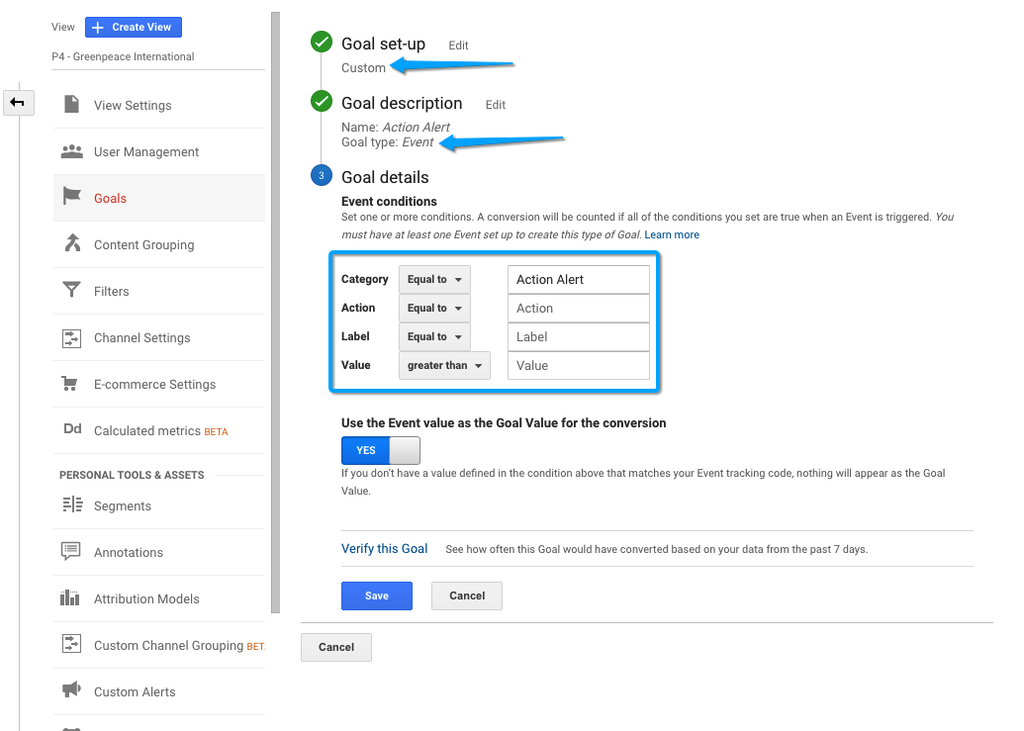
The GTM Configuration must be associated to a GA Custom Goal – Event – Action Alert
Social Share
Using the P4 GTM container, the Social Sharing buttons will send generic events to the Google Analytics view you connected whenever someone will hit any of the “Share” buttons.

Sharing buttons in Planet 4 – international site
To complete the setup and visualize Social Sharing conversion you have to create a “Social Share” goal in your Google Analytics view
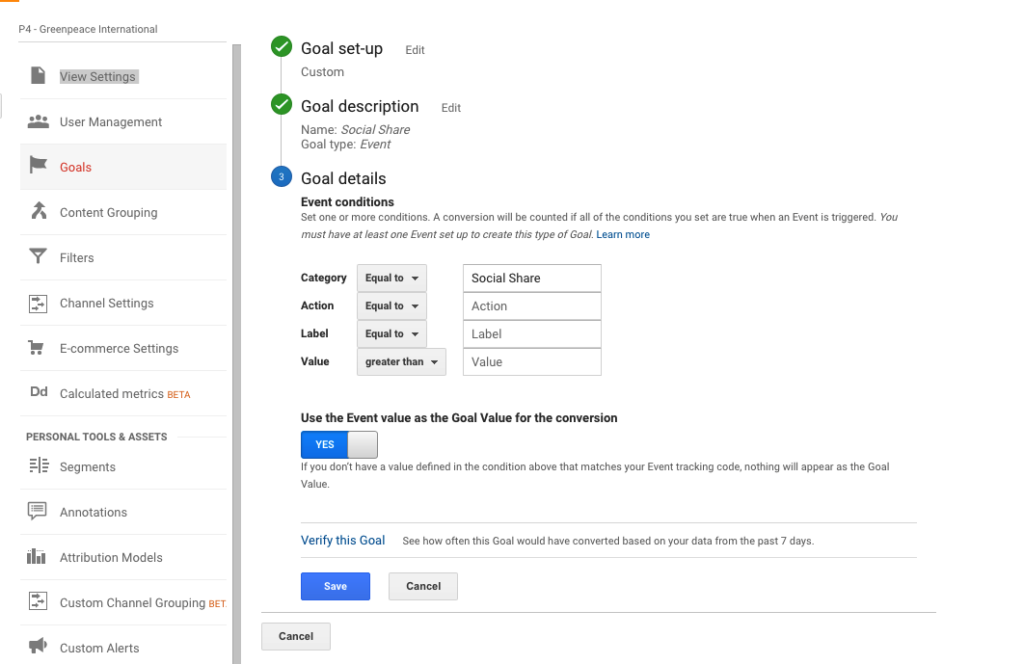
Setting up the Social Sharing goal in Google Analytics view. Custom Goal Set-up and a few labels
Scroll depth
Using the P4 GTM container, there should already be a “scroll depth” tag already set up, which will fire events to your Google Analytics view anytime people scroll down your P4 pages and consume content.
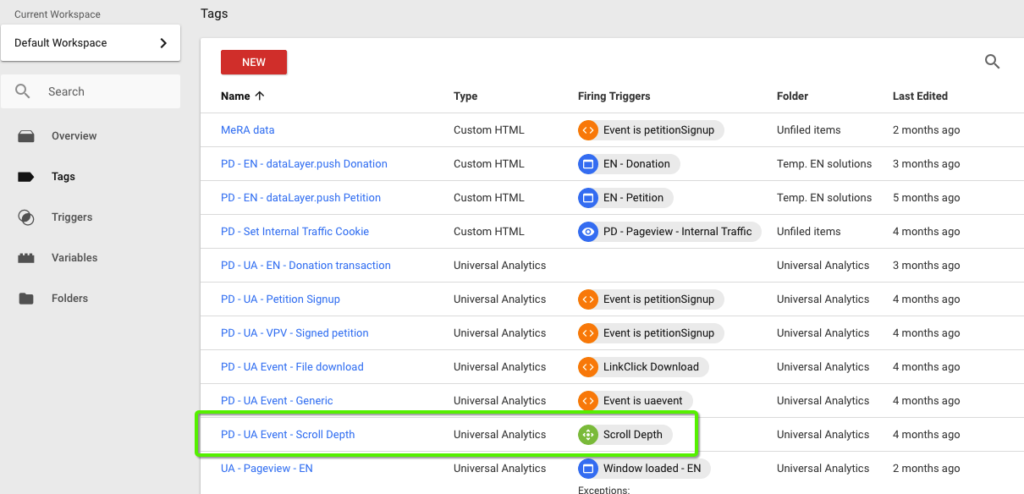
Scroll Depth Tag in the Google Tag Manager (GTM) Container
To complete the set-up in GA, you have to set up a custom goal, setting a percentage as the minimum label (for GPI we did 75%)
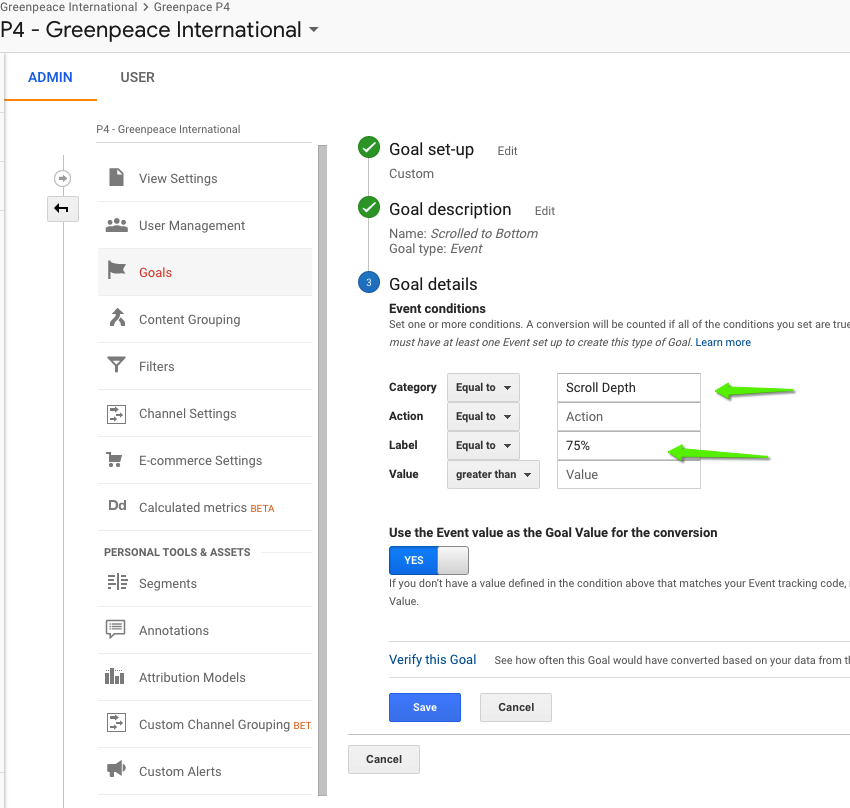
Setting up the “Scrolled to bottom” goal in GA
File Download
Using the P4 GTM container, the setup will send events to the Google Analytics view you connected whenever someone will download a PDF. If you successfully set it up in GTM, here’s how to configure your GA Goal:
- Goal Set-up > Custom
- Goal Description > Action Alert / Type > Event
- Goal Details > Category – Equal to – File Download
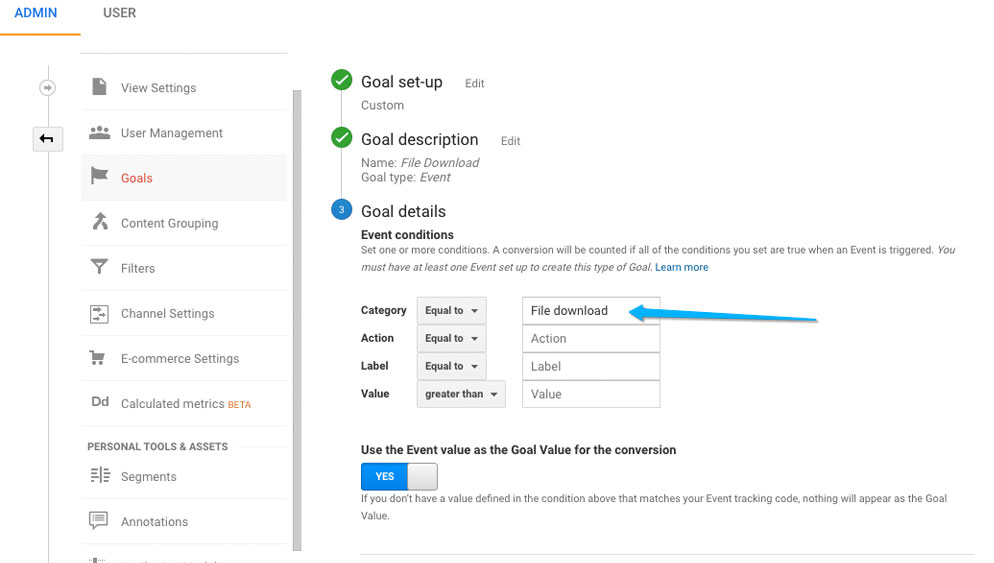
Setting up a File Download Goal in GA Settings – Goals
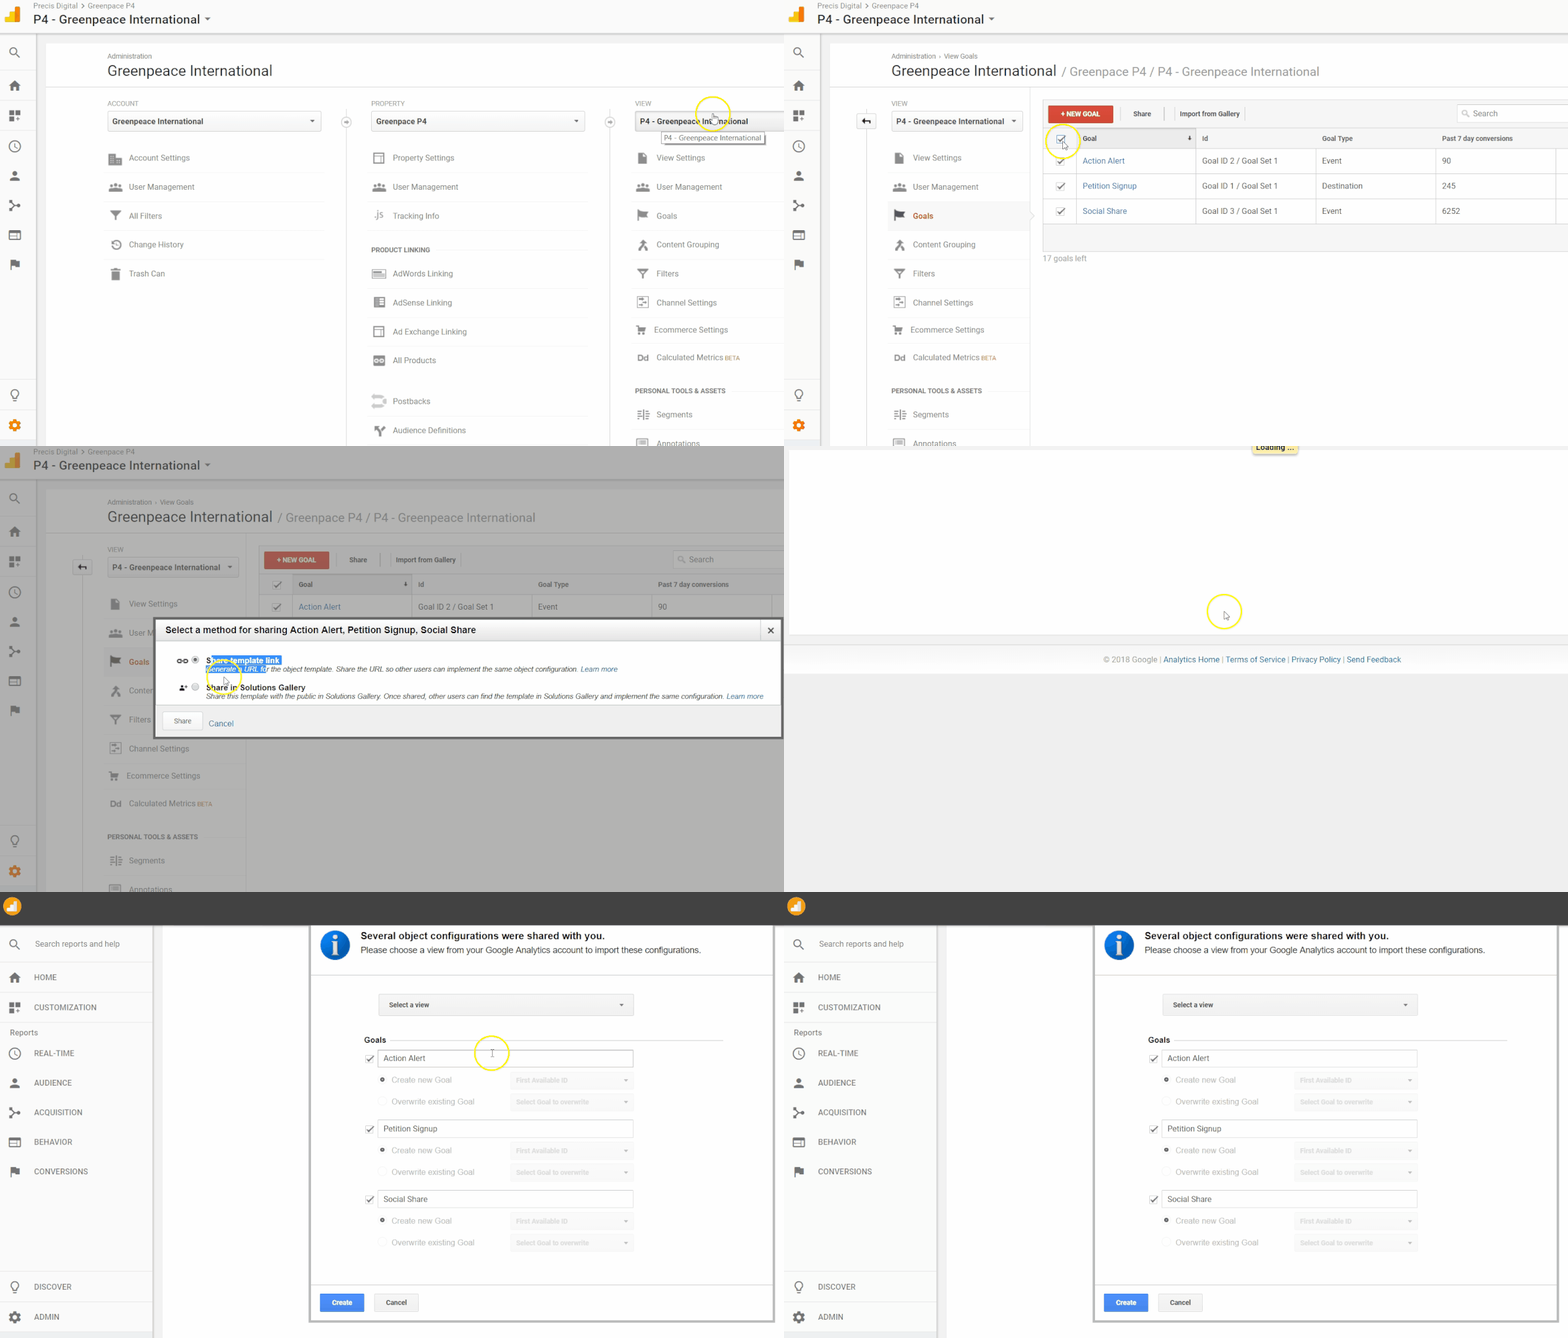
Copy goals from one view to another
The easiest way to create Goals fast, is to copy them from one view, to another. You can do it for individual Goals, or all at once by copying the Share URL into your browser like this:
Content Grouping
Content Grouping allows you to group content into a logical structure that reflects how you think about your site, and then view and compare aggregated metrics by group name in addition to being able to drill down to the individual URL, page title, or screen name. For example, you can see the aggregated number of pageviews for all pages in a group like Story pages, and then drill in to see each URL or page title.
When you setup your GA View for your country/region, you will need to define these groups in the way that you wish. We have a best practice recommendation that we have implemented for the International website. You are welcome (and strongly recommended) to use these grouping definitions to unlock very powerful reporting. You can see another option using GTM – explained as second example.
Option #1 – Google Analytics
Below an example of how content grouping is set up, by using Rule definitions. Be aware that only 5 content groups are available in a Google Analytics View.
To enable this, all Views must have the Content Grouping created. Go to Content Grouping the the View Admin:
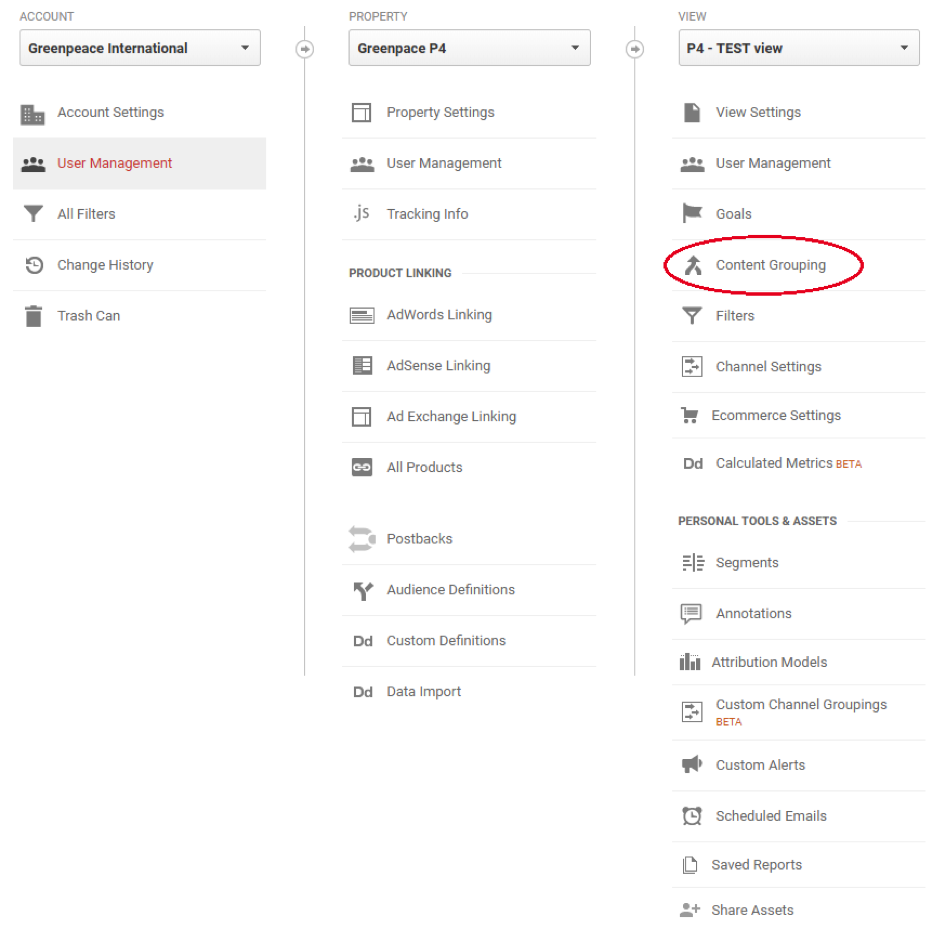
Create a new Content Grouping definition:

Give your Content Group a name “General” and scroll down to the bottom option “GROUP USING RULE DEFINITIONS”.

Click “Create a rule set” for each group that you would like to create.
e.g. Here are the rulesets for the International site – regex code /international(/$|/\?.*|/\#.*)
You can copy and adjust them for your site setup:


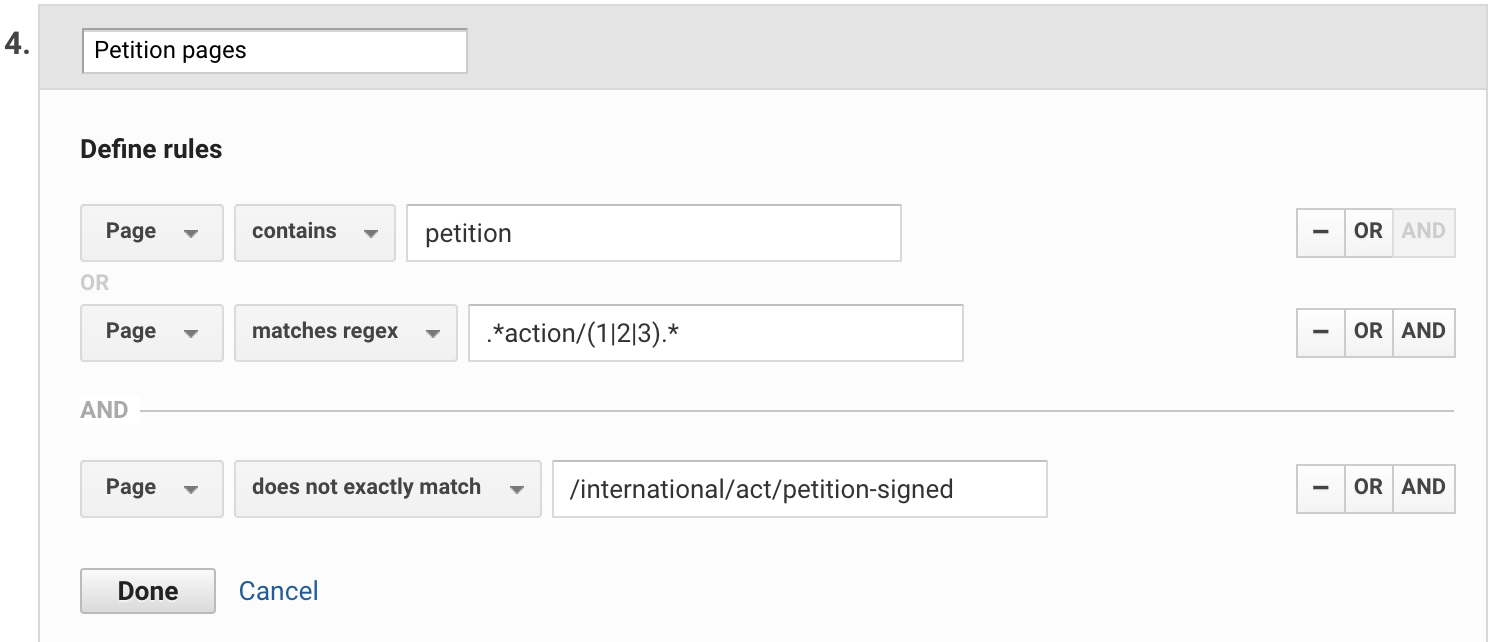

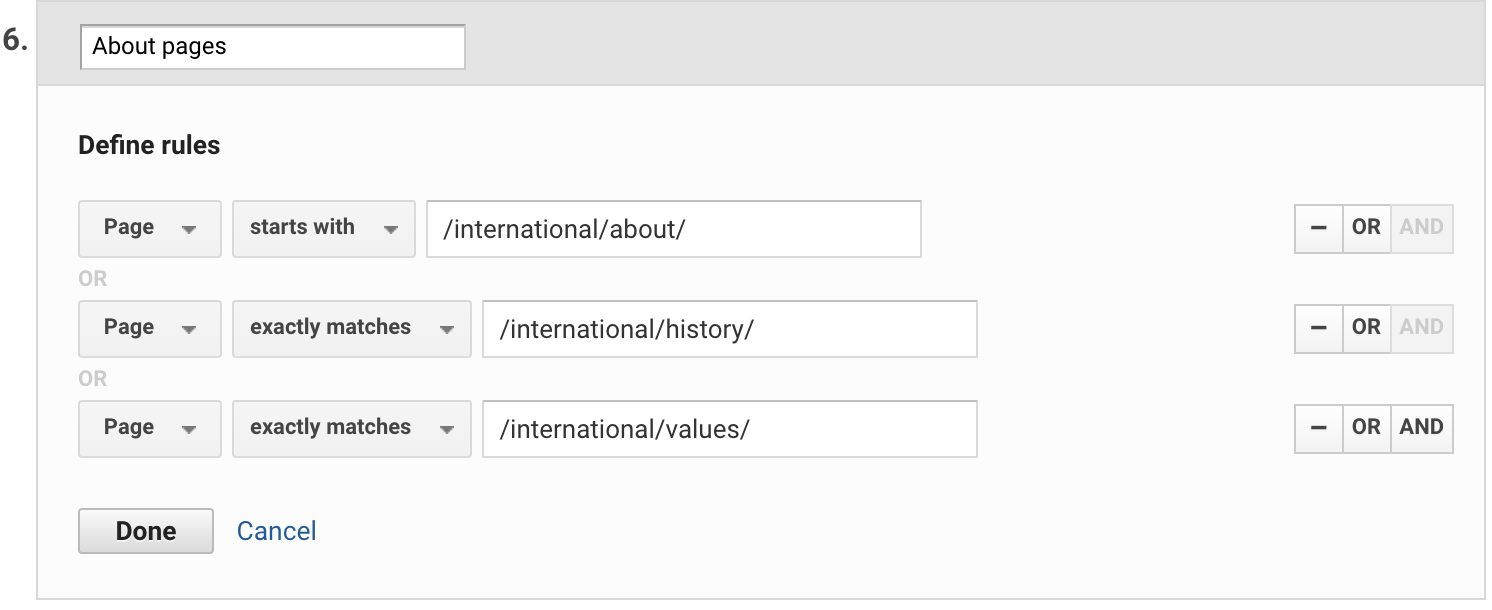


Once you have set the rules for each group, the data will start to collect from the point that you saved the group. Note: You will need to wait for about a day to start seeing data in the reports.
There are many benefits for using Content Grouping. A report such as the Navigation Summary report for the All Pages report is a great way to understand how people navigate the site.
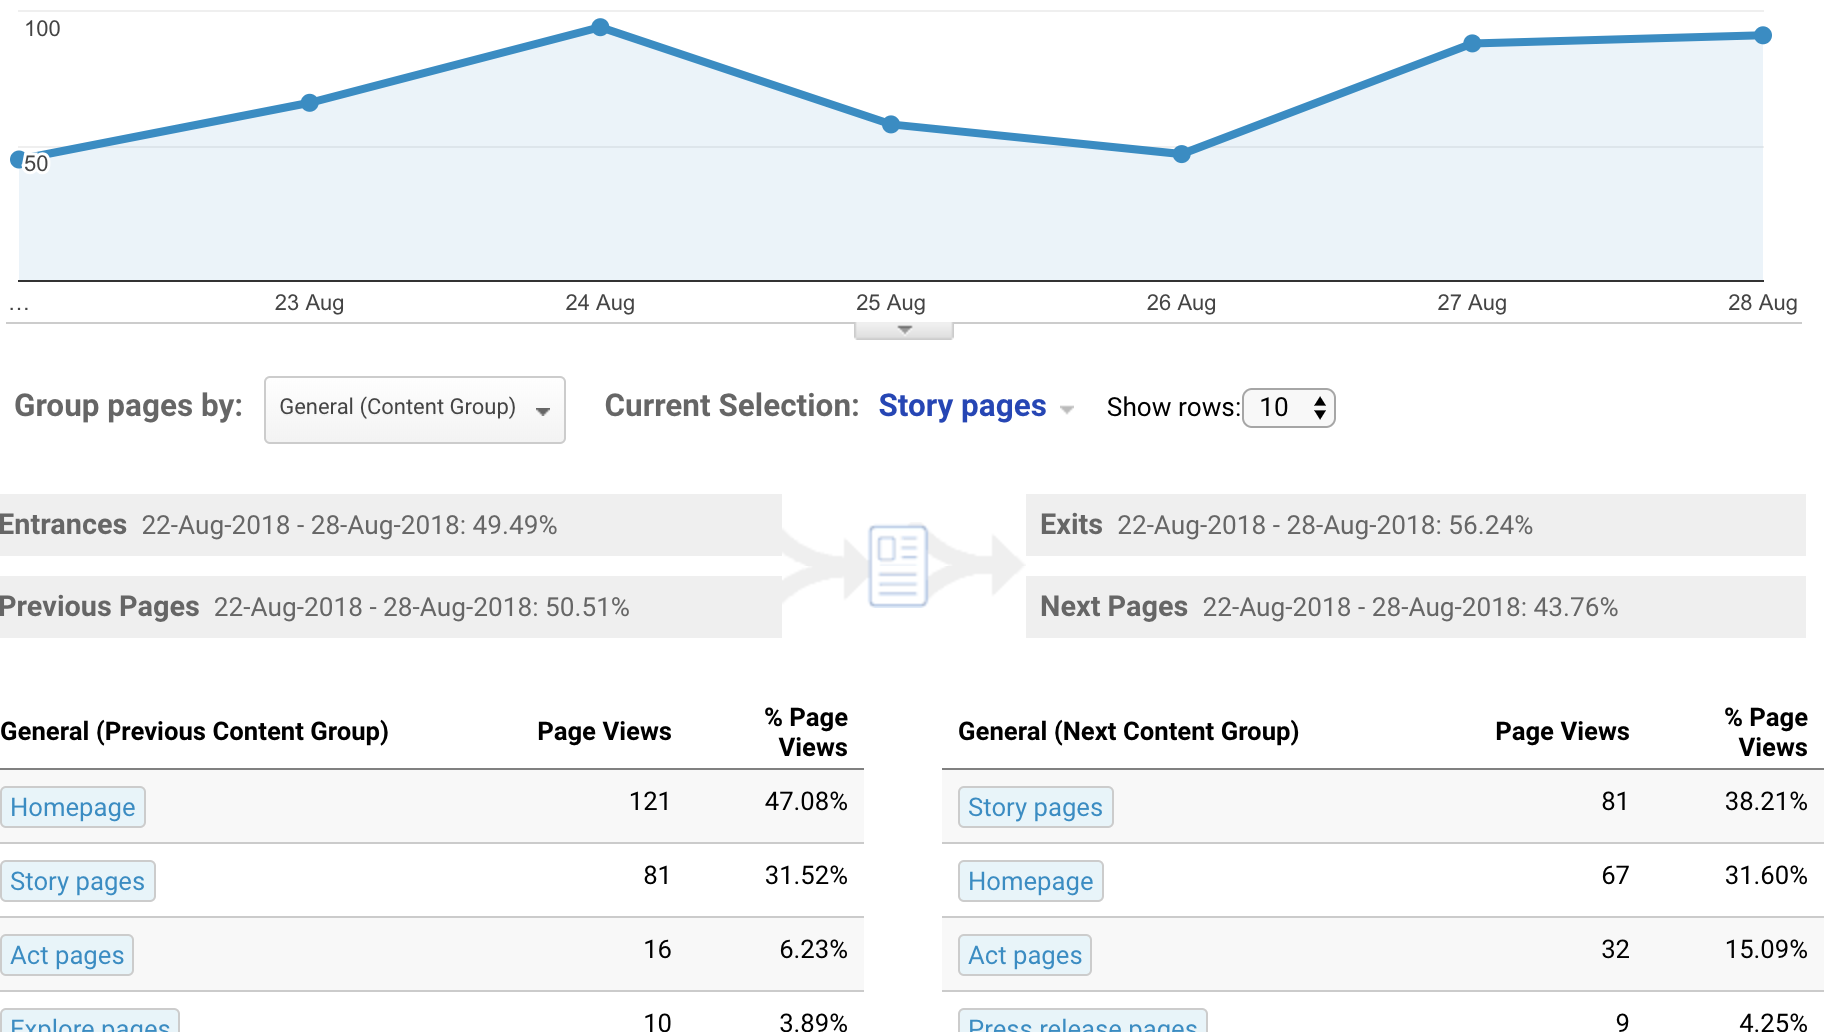
Most people come from the Homepage to the stories and usually return to the homepage after viewing Stories. A lot of people tend to go to Act pages after viewing stories (excellent results!). Idea: Maybe we can try to optimise Stories to increase the amount of people going to Act pages instead of the Homepage?
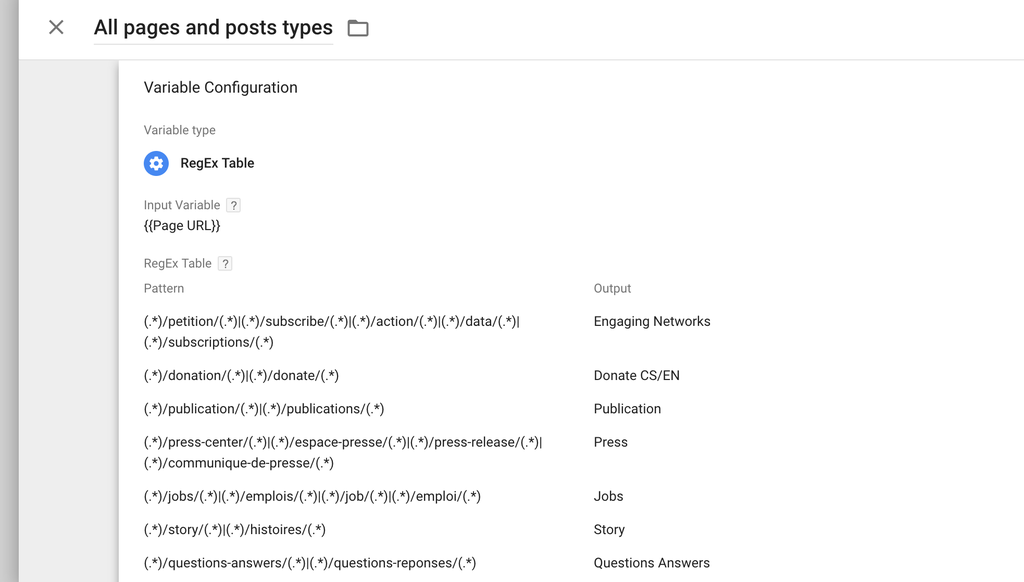
Option #2 – Tag Manager
If you prefer using Google Tag manager, you can set up a variable to get to the same results.
Filters
All new views must be configured with filters, to make sure only the needed data is collected in each view. Most of these filters are already available in the UA-109290164 Google Analytics Account and should be added as soon as the View is created.
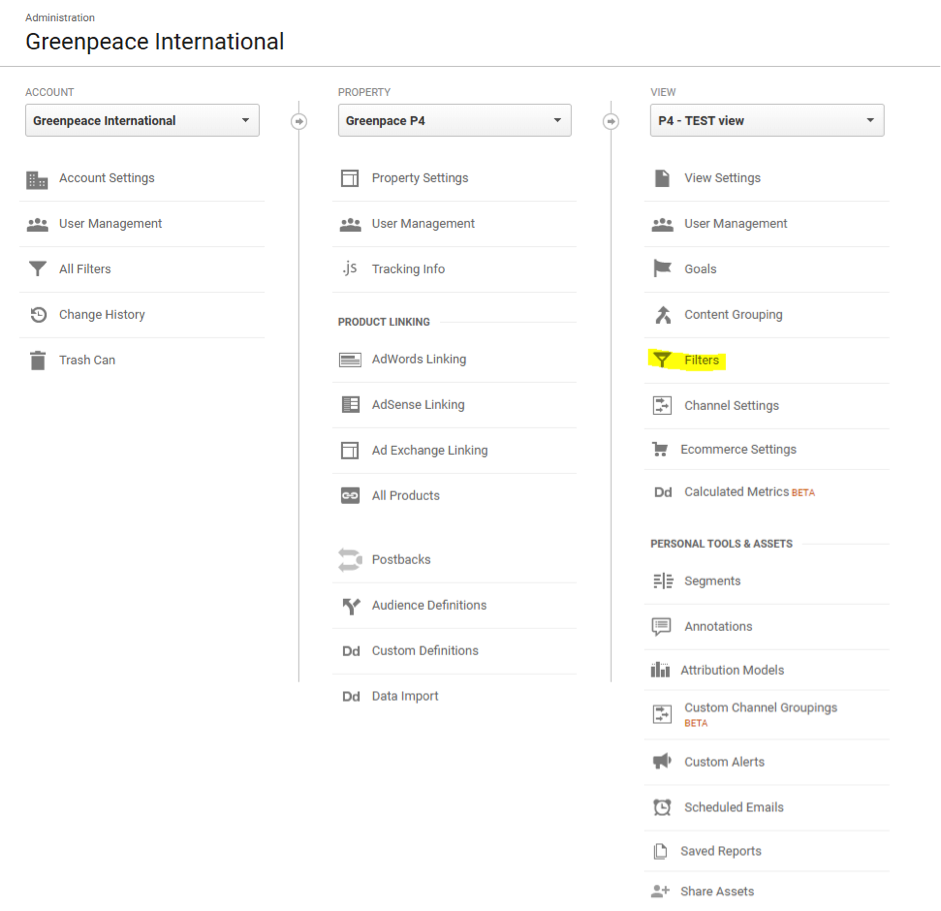
Go to the View settings for the newly created view and select Filters. Next you’ll be able to add existing filters.
|
Once all appropriate filters have been added, you will need to create a filter for your own site. I.e. the Greek NRO will create a filter that INCLUDES traffic to subdirectories that begin with /greece/
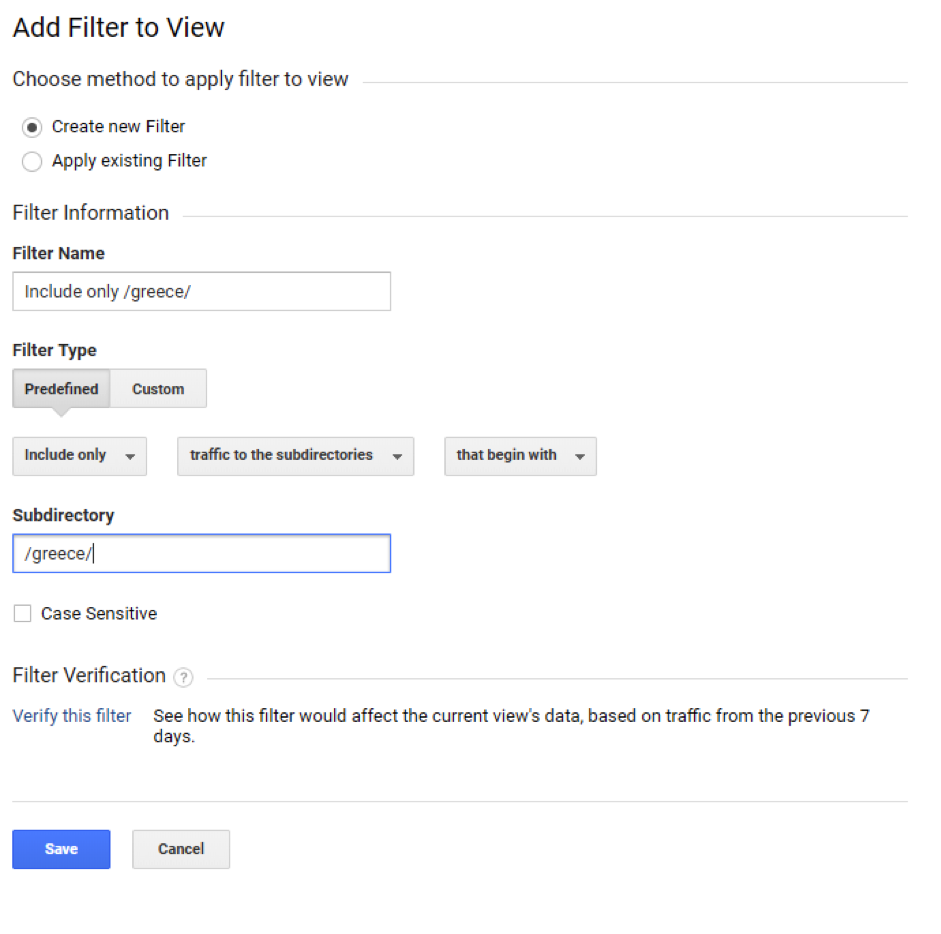
This should be adopted to reflect the URL of the country for which you are creating a View.
View setup for multiple Planet 4 pages (using GTM)
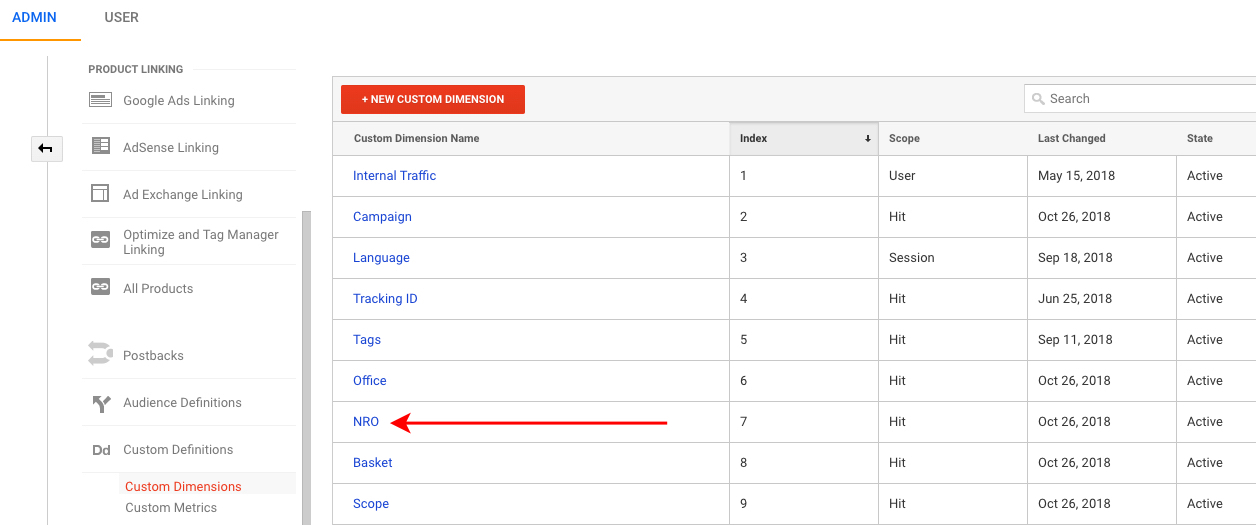
For this setup, you will need to use a custom dimension called ‘NRO’ which is under the index n. 7
(GA > Admin > Property > Custom definitions > Custom Dimensions > NRO)
- Google Tag Manager Setup
The first step is to update the Google Analytics tag that is triggered in all pages (e.g UA – Pageview – GP):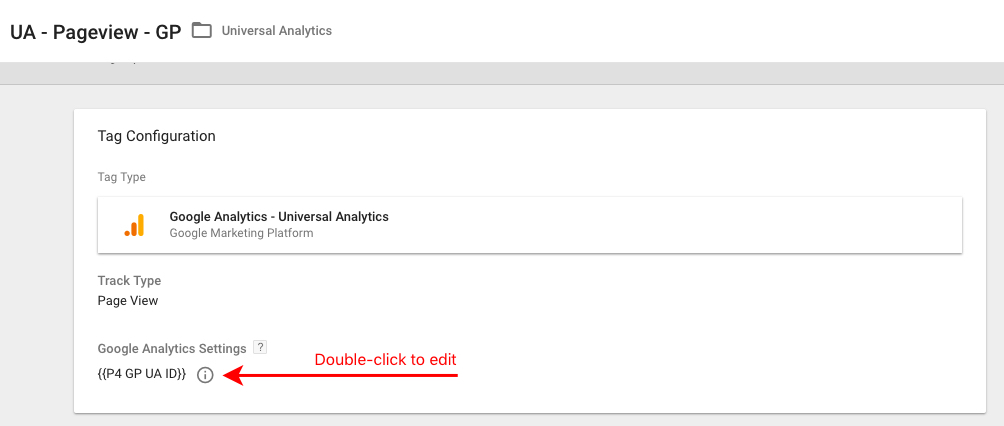
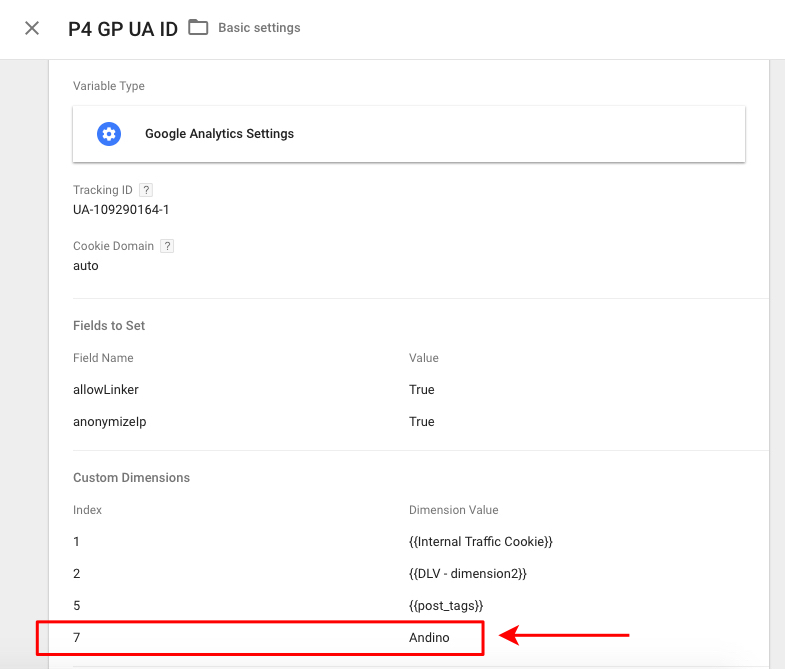
1.1. Edit the GA variable (e.g. ‘P4 GP UA ID’) and add a custom dimension under the same index (7). Insert as value the NRO’s name (e.g. ‘Andino’):
- Google Analytics Filter Setup
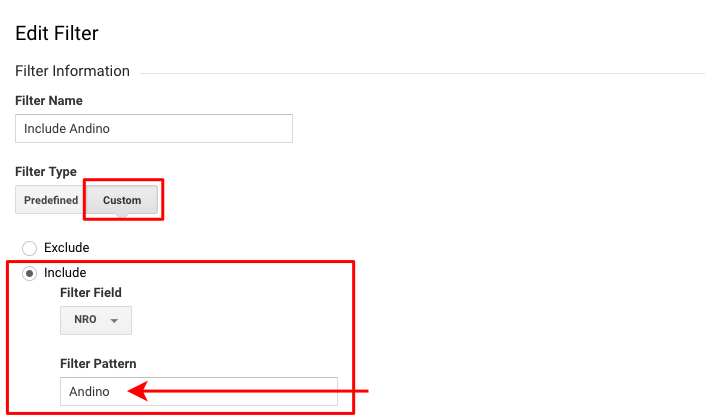
Once the value ‘Andino’ is sent from all pages, you can create a filter in Google Analytics. Remember to use the same custom dimension and value that you inserted in GTM. (GA > Admin > View > Filters > Add or edit existing filters)
Done! Preview and test it before publishing your container.
Channel settings (sources)
Channel Groupings are rule-based groupings of your traffic sources.
Throughout Analytics reports, you can see your data organized according to the Default Channel Grouping, a grouping of the most common sources of traffic, like Paid Search and Direct. This allows you to quickly check the performance of each of your traffic channels.
TheDefault Channel Grouping is more than enough for your P4 view. More on Channel Grouping in Google Analytics.
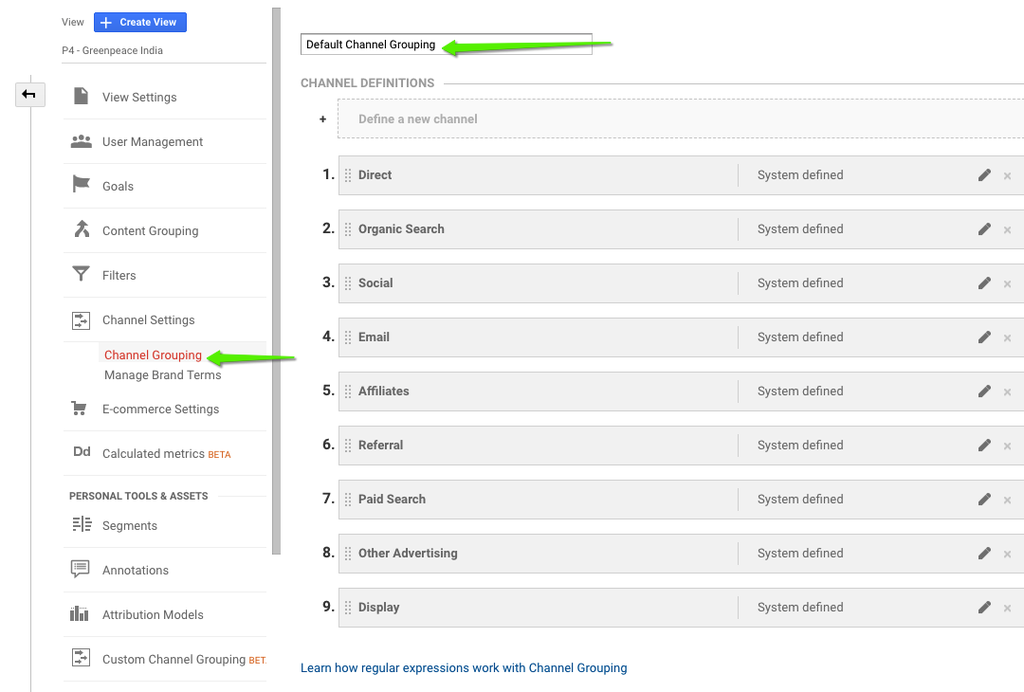
Default Channel Grouping in Google Analytics. This configuration is enough for our tracking parameters, but you can of course customize it.
E-commerce settings (donations)
Enable the “E-commerce” setting in the View Admin, but leave “Related products” switched off.
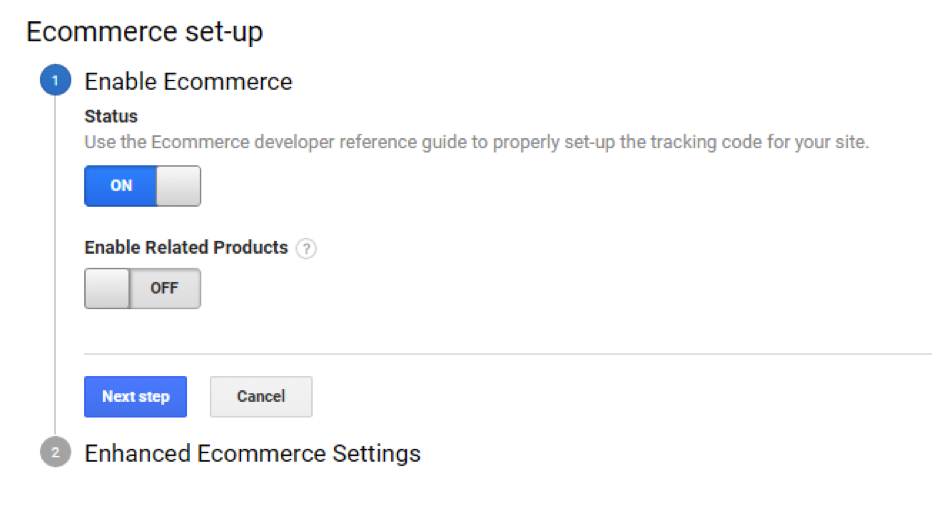
In the next step you can enable Enhanced E-commerce features. Do not enable these, as Enhanced E-commerce data is not collected.
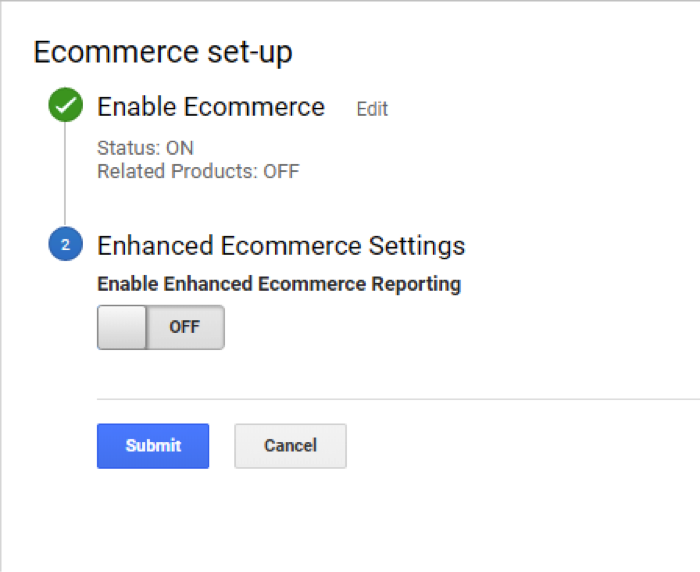
Hit Submit.
If your P4 Google Tag Manager setup is done correctly, you should visualize donations in Conversions > E-Commerce > Transactions
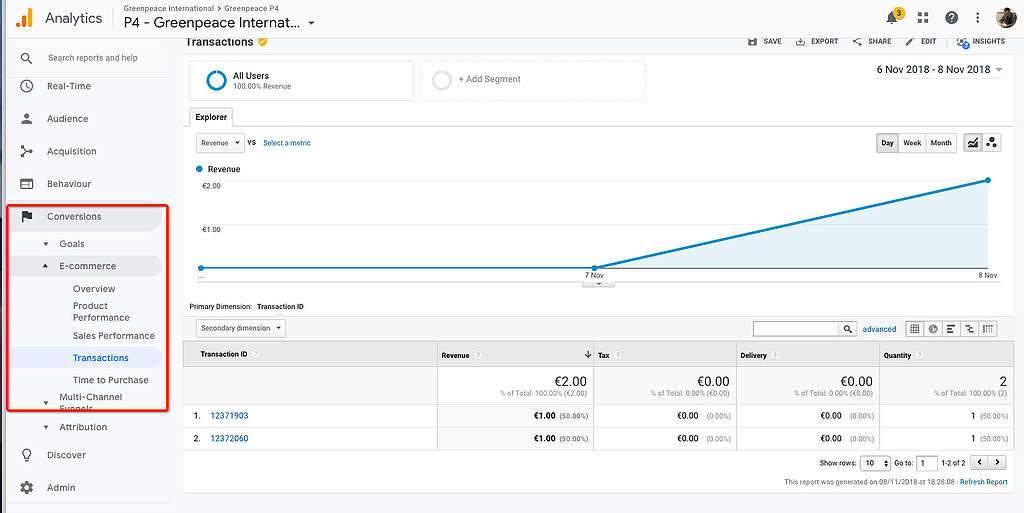
Donations of your P4 site can be visualized in Conversions > E-Commerce > Transactions (if the Tag Manager setup is correct)
IP-anonymization
KEY INFO >>
|
As mentioned in the General Data Protection Regulation (GDPR), IP addresses do qualify as personal information. We decided, therefore to turn on IP anonymization in Planet 4 Google Analytics to ensure that full IP addresses are never written to the disk.
Turning on IP anonymization is easily set up Tag Manager, just by adjusting your tag or Google Analytics Settings variable by clicking into More Settings -> Fields to Set and then add a new field named ‘anonymizeIp’ with a value of ‘true’.
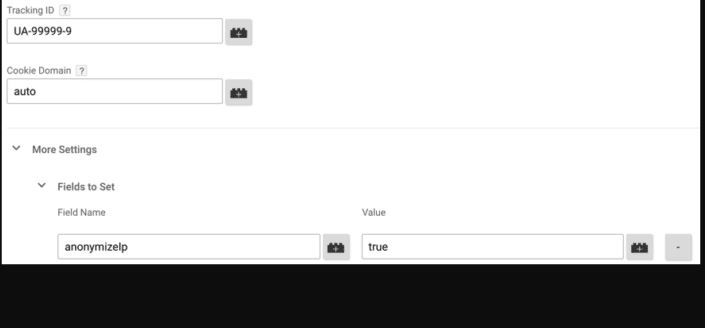
Anonymizing IP Addresses for Google Analytics in Tag manager
Read more on IP addresses in Google Analytics:
- GDPR, IP Addresses, and Personal Data in Google Analytics – Jeffanalytics
- 5 Actionable Steps to GDPR Compliance with Google Analytics – Blastam
- Is my use of Google Analytics GDPR and ePR compliant? – Cookiebot
- Configure Google Analytics to be GDPR compliant – Humix
- Are you ready for GDPR in GA? – Amazeemetrics
IP-exclusion of Dynamic IPs (staff traffic)
Given that we are not tracking IP addresses, it is important that all employees add one additional step to exclude internal traffic from being consolidated. This can be done by placing a custom cookie in all employees’ browser.
This must be done on all devices and in all browsers an employee might use to access any site of P4. It is recommended that all Greenpeace employees does this.
The scope of this custom cookie is restricted to the host. So if the host is www.greenpeace.org, it always works in www.greenpeace.org only.
For other hosts like act.greenpeace.org, you’ll need to do the same thing by sending the staff a link with “?internal” at the end of it.
|
This will redirect you to the home of your P4 site, and place a cookie in your browser that excludes your browsing behaviour from showing up in Google Analytics reports, regardless of which IP the employees is accessing the site from.
This is crucial, as employees browsing behaviour is irregular and will skew the reporting in Google Analytics.
It possible to have this cookie to exclude IP Address in other GA views than the GPI one (UA-10290164), just add the filter in your local view once you set it up in Google tag Manager..
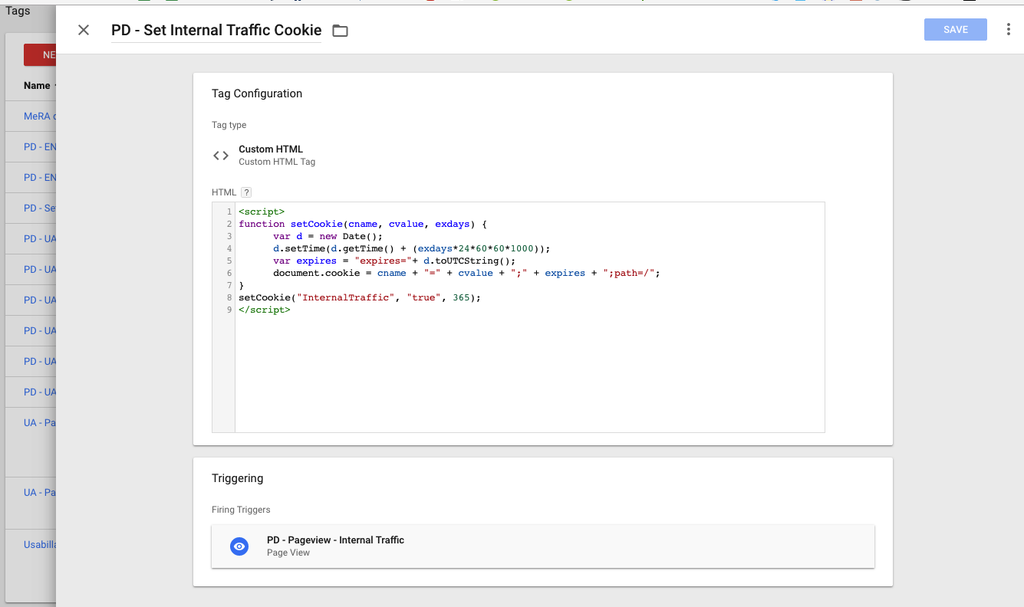
The Tag that triggers the internal traffic cookie
Once you checked that the cookie is referenced to the right GA view, you have to add the filter to the view. It is a domain cookie, so it works on any of the local sites that use the same cookie…
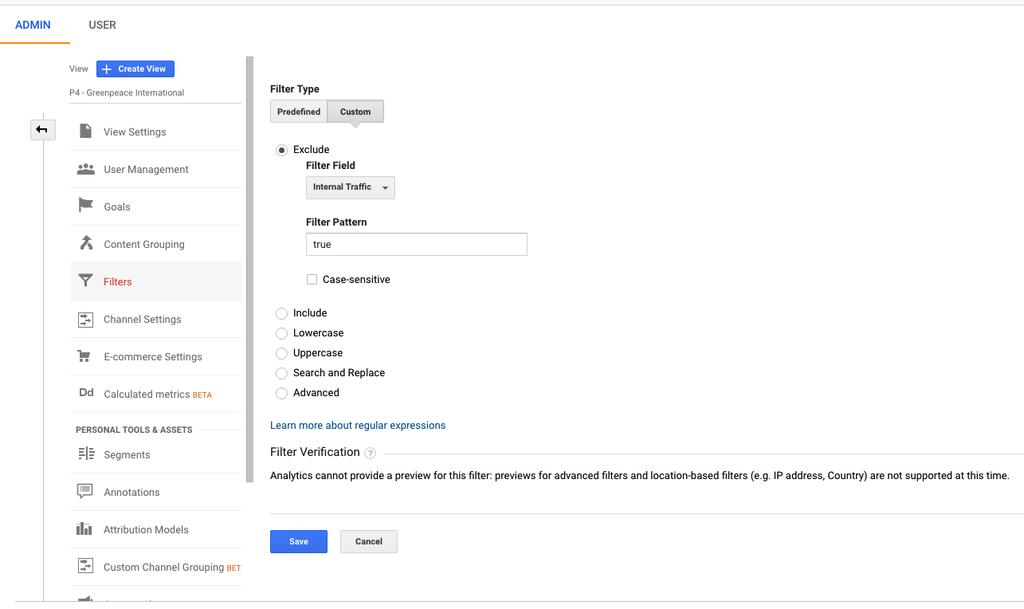
The Filter in Google Analytics to reference the cookie places via GTM
Custom dimensions
If you`re using your own Google Analytics property, go to Google Analytics > Admin, then under the property settings click on Custom dimensions:
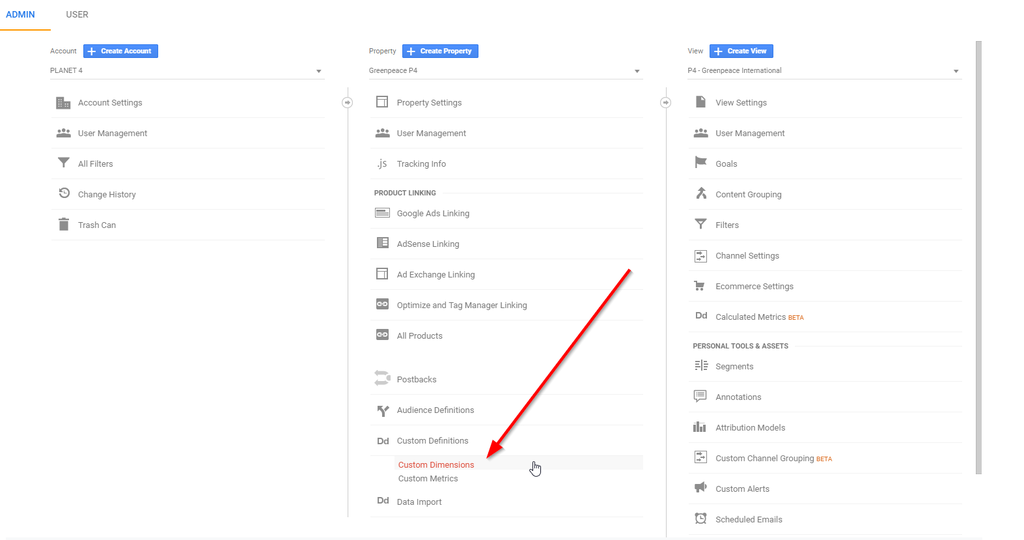
Then make sure you have the following dimensions in the exact order:
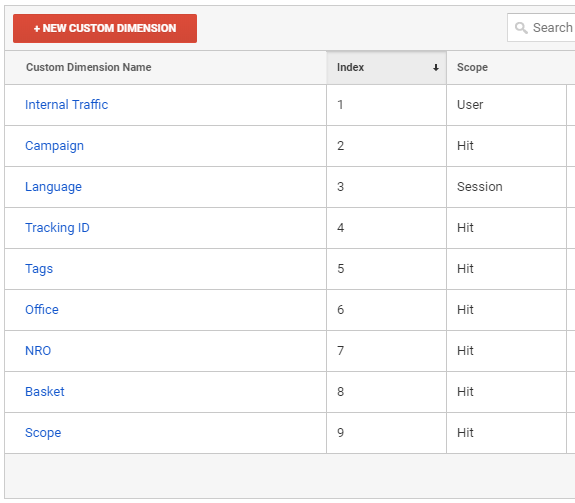
You can add your own dimensions and metrics and use them to collect and analyze data not automatically tracked. But make sure the standard P4 ones matches the Index as above to integerate with the standard GTM setup.
Creating either a custom dimension or a metric is a three-step process (GTM Variable – GTM Tag – Google Analytics view)
Multi-language P4 sites
We can use Google Tag Manager to extract the language from our URL path (e.g. https://www.greenpeace.org/canada/en/act/ and consolidate it in Google Analytics as a Custom Dimension.
1) Create a Trigger in your P4 GTM Container to extract the language from your site URL
- Hit “NEW“
- Name it : ‘English Pages’ (or any other language)
- Trigger type : page view type
- Fires on : some page views
- Select : Page URL contains > country/en (or any other language identifier)
- Hit “SAVE”
- Repeat the process for all your languages (ONE TRIGGER for each Language!)
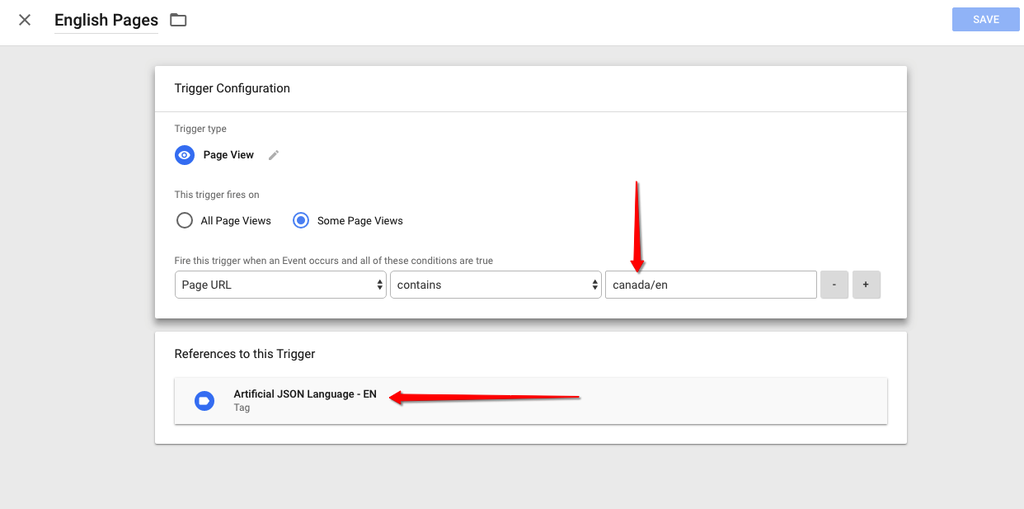
Step 1) of a multi-lingual Setup, the Language Trigger to extract the Language ID from your P4 URL
2) Create a Tag in your P4 GTM Container using an artificial Json to populate the value “locale” through GTM variable and triggers. This is for Engaging Networks or other platform not using language path in the URL.
- Hit “NEW“
- Name it : ‘Artificial JSON Language EN’
- Tag type : Custom HTML
- <script>
var pageJson = {
“locale”: “en-US“
}; </script>
- <script>
- Fire it to the corresponding Trigger ‘English Pages’ or others
- Hit “ADD“
- Hit “SAVE”
- Repeat the process for all your languages (ONE TAG for each Language!)
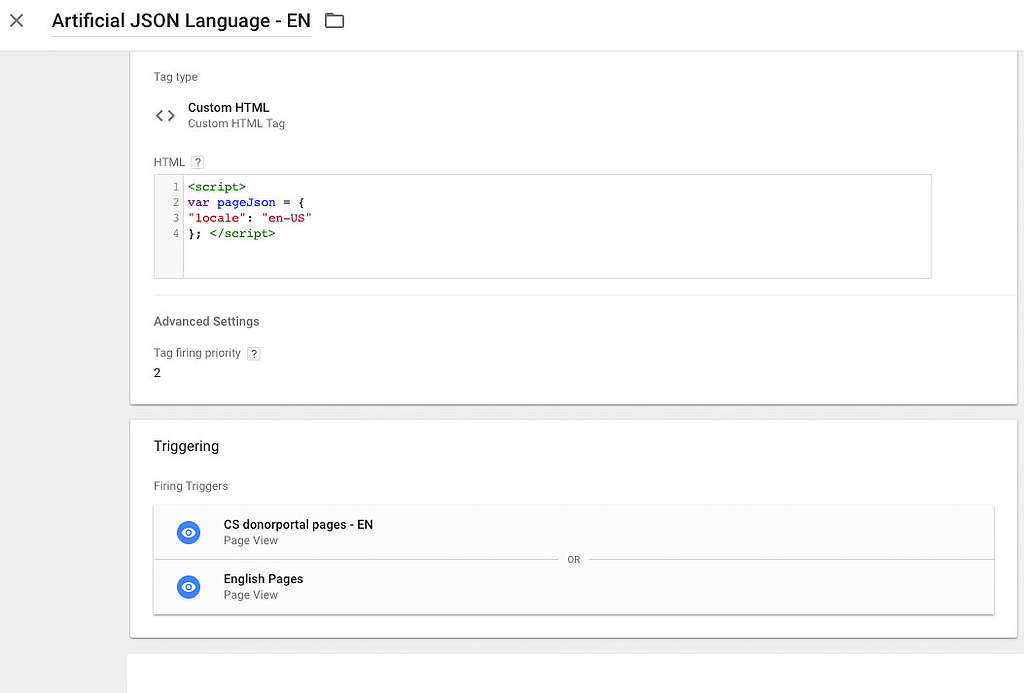
Step 2) Create a Custom HTML Tag ‘Artificial JSON Language EN’ to identify Language in Engaging Networks
3) Create a Variable in your GTM Container to output the same language name
- Hit “NEW” and name it “Language“
- Type : lookup table
- Input variable : page.Json.locale
- INPUT >> en-US – OUTPUT >>> ENGLISH (or other language your P4 site is using)
- ONE Input for each Language!
- His “SAVE“
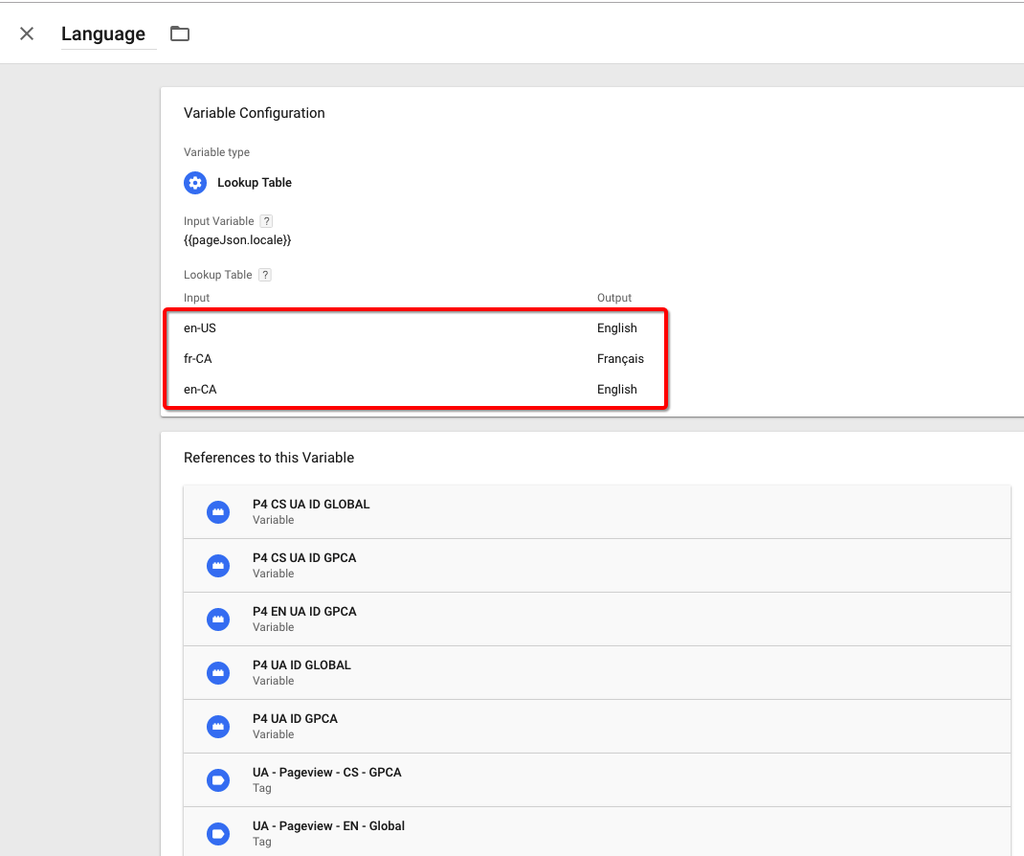
Step 3) Adding a ‘Lookup table’ type Language Variable in GTM
4) in Google Analytics, create a Custom Dimension in Property Settings > Custom Definitions > Custom Dimensions
- Name it ‘Language’
- Scope : session (or Hit if you want to track the language switch later on)
- Activate it
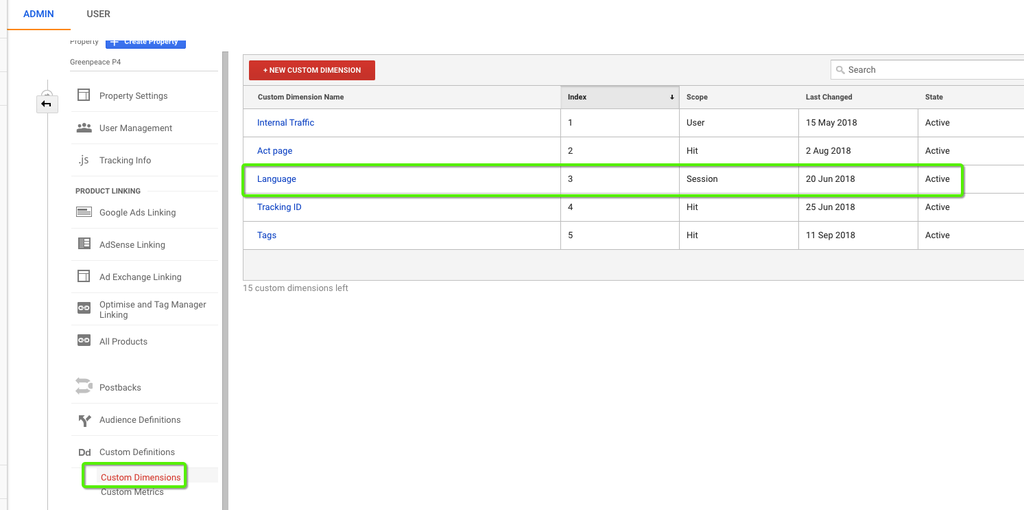
Step 4) Adding a ‘Language’ custom Dimension to the P4 Google Analytics view
5) Back to you GTM Container, link your GA Custom dimension to your relevant UA (Universal Analytics = Google Analytics) GTM tags and variables
- index ‘3’
- dimension value ‘Language’
- HIT “Save“
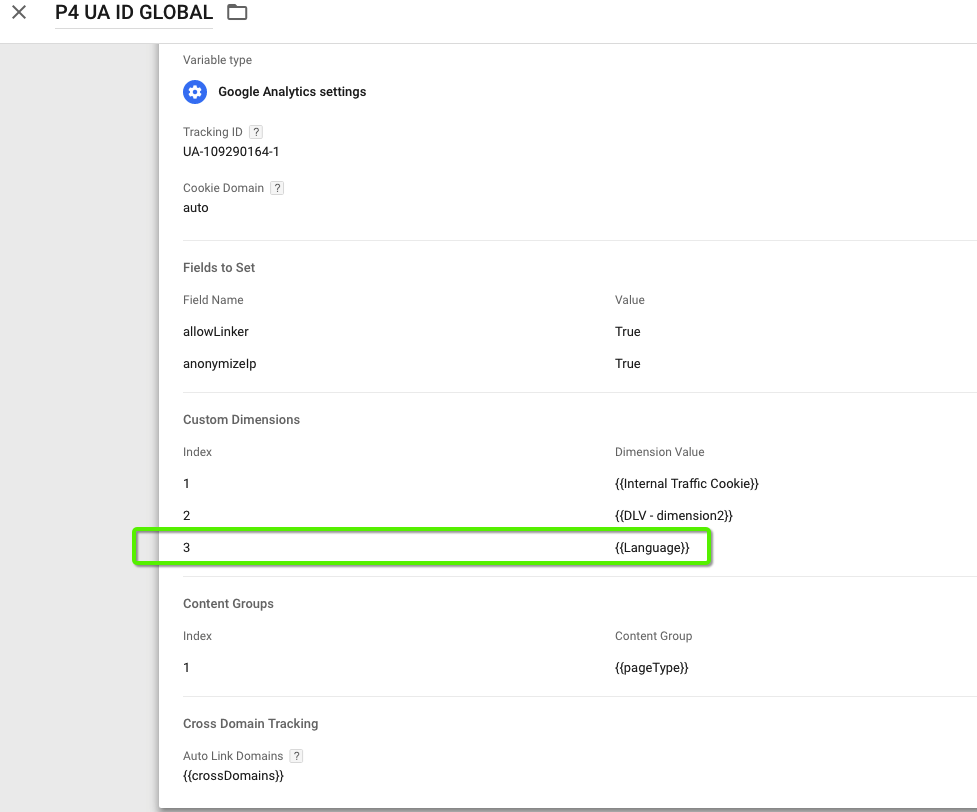
Step 5) Linking the GA Custom dimension to the relevant Analytics GTM tags and variables.
|
6) In Google Analytics, create your language segments to simplify your analysis:
- Go to View Settings > Personal Tools & Assets > All segments > New segment> conditions
- Name your the segment ‘English Pages’
- And apply : Language /matches exactly/ English
- Repeat the process for all your languages (ONE Segment for each Language!)
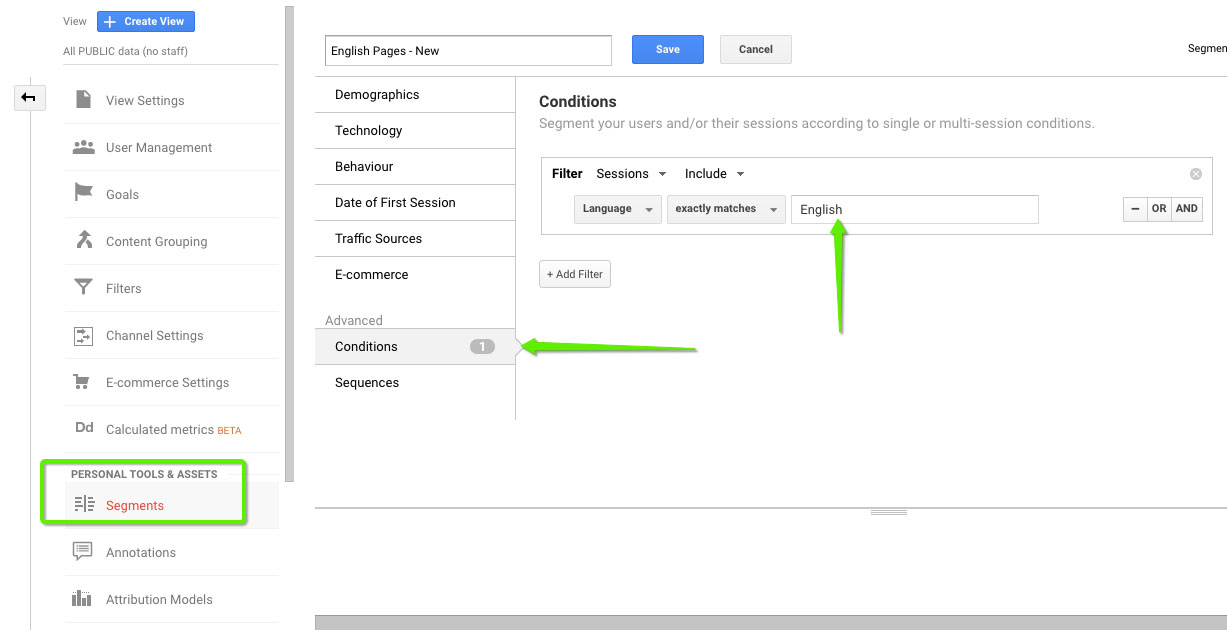
Step 6) Adding Language Segments in Google Analytics for better visualisation
7) Apply a the LANGUAGE Segments in your Google Analytics view, and you will be able to tack and compare all pages by language.
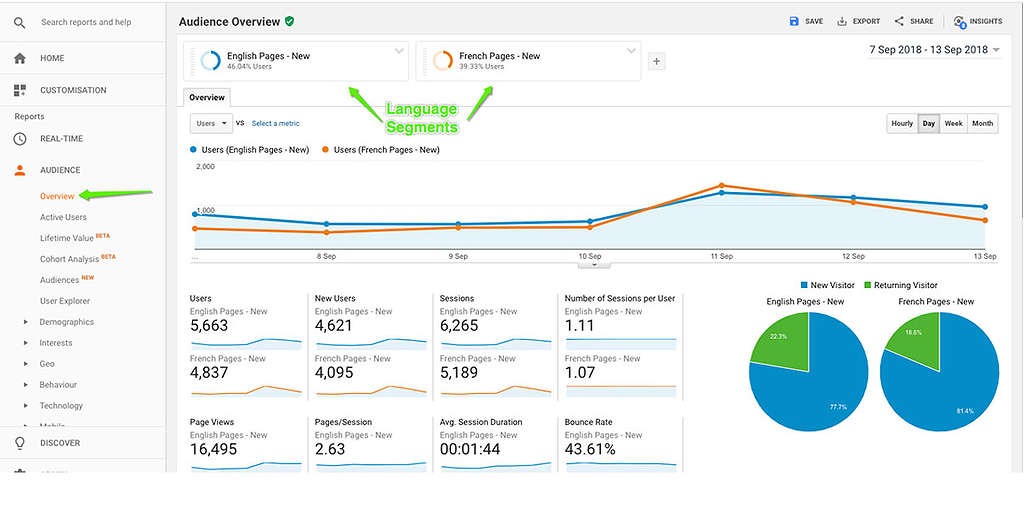
Step 7) Visualising Language segments in your Google Analytics reports
Most Popular tags
To easily consolidate the KPI #17 – Most popular tags, we will have to extract the “Post_tag” custom dimension from the DataLayer and consolidate in in Google Analytics.
1) set up the custom variable in Google Tag Manager.
- Create a Variable in your GTM container (in our case we need the variable that extracts the Post_Tag in the datalayer)
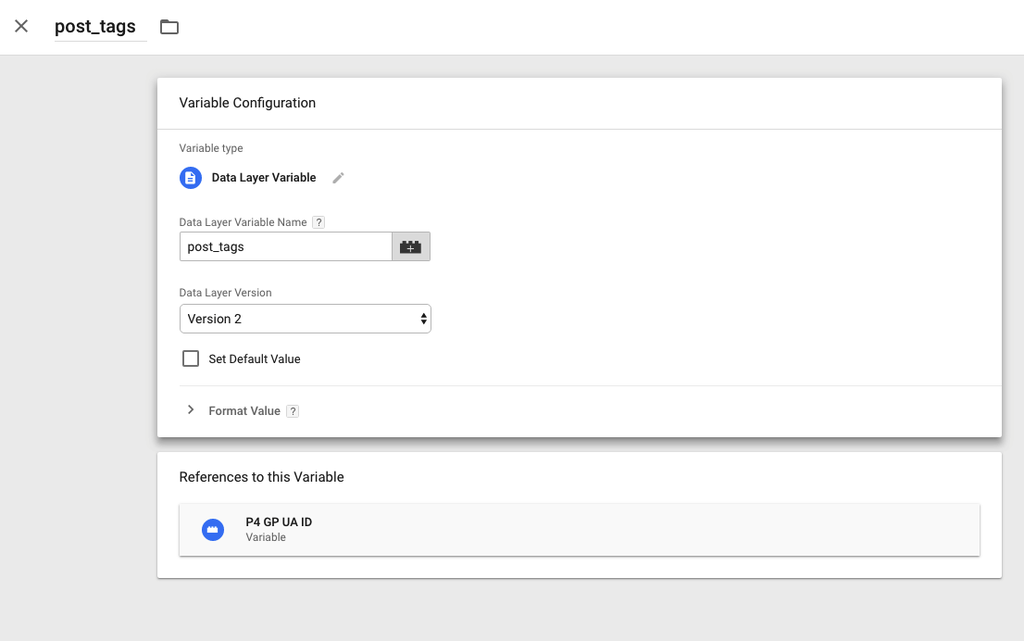
Creating a variable in Tag Manager to identify and extract Post_Type
2) Add the Custom Dimension in Google Analytics view to consolidate the information (in our case the ‘Post tags’ information)
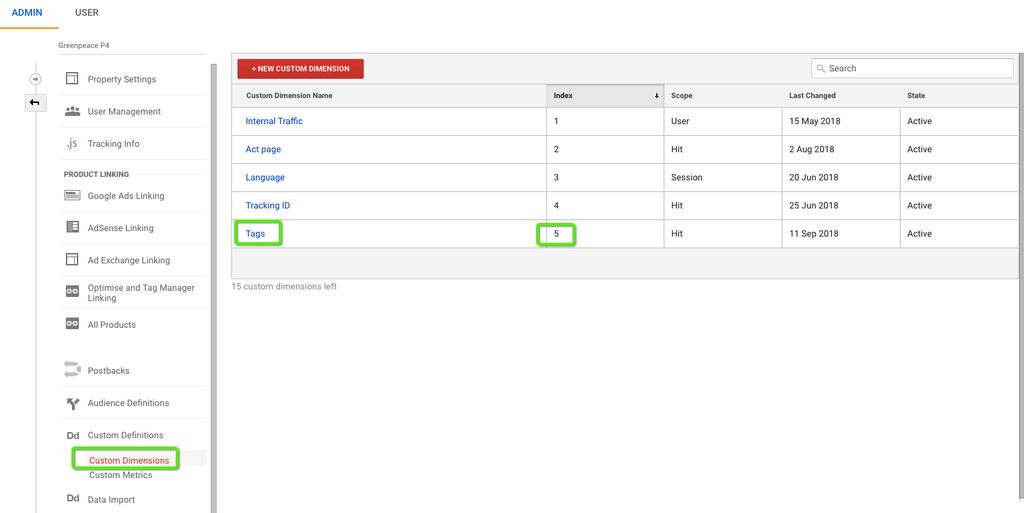
New custom dimension in Google Analytics (Property Settings > Custom Definitions > Custom Dimensions)
3) Add the Variable to the Tag UA (Universal Analytics) – Page view – GP to establish the connection GTM > GA
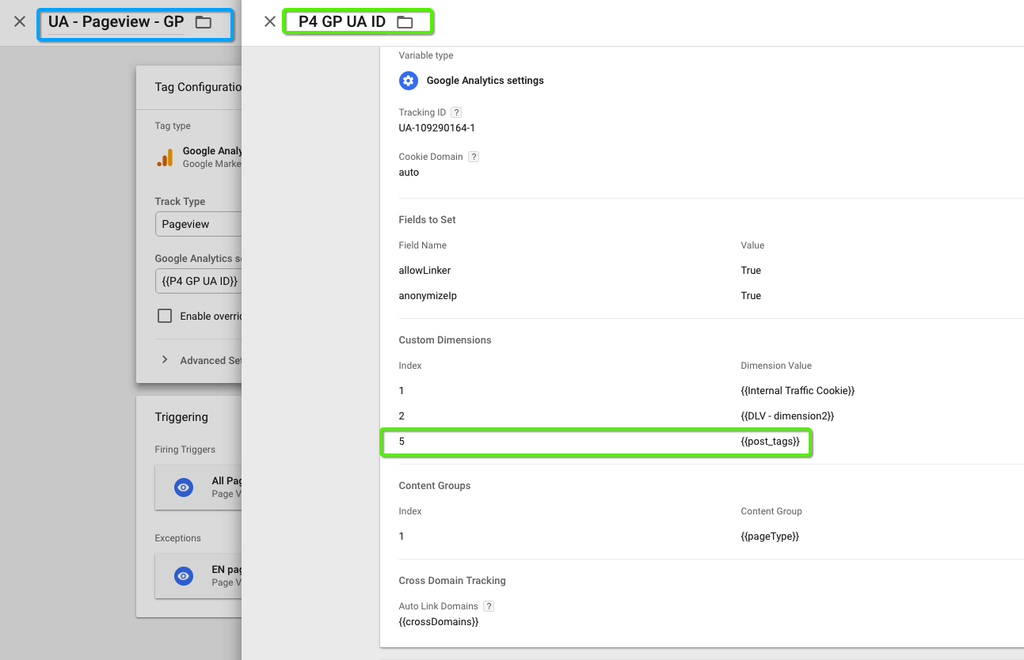
Adding a new variable (Post_tags) as a custom dimension to the UA Pageview tag
|
Set up events
Wrong place! Events should be set up in Google Tag Manager and not in Google Analytics anymore 🙂
Links & Resources
- Documentation
- Step-by-step Google Analytics view setup (this page in a GDoc)
- FULL GTM / GA implementation guide by Anton (GDoc)
- GTM-N7SG829 full setup (Tags, Triggers / rules and variables) (Google Sheet list)
- Greenpeace Engaging Networks IDs for each domain and NRO – FULL LIST (Accessible only to staff – privacy reasons)
- MEDIUM
