What you need
Here’s a step by step guide that will walk you through each step of importing and launching a campaign page.
To import a campaign page, you will need two things:
- The XML file containing the campaign page – this should be shared with you by the creator of the campaign page (see Step 0 at the bottom)
- A Planet4 user account with necessary permissions
- Administrators, Editors and Campaigners can import and publish any campaign page,
- Authors and Contributors can only edit or delete their own campaign pages but can’t publish them.)
- If the Campaign has a FORM
- If your NRO uses Engaging Networks (EN)
- An EN form created in P4
- A LIVE Petition page in EN
- If your NRO does not use EN
- A Happy point-alike form for data capture
- If your NRO uses Engaging Networks (EN)
Step 1: Import the campaign page
1. Navigate to Campaigns
2. Click on “Import”
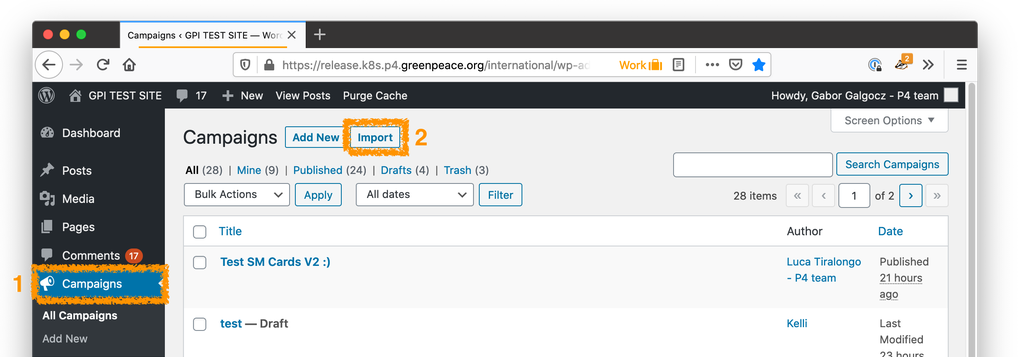
3. Select the XML file that contains the campaign page
4. Click on “Upload file” and then “Import”

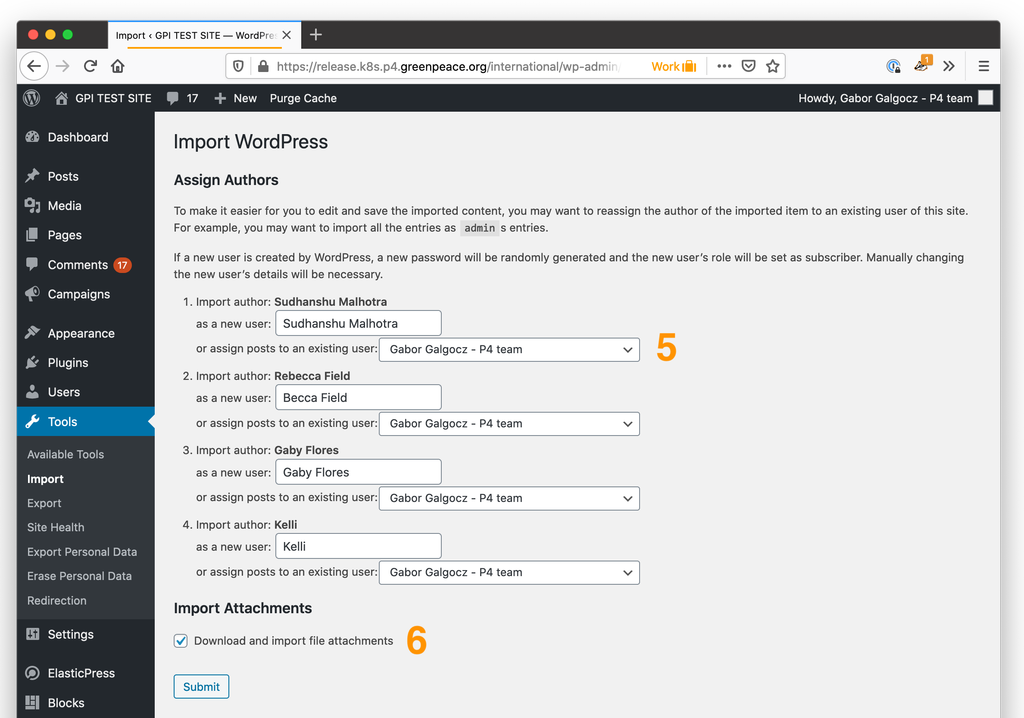
5. At this step, P4 checks if the original author/s of the campaign page exist in your site – and not just the author of the page but the authors of all media assets (images) included in the page.
Key Info – Original Campaign authors most probably don’t exist in your P4 site, and the best way is to reassign everything to yourself – so at every step of the Import author process, just select “assign post to an existing user:” and choose your user in the dropdown.
6. At the Import Attachments step, select “Download and import file attachments” so everything that’s included in the original page gets imported.
7. Click on “Submit”
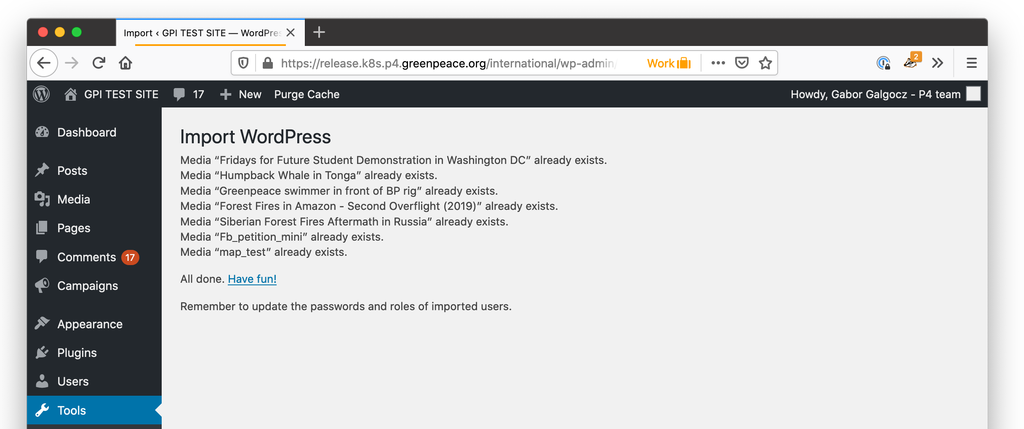
8. If all is imported successfully, you’ll see a summary page, listing those assets that already exist in your site. The importing is done, now it’s time to set up and publish your new campaign page!
Step 2: Setup the campaign page
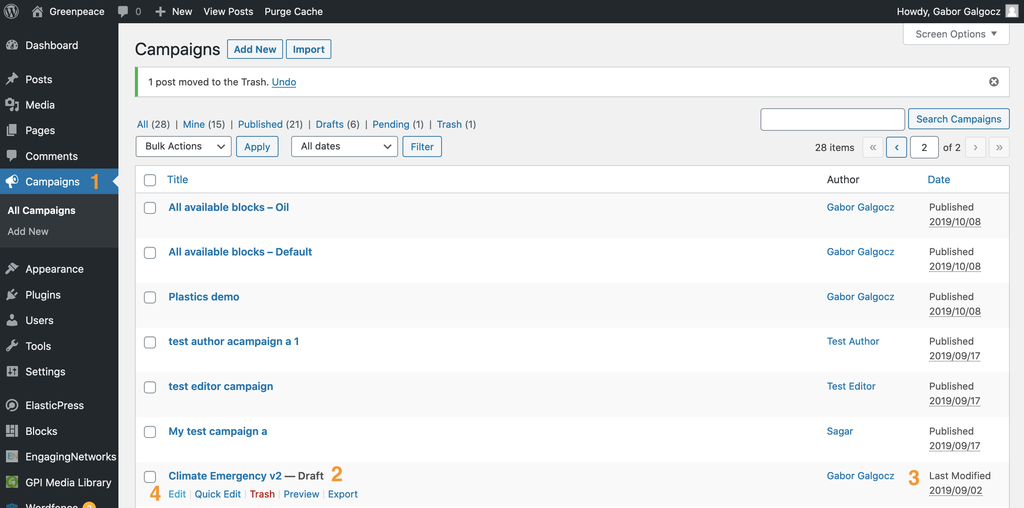
1. The imported campaign page will be listed under the “Campaigns” menu of your P4 site
2. The page will be imported as a Draft, so it won’t be published until you do that.
3. Please note that the pages are listed by the date they were published/last modified. If the imported campaign page was last modified at an earlier date, it will be not on the top of your list, you might need to find it further down.
4. Click on “Edit”
5. If you have an Engaging Networks Form block in the campaign page to capture supporter data, then you have to make sure to select what Engaging Networks petition page it should send data to.
You can do this in the EN Form block editor, selecting the EN petition you want in the “Engaging Networks Live Pages“.
KEY INFO – As the name suggests, your petition needs to be published/live in EN to appear in this list. Check the EN form block tutorial
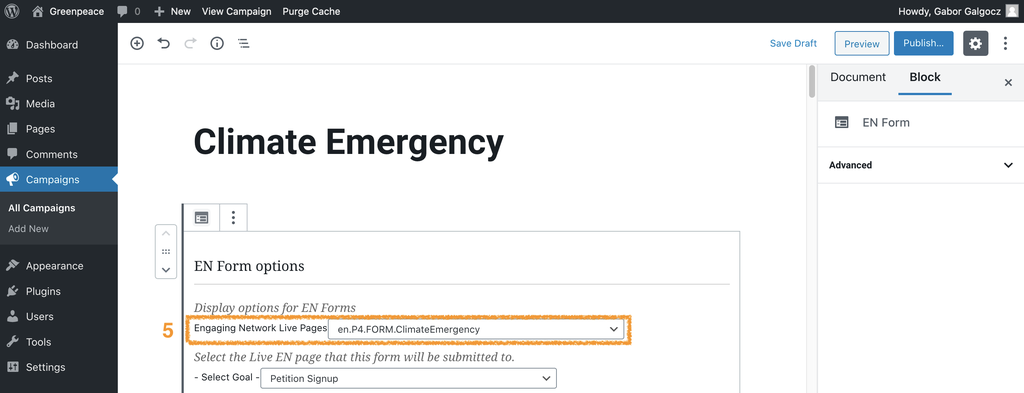
6. Scroll further down in the settings of the block, and select the P4 EN form that you want to display on the campaign page (remember, forms are country specific so they are not imported).
KEY INFO #1 – If you haven’t created any EN Form yet, you can do so by following these instructions.
KEY INFO #2 – If you are not using Engaging Networks, you can add a Happy Point for data capture and set it up using your usual settings.

7. If you want to disable theme style of the campaign pages when importing a campaign, you have one more setting to check. This is extremely useful for NROs using child themes, since campaign styles are incompatible with those.
From the menu on the left, go to Settings -> Planet 4 and at the end of the page there is the Exclude campaign styles when importing is ticked.
KEY INFO – If you want to change this setting, make sure you are in contact with the admin of your site.

8. Once done, the page is ready to be published. Don’t forget to check the usual things before publishing:
- Check content (text, images etc) looks good, translated and with no typos
- tracking settings under “Campaign Information (dataLayer)” in the right sidebar
- check if all is displaying fine, both on desktop and mobile. Please note that some template customizations (fonts) are currently not appearing correctly in Preview mode, so double-check after publishing the page
- check if the counter is displaying the correct number (if using)
- check if legal texts are correct and their links are pointing to the correct page of your site – as these might need to be updated for your site’s legal pages.
- check if the social media links in the footer are pointing to your channels
- sign the petition if there is one, then check the Thank you page and the Social share links on it
- Done!
Step 0: Export the campaign page
Once the campaign page is ready to go, you can easily export the full page to an XML file, that you can share with other participating NROs.
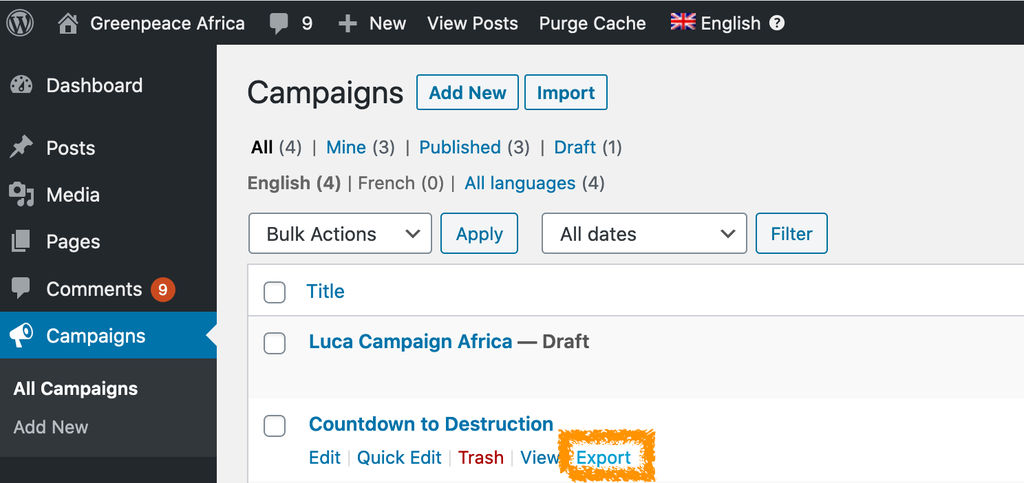
To export a Campaign in the P4 Campaign Generator, just click on the Export button next to the page in the Campaigns main page.
What gets exported and what does not
Please note that any page has page-specific elements and site-specific elements. Only page-specific elements are exported (and imported), site-specific elements are not.
Page-specific elements include everything that you edit on that specific page, so here’s what will be exported (and imported)
- blocks
- content
- images
- custom design
There are, however, site-specific elements that are specified outside of the page:that cannot be exported / imported, such as
- P4 site header and footer items
- forms,
- site theme customizations,
Links & Resources
- Handbook
- Import / Export a Campaign page
- Block: Form (Engaging Networks
- #Campaigns
- Track Petitions data in Google Tag Manager
- Set up the P4 GTM container
- Visuals
